Container Staging
This section describes how to move from an existing HCL Digital Experience (DX) environment to a containerized DX environment.
Overview of the approach
To move from a non-containerized deployment to a containerized deployment, it is recommended to take a similar approach as staging to another DX environment.
The Kubernetes containerized deployment is different from the non-containerized deployment in the following ways:
-
There is no HTTP server in front of your DX deployment. Instead, HAProxy is used for routing to the different pods and JVMs. You can configure your own ingress controller or deploy a proxy to customize cache headers, server static files, or other customizations you configured at your HTTP server.
-
There is no WebSphere cluster.
- Distributed Enterprise JavaBeans, JMS distribution, and custom DynaCache replication are not supported in containerized deployments because DX uses a farm-based deployment model for DX Core.
- Product-based caches are replicated across all Core pods, ensuring changes are distributed automatically.
- If you have custom DynaCaches that must be replicated, use an external caching solution such as Redis or Hazelcast.
- If you use in-memory session replication, switch to database-based session persistence.
Moving multiple environments
A typical DX solution includes multiple environments, such as development, staging, production authoring, and production rendering. While it is possible to migrate each environment independently, the recommended approach is to migrate, test, and validate a single environment first. This initial deployment should not be used as a template to copy or clone. Instead, use the configuration settings of this working environment as a reference guide to help configure the remaining deployments.
Prerequisites
The target environment in a customer-owned Kubernetes environment requires HCL DX 9.5 and IBM WebSphere Application Server 9.0.5. The HCL Digital Experience and IBM WebSphere Application Server versions for the source and target environments must be at the same level. It is also supported to use IBM WebSphere Application Server 8.5.5.x with JDK 8.
Ensure that the context root for DX Core and the security configuration match the source system (for example, the same LDAP connection).
If the 9.5 UI features are not enabled in the source non-container environment, enable or disable them in the container environment to ensure consistency.
Exporting the source HCL DX server
Follow these steps to export the source HCL DX server.
-
Upgrade the source environment.
Using the IBM Installation Manager, upgrade the HCL DX product to CF17 or later and HCL DX 9.5.
-
Log in to the machine where the source environment is located and set the
ulimit -nto 24000.For example,
ulimit -n 24000. -
Verify that the HCL DX server is started.
-
Navigate to the PortalServer/bin directory to export the base server.
/opt/HCL/wp_profile/PortalServer/bin/xmlaccess.sh -url http://mysource.machine.fqdn:10039/wps/config -user <your DX admin user> -password <your DX admin user password> -in /opt/HCL/PortalServer/doc/xml-samples/ExportRelease.xml -out /tmp/ExportReleaseResults.xml -
Save the output XML file (ExportReleaseResults.xml) to an external or shared drive, for later use when importing to the target environment.
-
Export the content for each Virtual Portal that exists in the source environment, renaming each file uniquely for easy identification.
/opt/HCL/wp_profile/PortalServer/bin/xmlaccess.sh -url http://mysource.machine.fqdn:10039/wps/config -user <your DX admin user> -password <your DX admin user password> -in /opt/HCL/PortalServer/doc/xml-samples/ExportRelease.xml -out /tmp/ExportReleaseResults.xml -
Save the Virtual Portal output files to an external or shared drive for later use when importing to the target environment.
-
Save the /opt/HCL/wp_profile/PortalServer/deployed/archive directory files to an external or shared drive, for later use when importing to the target environment.
-
If you are using PZN rules, export the PZN rules using the Personalization Administration Portlet functions and save the generated Workspace.nodes file to an external or shared drive, for later use when importing to the target environment.
- Log in to the HCL DX Home Page.
- Navigate to Personalization > Business Rules* > Extra Actions > Export.
- Save the output file.
-
When applicable, save all custom files (application and theme EAR files, WAR files) to an external or shared drive, for later use when importing to the target environment.
-
Validate if you have any custom DynaCaches, URLs, JVM Environment Parameters, or other custom WebSphere configuration.
If you are not sure what customizations were applied, you can use the WebSphere Configuration Comparison Tool.
Importing into the container HCL DX target server
Before starting the import, complete the Kubernetes deployment with the right CF level and configure the prerequisites. Ensure that the context root matches the previous deployment, and the security is configured (for example, connected to LDAP).
Warning
When copying commands, ensure that all hyphens (-) are standard ASCII hyphens. En dashes (–) or other special characters may cause commands to fail if pasted into the terminal.
-
Log in to the machine to access your HCL DX Container.
-
Download, install, and log in to the command line client for your Kubernetes environment according to the client instructions. For OpenShift, that is Red Hat OpenShift Command Line Client. For Non OpenShift, that is the Kubectl command line tool.
-
With only a single instance of an HCL DX container running, exec in, and ensure the
ulimit -nvalue is at least 24000. -
Empty the base HCL DX server.
-
OpenShift:
oc exec -it dx-deployment-nnnnn /bin/bash -
Non OpenShift
kubectl exec -it dx-deployment-nnnnn /bin/bash/opt/HCL/wp_profile/ConfigEngine/ConfigEngine.sh empty-portal -DWasPassword=<your WAS admin user password> -DPortalAdminPwd=<your DX admin user password>
The output displays a BUILD SUCCESSFUL message. If not, check the
/opt/HCL/wp_profile/ConfigEngine/log/ConfigTrace.logfile for errors. -
-
Clean up the deleted pages in the target server by using XML Access:
/opt/HCL/wp_profile/PortalServer/bin/xmlaccess.sh -url http://my.target.fqdn/wps/config -user <your DX admin user> -password <your DX admin user password> -in /opt/HCL/PortalServer/doc/xml-samples/Task.xml -out /tmp/task_result.xmlThe output displays a BUILD SUCCESSFUL message. If not, check the
/opt/HCL/wp_profile/logs/WebSphere_Portal/SystemOut.logfile for errors. -
Copy the output XML files, custom EAR and WAR files, the
Workspace.nodesfile, and the../deployed/archivedirectory to a location on the local machine. Ensure that you preserve the file names and directory structure when transferring them from the external or shared drive to the DX container.-
cp /drive/* /tmp/ -
OpenShift:
oc cp /tmp/* dx-deployment-nnnnn:/tmp/ -
Non OpenShift:
kubectl cp /tmp/* dx-deployment-nnnnn:/tmp/
-
-
Create a directory under /opt/HCL/wp_profile to house any custom code or shared libraries.
mkdir –p /opt/HCL/wp_profile/customAppsNote
In a containerized environment, ensure that all custom code and shared libraries are stored in the persisted profile volume.
-
Move the copied files to the appropriate locations in the container.
-
mv /tmp/custom.ear /opt/HCL/wp_profile/customApps/ -
mv /tmp/deployed/archive/* /opt/HCL/wp_profile/PortalServer/deployed/archive/
-
-
Deploy custom applications, pre-deployed portlets, or themes.
-
Configure any required syndication properties in the WCM ConfigService. For example, enable memberfixer to run during syndication.
-
Create any required configuration items. For example, URLs, namespace bindings, and so on.
You can use the WebSphere Application Server UI or deploy by using DXClient or wsadmin commands. It is recommended that you create a deployment script because you must perform the same deployment operation in other environments.
It is also recommended to run a comparison report using the WebSphere Configuration Comparison Tool.
For information about possible configuration settings in Resource Environment Providers, refer to the Resource Environment Providers section.
-
Import the source server base content into the HCL DX server in the container.
-
OpenShift:
oc exec -it dx-deployment-nnnnn /bin/bash -
Non OpenShift:
kubectl exec -it dx-deployment-nnnnn /bin/bash/opt/HCL/wp_profile/PortalServer/bin/xmlaccess.sh -url http://my.target.fqdn/wps/config -user <your DX admin user> -password <your DX admin user password> -in /opt/HCL/PortalServer/doc/xml-samples/Task.xml -out /tmp/task_result.xml
The output displays a successful execution. If not, check
/tmp/ExportReleaseResults_ImportResult.xmlfor errors. -
-
Update the WCM content in the HCL DX server instance:
/opt/HCL/wp_profile/ConfigEngine/ConfigEngine.sh update-wcm -DWasPassword=<your WAS admin user password> -DPortalAdminPwd=<your DX admin user password>The output displays a BUILD SUCCESSFUL message. If not, check the
/opt/HCL/wp_profile/ConfigEngine/log/ConfigTrace.logfile for errors. -
If you are using PZN rules, import the PZN rules by using the Personalization Administration portlet.
- Log in to the HCL DX home page.
- Navigate to Personalization > Business Rules > Extra Actions > Import.
- Browse to the /tmp/Workspace.nodes file and click Import.
-
Log in to the HCL DX home page and verify that the base server is functioning correctly:
http://my.target.fqdn/wps/portalCheck the /opt/HCL/wp_profile/logs/WebSphere_Portal/SystemOut.log to ensure that there are no startup errors.
-
Create all of your Virtual Portals:
/opt/HCL/wp_profile/ConfigEngine/ConfigEngine.sh create-virtual-portal -DWasPassword=<your WAS admin user password> -DPortalAdminPwd=<your DX admin user password> -DVirtualPortalTitle=VirtualPortal1 -DVirtualPortalRealm=VirtualPortal1Realm -DVirtualPortalContext=VirtualPortal1 -
For each virtual portal, import the content by using XMLAccess. Ensure that the context root and the virtual portal name match in the XMLAccess command.
/opt/HCL/wp_profile/PortalServer/bin/xmlaccess.sh -url http://my.target.fqdn/wps/config -user <your DX admin user> -password <your DX admin user password> -in /opt/HCL/PortalServer/doc/xml-samples/Task.xml -out /tmp/task_result.xml -
Restart the HCL DX server and check /opt/HCL/wp_profile/logs/WebSphere_Portal/SystemOut.log to ensure no startup errors.
Syndicating the source and target environments
Follow these steps to syndicate the source and target environments:
Note
If you have larger libraries, move the default database to a supported database. For information about supported databases, see Database Management Systems. To learn more about transferring the default DX 9.5 container database to IBM DB2, see IBM DB2: Database transfer.
-
Because Kubernetes deployments typically allow only SSL traffic, update the SSL signer certificates for the syndicator and subscriber setups so they can communicate with each other. To do this, log in to the WebSphere Application Server console (
https://machine_name/ibm/consoleorhttps://machine_name:port/ibm/console) and go to the Signer certificates page under Security > SSL certificate and key management.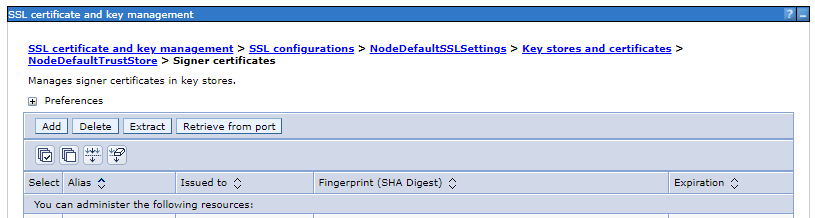
-
Select Retrieve from port and create the signer certificate, and then save the certificate.
-
Log in to the HCL DX instance to configure syndication: http://my.target.fqdn/wps/portal.
-
Navigate to Administration > Security > Credential Vault > Add a Vault Slot.
-
On the Credential Vault page, select New and provide the following:
- Name - enter the name for the vault slot.
- Vault resource associated with vault slot - select new and enter the vault resource name.
- Vault slot is shared check box - tick this check box and provide the credentials for a user that has appropriate access on the source/syndication system: Shared userid, Shared password, and Confirm password.
- Click OK to save the changes.
-
Navigate to Portal Content > Subscribers. Click Subscribe Now.
-
In the Subscribe to a syndicator pop-up, provide the following:
- Syndicator URL
- Syndicator Name
- Subscriber Name
- Credential Vault Slot created in step 2.
- Click Next.
-
Select the libraries to syndicate and the Scope of the syndication.
- Click Finish.
- If you have Virtual Portals, you must repeat the syndication steps for each Virtual Portal.
-
If needed, configure library permissions when syndication is completed.
Note
As with syndication between on-premise setups, it is possible to do a one-way syndication from an earlier to a later release.
You do not need to disable Practitioner Studio to do this syndication.
Syndicating large libraries
Syndicating large libraries, especially when syndicating all items if you need all versions and projects on the containerized environment, can be a slow process. For these scenarios, you can consider copying the JCR database from the non-container to the container system and reconnecting the container to the copied database. For details, see Manual staging to production process. Note that these instructions are specific to DB2, but you can also apply them to MS SQL Server and Oracle.
Resource environment providers
HCL DX comprises a framework of configuration services to accommodate different scenarios that portals must address. You can configure some of these services.
The configuration for each service is stored in and accessed through the WebSphere® Integrated Solutions Console. In the WebSphere Integrated Solutions Console, most portal configuration services are spelled as a single word. Some services are abbreviated and prefixed with WP. For example, the portal Configuration Service appears as WP ConfigService in the WebSphere Integrated Solutions Console.
For more information about each service, see Service configuration.
If you cannot recall all the configuration settings you usually change and also have not automated the setting using CI/CD, you can compare the configurations using the WebSphere Configuration Comparison Tool.
When comparing configuration settings, you might notice differences in the settings that DX configures in containers. The following is a list of changes performed for Resource Environment Providers for containers/Kubernetes:
- WCM WCMConfigService: Tuning changes as documented in the tuning task. Refer to Portal server performance tuning tool for more information.
- WP ConfigService:
use.db.cache.invalidation.tableanddb.cache.invalidation.read.freqfor cache replication.digitalAssets.useSSLDAMfor DAM integration. - WCM DigitalAssetManagerService:
enabledif using DAM. - WP CacheManagerService: Tuning changes as documented in the tuning task. Refer to Portal server performance tuning tool for more information.
Configuration tasks changing resource environment providers
Configuration tasks such as changing the context root and enabling features like social publishing from WCM or others can make changes to the resource environment providers. Some of the these configurations have been moved to the Helm chart. If you are performing remote search, changing the context root or admin password, doing performance tuning, or enabling WCM Artificial Intelligence, you must trigger these configuration tasks from the Helm chart. All other configurations are performed using tasks. Some features are also enabled out-of-the-box on containers that are not enabled by default for non-containers (for example, DAM integration and WCM Multilingual).
Additionally, anonymous sign up has been disabled on containers through access control. It can be re-enabled through the config task or changing access control. Refer to Registration/Edit My Profile and Login portlets for more information. If you are unsure what was performed on your non-container environment, check the ConfigTrace.log file.
HCLSoftware U learning materials
For an introduction and a demo on DX staging, go to Staging for Beginners.
To learn how to use staging tools such as DXClient, Syndication, XMLAccess, ReleaseBuilder/Solution Installer, and ConfigEngine, go to Staging for Intermediate Users. You can try it out using the Staging Lab for Intermediate Users and corresponding Staging Lab Resources.