Android Wear Properties
Native app properties are divided into two categories: those that are common to all platforms, and those that are platform-specific. These properties range from the logo image your app displays to the types of screens and SDKs the app supports, and how certificates are handled.
To set Native app properties, do the following:
- On the File menu, click Settings.
- Click the Native tab.
-
On the Common secondary tab, set the following properties:
- Enter a Name for the Native channel version of the application. If no name is specified, the name specified under Application Properties is used.
-
Browse and select an image file for the logo.
Important:* The logo you specify here will be renamed to
icon.pngwhile building the application on the iPhone platform. * For Desktop/Kiosk, the icon dimension must be in multiples of 8. Minimum pixels can be 8 x 8 and maximum pixels can be 248 x 248.
-
Click the Android secondary tab.
-
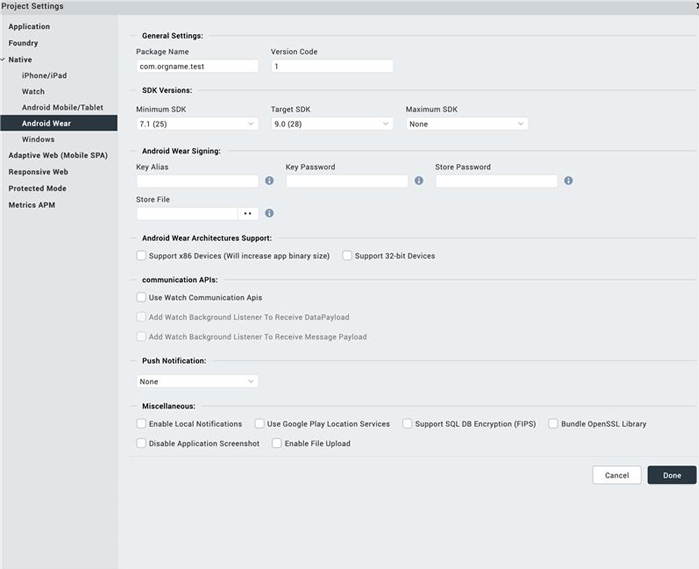
Select the Android Weartab and set the following properties:
-
In the SDK Versions section:
-
Select the Minimum SDK Version that needs to be supported for the application. The default minimum SDK value is 7.1.
-
Select the Target SDK Version that needs to be supported for the application.
Note: The Target SDK Version must be greater than or equal to the Minimum SDK Version.
-
Select the Maximum SDK Version that needs to be supported for the application.
- Package Name: This is the name with which the application is submitted to Google Play. Google Play is an online software store developed by Google for Android mobile devices. A software program called Market is pre-installed on most of Android mobile devices. This software allows the users to browse and download third-party applications. This name is used to search the application in Google Play.
Note: The name you specify for Android Package must contain at least two segments.
-
-
Version Code. This is an internal version number. This number is used to determine whether the application is a recent version. This version number is not shown to users. The value must be an integer. You can increase each version by one to indicate a newer version.
-
In Push Notification section:
-
GCM - Select this option to enable Push Notifications for the application. This option copies the libraries required for push notification into the project during build time.
Important: GCM (Google Cloud Messaging) is supported only for Android SDK Versions 2.3 and above.
- Custom GCM Broadcast Receiver (Optional) - If your application requires to override the default GCM broadcast receiver behavior, you can provide your own custom broadcast receiver. To customize the GCM receiver, see Customizing GCM Broadcast Receiver. * FCM Select this option to enable Push Notifications for the application. This option copies the libraries required for push notification into the project during build time.
- Custom FCM Service (Optional) - If your application requires to override the default FCM service, you can provide your own custom FCM service. To customize the FCM service, see Customizing FCM Service.
- In the Miscellaneous section:
- Enable Local Notifications: Selecting this option ensures that your Android Wear app supports local notifications.
- Protected Mode - Selecting this option ensures that your app is not run on a rooted/jail broken device.
- In the Miscellaneous section:
Note: This option works only if the application is built in Release mode. The Protected Mode option works only if the application is built in Release mode. To know more about protecting your application, see Applying Application Security.
-
-
Signing - Use this option to sign the android binary automatically during the build process.
- Key Alias- Use this option to enter the alias of the key.
- Key Password - Use this option to enter the password for the key.
- Store File - Use this option to locate and configure the store file.
- Store Password - Use this option to enter the password for the store.
- Support x86 Devices - Select this option to support any Android-x86 devices. For more information on devices, see the Porting Android to x86 Hardware List.
-
Support 64-bit Devices - Select this option to build Android APK with 64-bit support. If Support 64 bit option is not selected by a developer, 32 bit libraries/.so files (armeabi-v7a and x86) are packed by default. Once you select this option, only 64 bit .so files (arm64-v8a and x86_64 ) are packed with the application leaving out 32 bit .so files(armeabi-v7a and x86).
Image manipulation APIs are not supported.
64 is not respected and it will fall back to 32 bit even when you have selected the 64 bit option in the following cases:
Charts (not supported in both arm64 and x86_64 architectures) -
Use Google Play Location Services: Select this to use Google Play Location Services.
- Support SQL DB Encryption (FIPS): Select this to support SQL DB encryption.
- Bundle OpenSSL Library: Select this to bundle Open SSL library.
-
Use Watch Communication APIs: Select this to use watch communication APIs.
- Add Watch Background Listener To Receive DataPayload: Select this option to enable watch to receive data payload.
- Add Watch Background Listener To Receive Message Payload: Select this to enable watch to receive message payload.
-
In Manifest Properties section:
-
Permissions tab: Set the permissions to true or false based on the application requirements. Set the appropriate permissions for Android Manifest file. For more information, see The Android Manifest File.
- To enable permissions, select the permissions from the left pane and click Add >.
-
To disable permissions, select the permissions from the right pane and click < Remove.
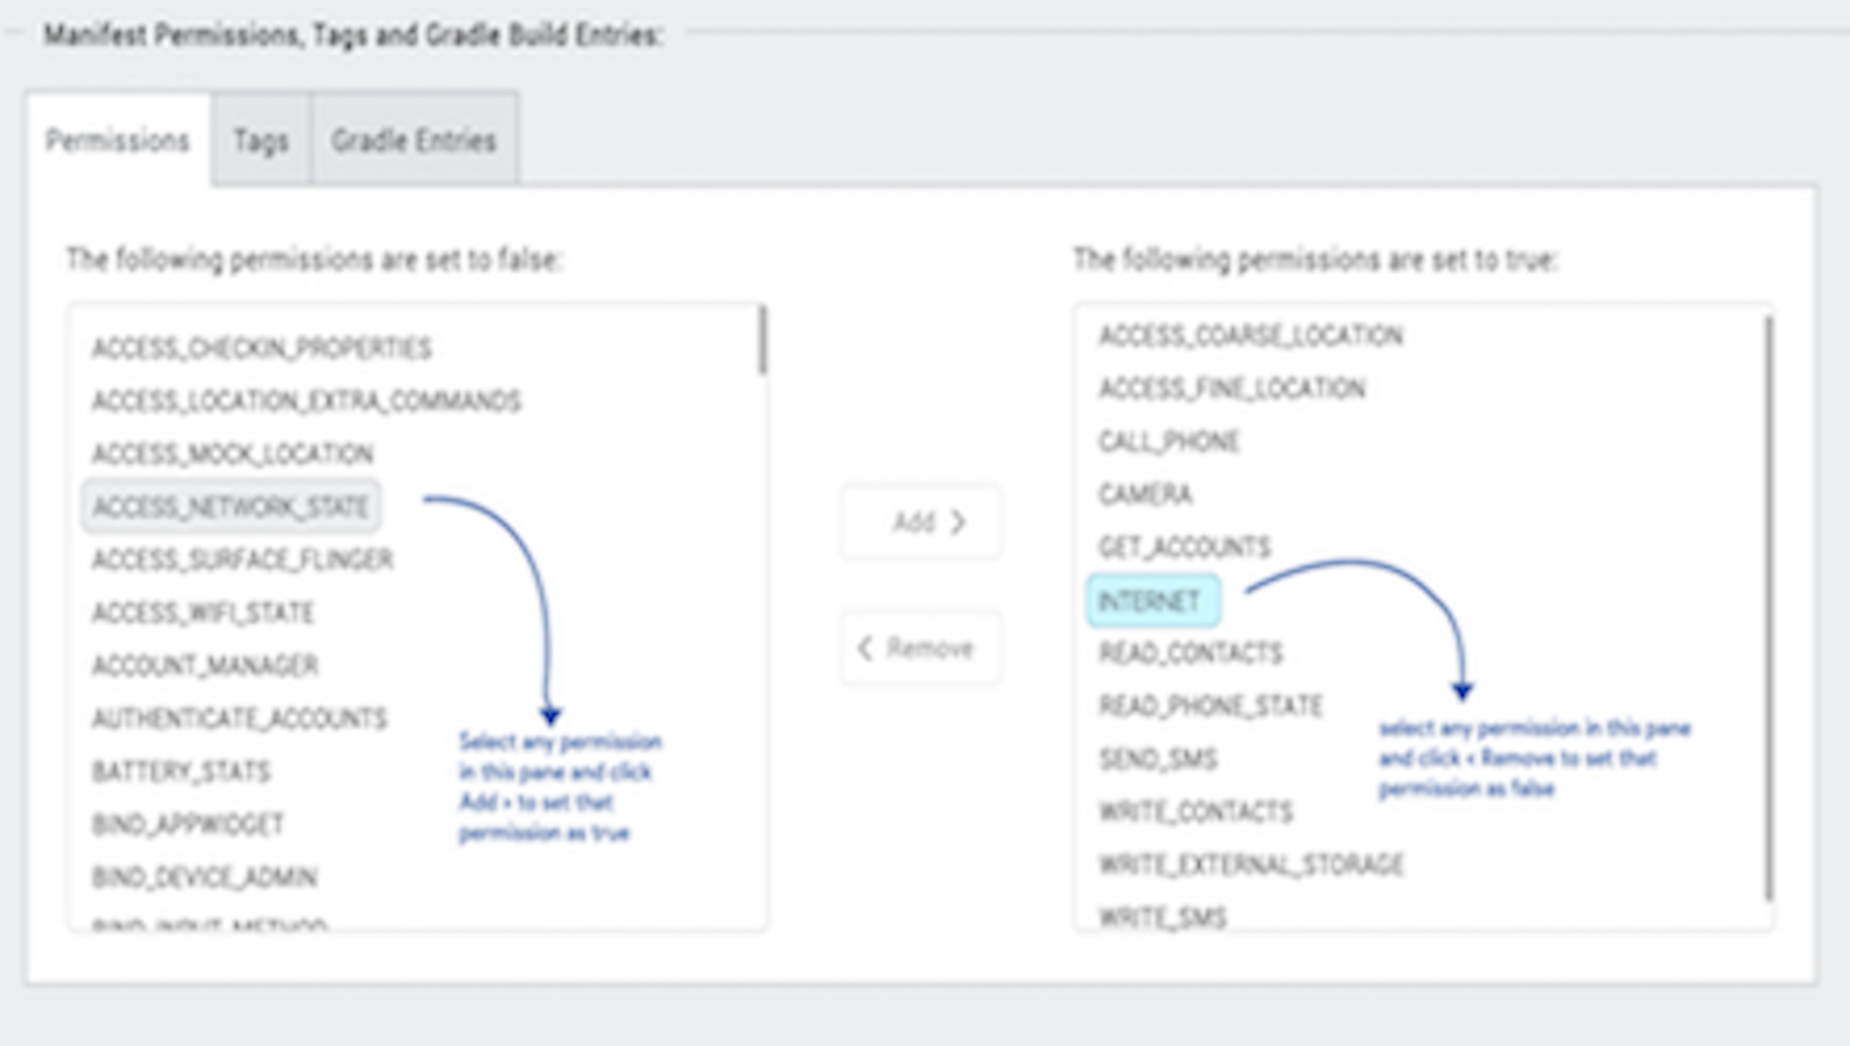
Important: Add the
WRITE_EXTERNAL_STORAGEsetting if you need to save images in an external storage like SD Card.
-
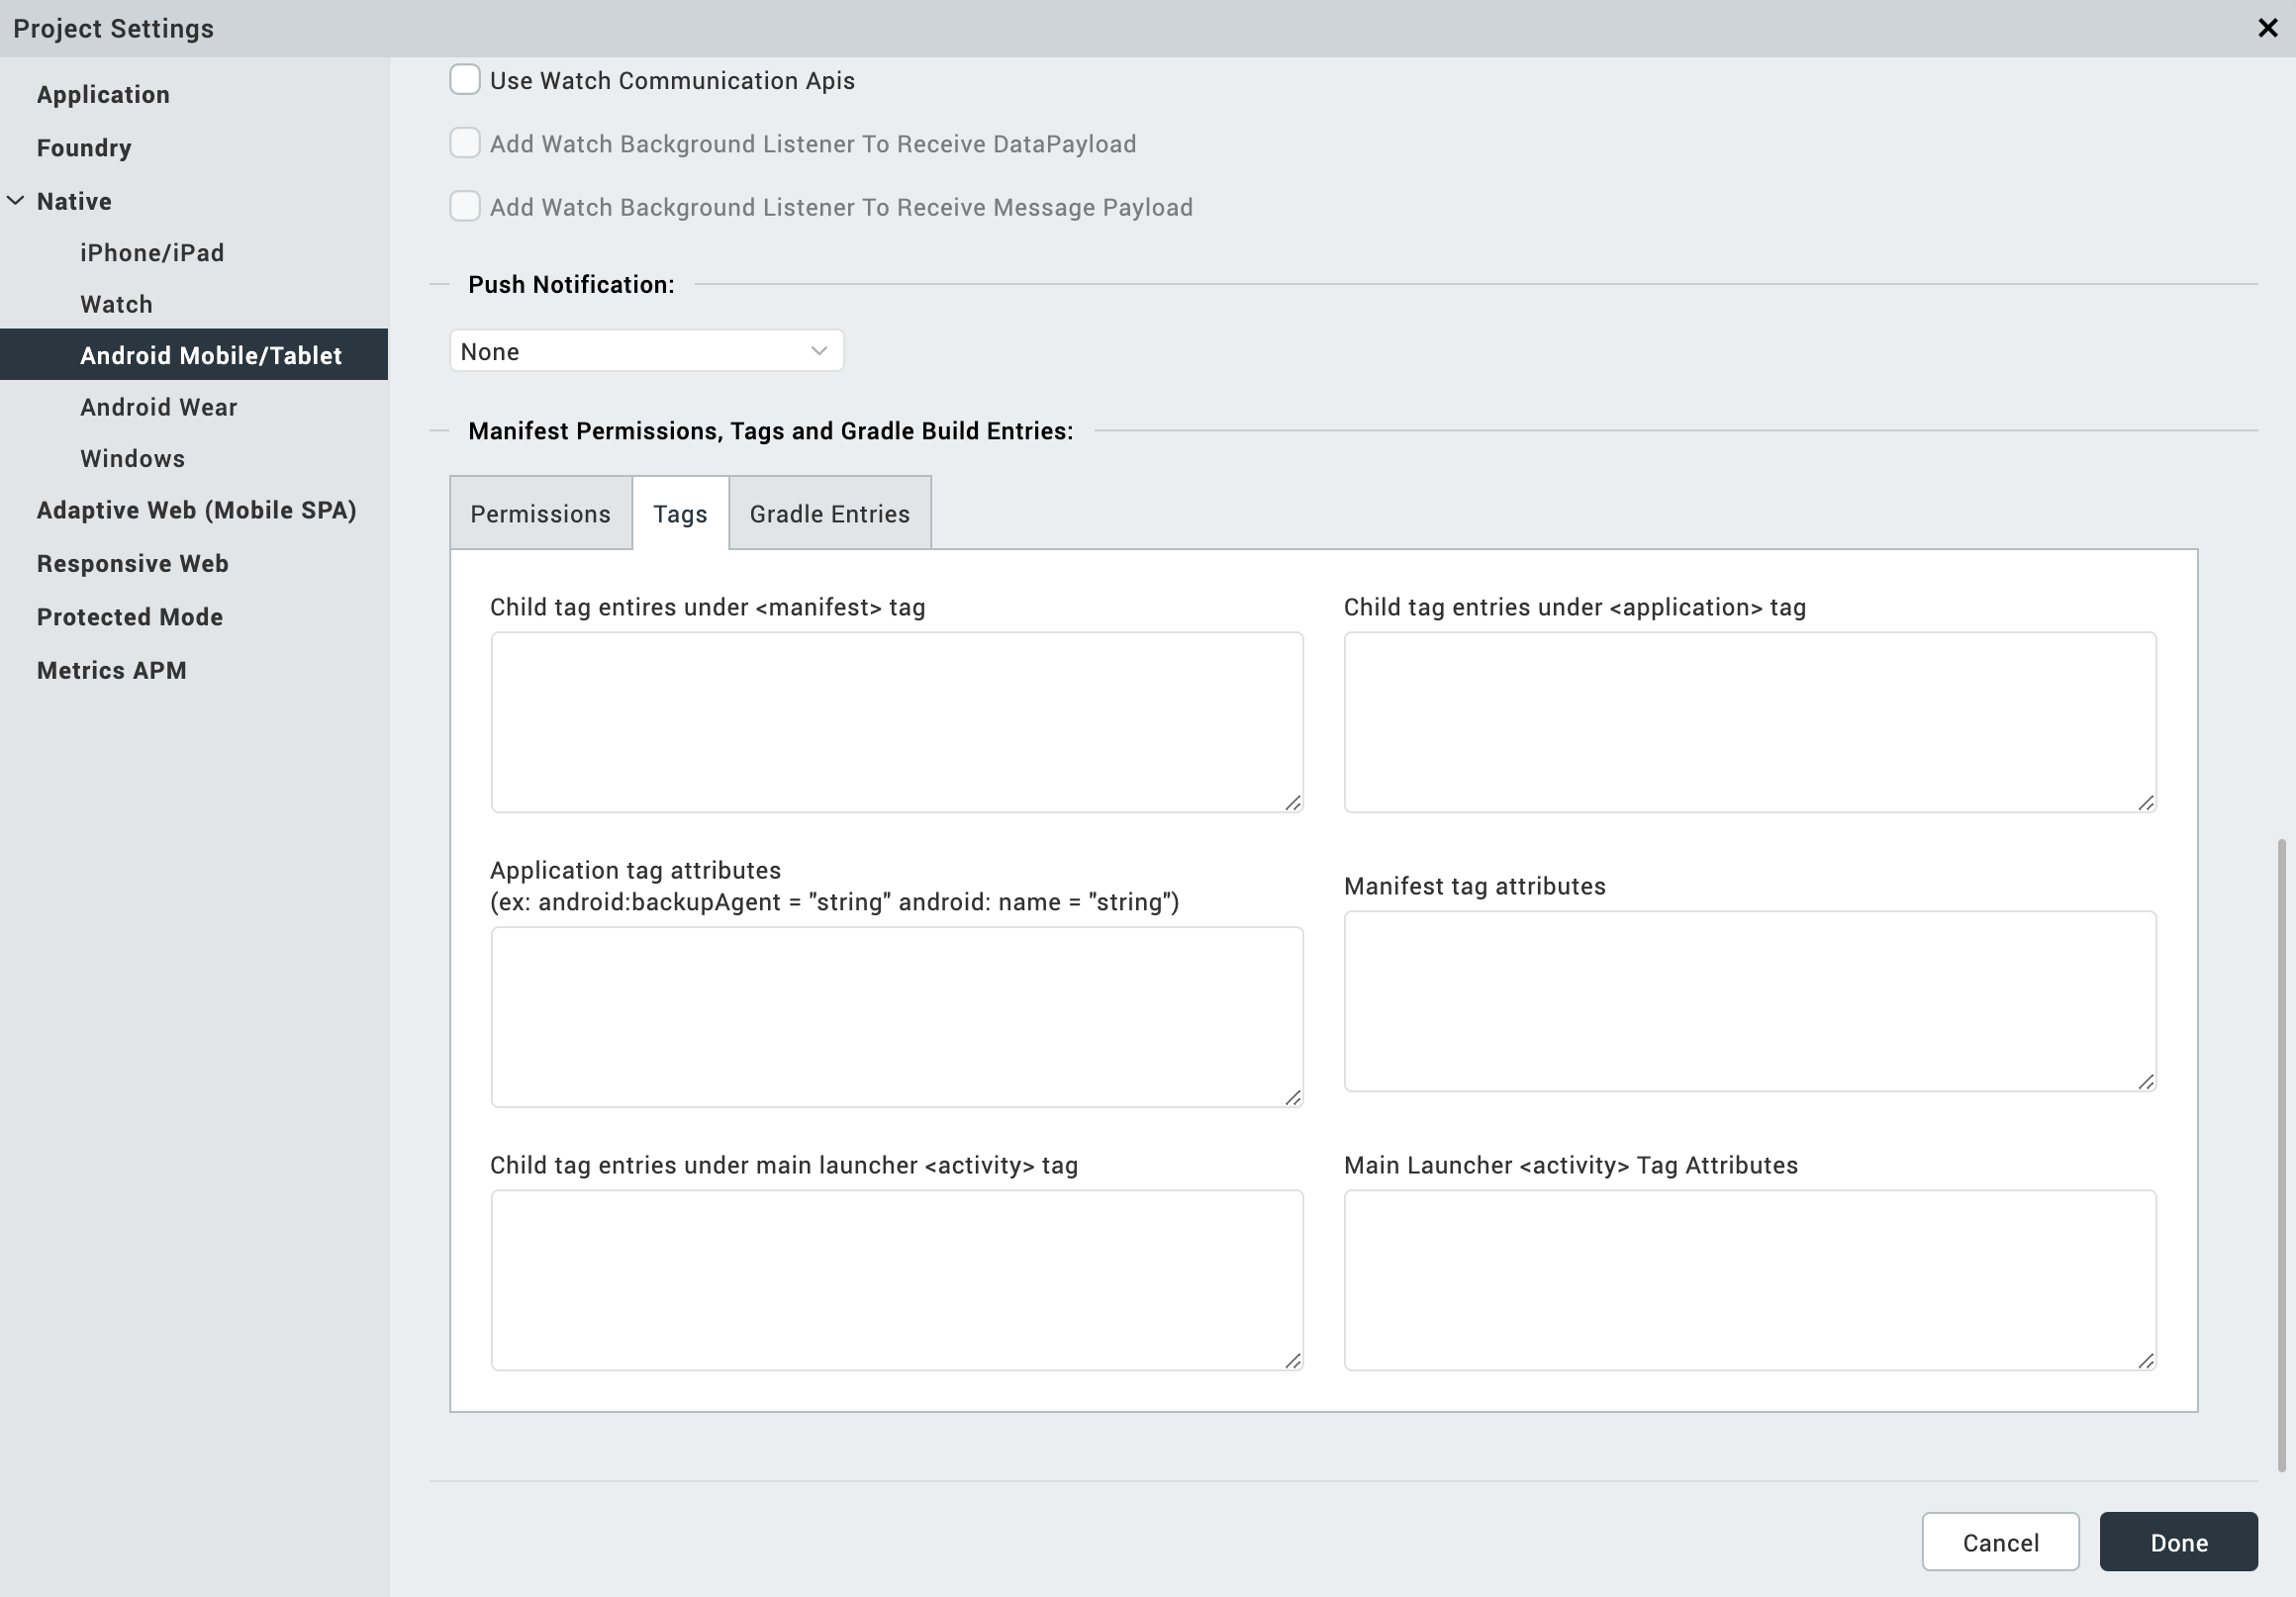
Tags tab: You can add tags to the Android manifest file directly from Volt MX Iris by specifying tag entries and attributes on the Tags tab. You can specify child tag entries and attributes for
and tags, and the Main Launcher tag. For more information on the tags you can add with the manifest or application tags, see http://developer.android.com/guide/topics/manifest/manifest-intro.html.

For more information on the tags you can add, see http://developer.android.com/guide/topics/manifest/manifest-intro.html.
-
Deeplink URL Scheme tab: You can use the URL Scheme tab for Deeplinking. The values for Scheme/ port/ path/host/pathprefix/path pattern specified under this tab can be used to deep-link to a particular URL directly. For instance, if you set the masterdata for a browser widget to be a URL to deep-link, use the following format,
scheme://host:port/pathorpathPrefixorpathPattern. For more information on each of the values available under the URL Scheme tab, see http://developer.android.com/guide/topics/manifest/data-element.html#path.Important: For a URL scheme in Android, please note that the scheme name should be in lowercase; otherwise the scheme name will not work in higher versions (Android 4.0 and above) or Android devices.
-
Gradle Entries tab: You can use the Gradle Entries tab to import additional gradle packages, apply external plugins, or specify build-related configuration information, build dependencies, or the location of any external repositories or modules used by your Android application.
You can specify build.gradle entries as a prefix or suffix entries:
-
Prefix entries are added just below any existing import statements in the build.gradle build script file. Use prefix entries to import additional gradle packages, or to specify external plugins to use in the build.
-
Suffix entries are appended to the end of the generated build.gradle file. Use suffix entries to customize build logic; for example, to add compilation dependencies such as Google and Android support repositories, local library modules, or local and remote repository paths. For more information, see Organizing Build Logic.
Use the gradle.properties entry to configure project-wide Gradle settings, such as the Gradle daemon's maximum heap size or proxy settings. For more information, see The Build Environment.
Use the settings.gradle entry to specify external modules (Gradle-based third-party Android libraries) to include when building your application. For more information, see Configure Your Build.
-
-
-
Click Finish.
| Rev | Author | Edits |
|---|---|---|
| 7.0 | NMK | NMK |