VBox Behavior
VBox Behavior
A VBox has the following characteristics:
- A VBox cannot be placed directly onto a form.
- A VBox cannot be placed within another VBox.
- The width of a widget in a VBox is the width of the VBox.
- The height of a VBox is the cumulative height of the child widgets.
- The shadow effects applied directly on widgets do not work when placed inside a VBox. To achieve the shadow effects, apply the shadows at Box level.
- The Expand vertical property is not applicable for widgets inside a VBox.
Based on the above characteristics of a VBox, the following section lists a possible Scenario and Use Cases for a VBox:
Scenario 1
Create a VBox of width 100 px and add two buttons (Button1 and Button2) with container weights of 50 and 50 respectively, consider the following cases:
Use Case 1
Set the following property values for the VBox and Button1:
VBox:
VBox width: 100 px
Button1:
Expand horizontal: false
Allocated width: 100 px
Text to be displayed: Hello
Width required to display the text 'Hello' (preferred width): 40 px
Height required to display the text 'Hello' (preferred height): 30 px
Layout
The layout with the above properties appears as follows:
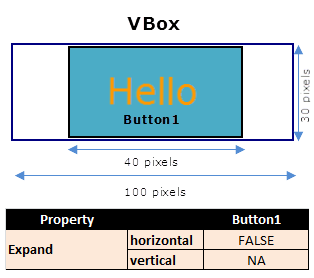
Explanation:
For Button1, as the Expand horizontal property is set to false, it occupies a width of 40 px (preferred width) and not 100 px (allocated width), and occupies a height of 30 px (preferred height). However, Button1 can be aligned in the left, center, and right direction of the allocated space.
Use Case 2
Set the following property values for the VBox and Button1:
VBox:
VBox width: 100 px
Button1:
Expand horizontal: true
Allocated width: 100 px
Text to be displayed: Hello
Width required to display the text 'Hello' (preferred width): 40 px
Height required to display the text 'Hello' (preferred height): 30 px
Layout
The layout with the above properties appears as follows:
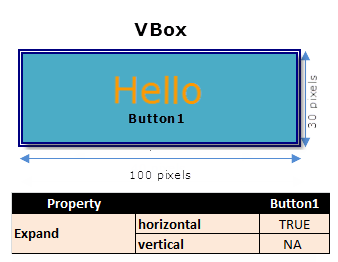
Behavior:
Button1 occupies the allocated width (100 px) and the height is the preferred height (30 px).
Explanation:
As the Expand horizontal property is set to true, the widget occupies a width of 100 px (allocated width) and not 40 px (preferred width) because the horizontal expansion is allowed.
The height occupied is 30 px (preferred height).
Use Case 3
Set the following property values for the VBox and Button1:
VBox:
VBox width: 100 px
Button1:
Expand horizontal: false
Allocated width: 100 px
Text to be displayed: Good Morning World
Width required to display the text 'Good Morning World' (preferred width): 120 px
Height required to display the text 'Good Morning World' (preferred height): 40 px
Layout
The layout with the above properties appears as follows:
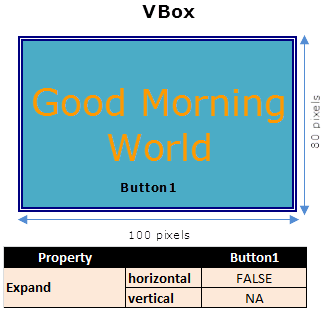
Behavior:
Button2 occupies the allocated width (100 px) and wraps the text to the next line and has an height of 80 px.
Reason
When the required width is more than the allocated width, the widget always occupies the complete allocated width irrespective of the Expand property setting and wraps the text to the next line.
Here, Button1 occupies a width of 100 px (allocated width). and wraps the text to the next line, and has an height of 80 px.
As the height of the VBox is dependent on the content, and in this use case, the text is wrapped to the next line, this results in a corresponding increase in height.
Here Button1 occupies a height of 80 px.