Volt MX Foundry console User Guide: Hard Delete option for Storage Services using the X-VoltMX-Soft-Delete Flag
Object Services
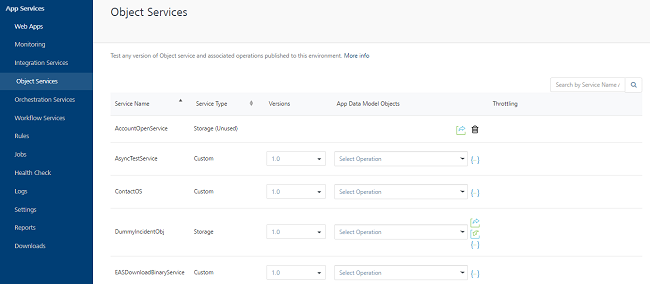
The object services are used test the defined app data model in Volt MX Foundry Console. The services defined and published in the Object Services tab of Volt MX Foundry Console are displayed in the page. You can test the app data model objects of each service defined using different operations available. To know more, refer Object Services.
The following fields are displayed in the page:
| Column | Description |
|---|---|
| Service Name | The name of the service created |
| Service Type | The type of the service created. For more information on different types of services, refer VoltMX Foundry Supported Endpoints. |
| Versions | The version number selected while creating the service. For more information on versioning, refer API Versioning. |
| App Data Model Objects | The list of predefined objects configured in Volt MX Foundry Console. You can test a service by selecting an object from the drop-down list. |
| Documentation | Download the Swagger API file using the download link provided across each service. For more information, refer Downloading a Swagger API file. |
If any Storage service is unpublished in Volt MX Foundry, its status changes to Storage (Unused) in Services Type and a Delete icon appears for that service. Click the Delete icon if you want to remove the data associated with that storage service permanently and free up the space in the environment.
Note: You can export the data associated to the storage service before deleting it.
Hard Delete option for Storage Services using the X-VoltMX-Soft-Delete Flag
The Delete Strategy section is displayed in Volt MX Foundry Console for Storage services. The Delete Strategy contains two options: Hard Delete or Soft Delete. It helps you delete the selected record data from the database.
- Select the Soft Delete option to mark the selected record data as a soft delete flag. If you have selected the default Soft Delete setting in the Delete strategy in Volt MX Foundry Console, and when a client request is sent for deleting records, these records are marked for the SoftDeleteFlag with value as
1in the database. This option is selected by default. -
Select the Hard Delete option to delete the selected record data permanently from the database.
Note: To configure the Delete strategy for Storage services using the Foundry Console, refer to ObjectsServices > Storage Endpoint.
In case you have published your storage service with the default Soft Delete option, you can permanently delete the selected records from the database by passing the header (X-VoltMX-Soft-Delete) parameter in the delete request call by using the Admin Console, as follows:
- To use the hard delete option, go to the App Services Console > Object Services page.
-
Under the App Data Model Objects column, select the object for a specific service of type Storage.

-
In the Request Input tab, select the delete operation from the list.
-
Click the Body section and specify the field value that you want to delete. The field value must be based on a primary key.
- Click the Header section, and enter the header parameter for the Hard Delete operation as follows:
- Field Name:
X-VoltMX-Soft-Delete - Field Value:
false
- Field Name:
-
Click Get Response.
The response for the delete request is displayed under the Response Output tab > Response Body section.
//Sample response code for a Hard delete request call
    Response Body

    {
        "records":[],"opstatus":0,"httpStatusCode":0
    }
The records mentioned in the request body are deleted.
Testing a Service
To test an object service, select an App Data Model Object from the drop-down list of a selected service.
-
Note: Object services has two types of Operations, General and Binary. Based on the selected object the operations can be either general or binary.
Click the drop-down list of an app data model and select an object for a service. The selected data model object displays the page with two toggles.
-
Request Input
- Response Output
Request Input
The Request Input page displays the input parameters for the selected services.
| Field | Description |
|---|---|
| Operation | Select a method from the drop-down list to send the request. The available methods are:CreateUpdateDeleteGetFor more information on Methods Mapping, refer Configure Methods Mapping to the Fields in the Background. |
| Server URL | Displays the middleware URL under which the request is posted. (this is a non editable field) |
| Query Params | Enter the query parameter for the request to be sent. |
| Body | The Body section displays the field names defined for the selected service. The field names are defined while creating the service in Volt MX Foundry Console.Enter the field value across the field name for the request to be sent. |
| Header | The Header section displays the table with the field name and field value as the headers. Enter the required field name as the header and provide the value for the field name entered.- You can add more than one header field by clicking on the Add button above the header table.- You can delete the existing fields by clicking the Delete button across each field. |
| Get Response | Encodes the parameter name and field name with their values provided. |
| Download | You can download the request input records in CSV and JSON formats. |
Response Output
You can view the response for the request parameters sent in the Response Output toggle. This page displays the following fields:
| Section | Description |
|---|---|
| Response Header | Displays the header values of the response received for the request sent. |
| Response Body | Displays the response for the given request parameters in the code format. |
To test an object service, follow these steps:
- Login to App Services and click Object Services from the left pane of the screen.
- Click the drop-down list of an App Data Model Objects for a service and select an object.
- In the Request Input screen, perform the following actions
- Select the method from the drop-down list and enter the parameter value.
- In the Body section, enter the field value across the field name.
- Click the Header toggle and enter the field name and field value.
-
Click Get Response.
The response for the given input parameters is displayed in the Response Header and Response Body sections of Response Output page.