Java Adapter
User Guide: Integration > Configure the Integration Service > Java Adapter
Java Adapter
With Java service, you can interact with your software application that does not support restful APIs. A service that uses a custom Java adapter is a Java service. The Java adapter is a custom Java class and you can create a Java adapter either by implementing com.hcl.voltmx.middleware.common.JavaService interface or com.hcl.voltmx.middleware.common.JavaService2 interface. Volt MX recommends to use JavaService2 as you can get an access to DataControllerRequest and DataControllerResponse objects.
You must load the required JAR files to define a Java service. The JAR files contain the Java classes. The Java classes contain the Java methods. These methods have the logic defined that is required for a service. Java services are mostly used with Webconnector Services.
Note: The
middleware-system.jarhelps you to develop a Java adapter. You can download themiddleware-system.jarfrom Admin Console's download page.Note: You should not modify JVM timezone through custom code as modifying it can result in app server outage.
Data Conversion of a Java Adapter
Click here for more details
The data structure of the Volt MX Result object (com.hcl.voltmx.middleware.datamapping.Result) shows that all the data is converted, but the complete data in the Volt MX Result object in not exposed as expected. You get a part of the data in Volt MX Foundry because only a few unnamed records are converted into an object instead of an array.
The use of JSON Arrays is particularly important for the mapping of data in user interface segments that require arrays as data input.
The following code details sample original JSON data, data converted to Volt MX Object, and in the result - data converted only limited unnamed records into an object in Volt MX Foundry (loss of data).
{% highlight json %} //Sample: Original JSON Data:
{"booking":[ {"amount":-254.6,"description":"Paiement carte BIM STORES PALMIER le 21/02/2016 à 18:54","doc_id":17150820,"value_date":"2016-02-19","temporary":false,"date":"2016-02-21"},{"amount":-44.26,"description":"Paiement internet LYDEC ECOM le 19/02/2016 à 13:04","doc_id":17146660,"value_date":"2016-02-18","temporary":false,"date":"2016-02-19"},{"amount":-37.26,"description":"Paiement internet LYDEC ECOM le 19/02/2016 à 13:19","doc_id":17146835,"value_date":"2016-02-18","temporary":false,"date":"2016-02-19"},{"amount":-14.34,"description":"Paiement internet LYDEC ECOM le 19/02/2016 à 13:11","doc_id":17146744,"value_date":"2016-02-18","temporary":false,"date":"2016-02-19"} ]}
Sample: Data converted to VOLTMX Object:
Dataset [id=booking, index=-1,
records=[
Record [index=-1, order=0, id=,
params=[
Param [name=amount, value=-254.6],
Param [name=description, value=Paiement carte BIM STORES PALMIER le 21/02/2016 à 18:54],
Param [name=doc_id, value=17150820],
Param [name=value_date, value=2016-02-19],
Param [name=temporary, value=false],
Param [name=date, value=2016-02-21]
], datasets=[], records=[]
], Record [index=-1, order=0, id=,
params=[
Param [name=amount, value=-44.26],
Param [name=description, value=Paiement internet LYDEC ECOM le 19/02/2016 à 13:04],
Param [name=doc_id, value=17146660],
Param [name=value_date, value=2016-02-18],
Param [name=temporary, value=false],
Param [name=date, value=2016-02-19]
], datasets=[], records=[]
],
//Sample: Data converted only limited unnamed records into an object in Volt MX Foundry:
"booking": {
"": {
"date": "2016-02-21",
"temporary": "false",
"amount": "-254.6",
"description": "Paiement carte BIM STORES PALMIER le 21/02/2016 à 18:54",
"doc_id": "17150820",
"value_date": "2016-02-19"
}
}
</details>
### Writing a Java Class

**To write a Java class for a Java adapter, follow these steps:**

1.  Create a Java adapter either by implementing the `com.hcl.voltmx.middleware.common.JavaService` interface or `com.hcl.voltmx.middleware.common.JavaService2` interface.
2.  When you implement `com.hcl.voltmx.middleware.common.JavaService`, you have to implement the following `invoke()` method with the signature:
public Object invoke(String paramString, Object[] paramArrayOfObject) throws Exception;
3. When you implement `com.hcl.voltmx.middleware.common.JavaService2`, you have to implement the following `invoke()` method with the signature:
public Object invoke(String methodID, Object[] objectArray, DataControllerRequest request, DataControllerResponse response) throws Exception;
### Middleware API to get Output parameters in a Java Service

A middleware API is provided to get the output params/records/datasets configured as part of a service definition of a Java service.

The following is a sample code:
ServiceOutputWrapper serviceOutputWrapper =  request.getServicesManager().getOperationData()
.getServiceOutputWrapper();
```
Note: Request is an instance of data controller request.
Configure Java Endpoint Adapter
To configure Java service in the Integration Service Definition tab, follow these steps:
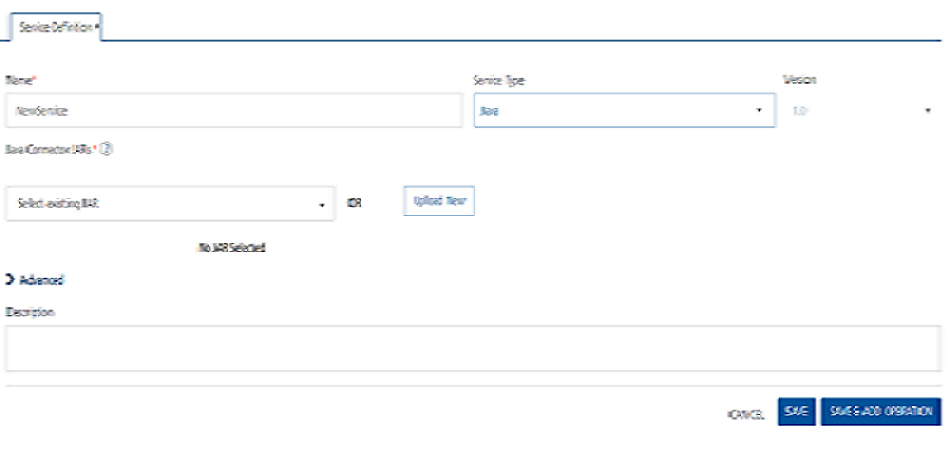
- In the Name field, provide a unique name for your service.
- From the Service Type list, select Java.
-
From the Java Connector JARs list, select the required JAR file that contains the classes that implement the JavaService interface for this Integration Service from existing JARs in the account or click UploadNew to select the JARs from your local machine.
Note: You can select multiple JAR files from the Java Connector JARs list if required.
Important: To upload an updated JAR file, upload the new file, which must have the same name as the old JAR file. The new JAR file overrides the existing file.dsd
-
For additional configuration of your service definition, provide the following details in the Advanced section:
Field Description Custom Code Custom Code enables you to specify dependent JAR. To specify dependent JAR, select the JAR containing preprocessor or postprocessor libraries from the drop-down list, or click Upload New to browse the JAR file from your local system. This step allows you to further filter the data sent to the back end. You can select multiple JAR files if required.
Important: Make sure that you upload a custom JAR file that is built on the same JDK version used for installing Volt MX Foundry Integration.For example, if the JDK version on the machine where Volt MX Foundry Integration is installed is 1.6, you must use the same JDK version to build your custom jar files. If the JDK version is different, an unsupported class version error will appear when a service is used from a device. You can download the uploaded jars to your local system.Throttling API throttling enables you to limit the number of request calls within a minute. If an API exceeds the throttling limit, it will not return the service response.
To specify throttling in Volt MX Foundry Console, follow these steps:
In the Total Rate Limit text box, enter a required value. With this value, you can limit the number of requests configured in your Volt MX Foundry console in terms of Total Rate Limit.
In the Rate Limit Per IP text box, enter a required value. With this value, you can limit the number of IP address requests configured in your Volt MX Foundry console in terms of Per IP Rate Limit.
To override throttling in App Services Console, refer to Override API Throttling Configuration.
Note: All options in the Advanced section are optional.
-
In the Description field, provide a suitable description for the service.
-
Click Save to save your service definition.
Create Operations for Java
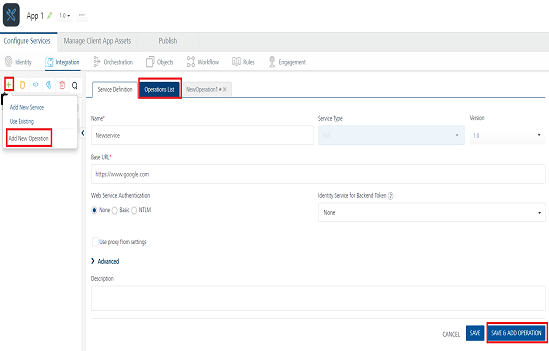
The Operation List tab appears when you click Add Operation in the Service Definition page.
Note: Click Operations List tab > Configure Operation. The Configured Operations list appears.
To create an operation, follow these steps:
-
Click SAVE & ADD OPERATION in your service definition page to save your service definition and display the NewOperation tab for adding operations.
OR
Click Add Operation to add a new operation or from the tree in the left pane, click Add > Add New Operation.Click to View image
Note: To use an existing integration service, refer to How to Use an Existing Integration Service.
-
In the Operation Modal tab, follow these steps:
This tab contains the request input, response output, and advanced sections. The input values are data types, scope, and format types. By default, the system will display the Request Input tab.
Note: You can add an entry by clicking the Add button if entries for the input and the output tabs do not exist.
You can also delete an entry. Select the check box for an entry, and then click Delete .
-
To configure an operation, provide the following details:
| Field | Description |
|---|---|
| Name | It is prepopulated with the operation name. You can change the name if required. |
| Operation Security Level | It specifies how a client must authenticate to invoke this operation.Select one of the following security operations in the Operation Security Level field Authenticated App User – It restricts the access to clients who have successfully authenticated using an Identity Service associated with the app. Anonymous App User – It allows the access from trusted clients that have the required App Key and App Secret. Authentication through an Identity Service is not required. Public – It allows any client to invoke this operation without any authentication. This setting does not provide any security to invoke this operation and you should avoid this authentication type if possible. Private - It blocks the access to this operation from any external client. It allows invocation either from an Orchestration/Object Service, or from the custom code in the same run-time environment. |
response operations, provide the following details in the Advanced section:
| Field | Description |
|---|---|
| Custom Code Invocation - Preprocessor and Postprocessor (for Java and JavaScript) | You can add pre and post processing logic to services to modify the request inputs. When you test, the services details of various stages in the service execution are presented to you for better debugging. All options in the Advanced section are optional. For more details, refer to Preprocessor and Postprocessor. |
| Properties | Additional Configuration Properties allows you to configure service call time out cache response. For information on different types of configuration properties, refer Properties. |
| Front End API | Front-end API allows you map your endpoint (or) backend URL of an operation to a front-end URL. For detailed information, refer Custom Front-end URL. |
| Server Events | Using Server Events you can configure this service to trigger or process server side events. For detailed information, refer Server Events. |
Note: All options in the Advanced section are optional.
Configure Request Operation for Java
Integration services accept only form-url-encoded inputs for all the input parameters provided in the service input parameters (request input).
To forward the body of the client's request to backend as it is, select the Enable pass-through input body check box. For more details on API Proxy service, refer to How to Enable Pass-through Proxy for Operations.
You can perform the following actions in Request Input tab:
- Click Add Parameter to add an entry (if the entries for input and the output tabs does not exist).
- To make duplicate entries, select the check box for the entry, click Copy and Paste.
- To delete an entry, select the check box for an entry and click Delete .
- To configure the request input tab, provide the following details:
| Field | Description |
|---|---|
| Name | It Contains a Unique Identifier. Change the name if required. |
| Test Value | Enter a value. A test value is used for testing the service. |
| Default Value | Enter the value, if required. The default value will be used if the test value is empty. |
| Scope | Select Request or Session. It is set to Request by default. Request indicates that the value must be retrieved from the HTTP request received from the mobile device. Session indicates that the value must be retrieved from the HTTP session stored on Volt MX Foundry. Identity: If this is selected, you can filter the request parameters based on the response from the identity provider. For more details to configure identity filters, refer to Enhanced Identity Filters - Integration Services. |
| Data Type | Select one of the following data types String - A combination of alpha-numeric and special characters. Supports all formats including UTF-8 and UTF-16 with no maximum size limit. Boolean - A value that can be true or false. Number - An integer or a floating number. Collection - A group of data, also referred as data set. |
| Encode | Select the check box to enable encoding of an input parameter. For example, the name New York Times would be encoded as New_York_Times when the encoding is set to True. The encoding must also adhere to the HTML URL encoding standards. |
| Description | Provide a suitable description. |
- To validate the operation details, click Save and Test. For more details, refer to Test a Service Operation.
Configure Response Operation for Java
-
Click the Response Output tab, and enter the values for required fields such as name, scope, data type, collection ID, record ID, format and format value.
Note: If you define parameters inside a record as the session, the session scope will not get reflected for the parameters.
In Java service, the response (output) from a backend is not parsed based on the response values. The complete response from the backend is sent to the client device.
Note: By default, the
opStatusandhttpStatusCodevalues for Java and JavaScript services are added as 0 and 200. -
To validate the operation details, click Save and Test. For more details, refer to Test a Service Operation.
-
Click SAVE OPERATION to save the operation. The system updates the operation definition.
If you click Cancel, the Edit Service Parameters window will close without saving any information.
Note: To add more operations for your Java service, repeat Step 3 through Step 4.
Note: You can view the service in the Data Panel feature of Volt MX Iris. By using the Data Panel, you can link back-end data services to your application UI elements seamlessly with low-code to no code. For more information on Data Panel, click here.
How to Edit an Existing Java Adapter
If you want to edit an existing Java service, you can edit details such as service name, JAR files, operation modal details. While editing a Java service, you can change the Java service type. A Java service must be available in the Integration home screen. To add an existing Integration service, refer to Use an Existing Service.
To edit an existing Java service, follow these steps:
- In the Integration page, click one of your Java services.
-
Under Operations > Configured Operations, hover your cursor over the required service, click the Settings button, and then click Edit.
The operation details are displayed in the Edit Service Parameters dialog.
-
Make the necessary changes in the Service Definition section, and click Update.
For more details, refer to How to Configure Service Definition for Java Service. - Under the Operation section, hover your cursor over the required service, click the Settings button, and then click Edit to display the Operation Modal tab.
To modify Java operations, refer to How to Configure and Edit Operation Modal. - Click Done to update your Java service. The Integration page is displayed.