How to Configure a Custom Identity Service by using an Integration Service
User Guide: Identity > Configure the Identity Service > VoltMX Custom Identity Service > How to Configure a Custom Identity Service by using an Integration Service
How to Configure a Custom Identity Service by using an Integration service
A custom identity service is configured by pointing to an endpoint, which follows a custom identity protocol/contract.
An external back-end server can be used to configure a custom identity service, if it implements the identity protocol/contract. Otherwise you can make use of Volt MX Foundry Integration Service, which internally points to the authentication/login API of the back-end server.
For example,
- If a back-end server does not support login and logout APIs, you can configure a custom auth service by pointing to an end-point.
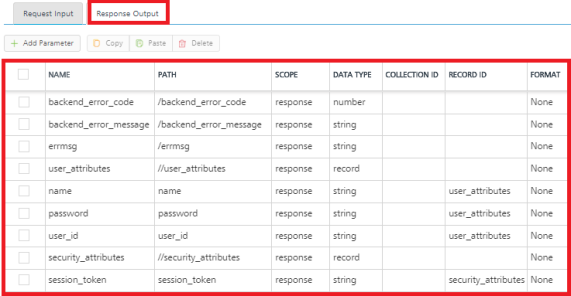
For example, A Volt MX Foundry user creates an integration service that has a login and logout operations. Based on the input and output parameters configuration, Volt MX Foundry fetches a response for a user for login and logout operations. To get custom back-end server's error codes and error messages in the login/logout response, a developer must map error codes and messages with the parametersbackend_error_codeandbackend_error_messagein the Integration service Response Output. The following steps explain how to configure a custom auth service by pointing to an end-point.
To create a custom auth service by pointing to an end-point that, follow these steps:
- Create a JSON integration service with the custom back-end server's base URL.
-
Create an operation by name
login.- In the Target URL field of the operation, enter the
login/authenticationAPI of the custom back-end server. - In the Operation Security Level list, select one of the Authenticated App User option. The Authenticated App User option restricts the access to clients who have successfully authenticated using an Identity Service associated with the app.
-
In Request Input, configure the login parameters for Body, Header, and Request Template (for example, name and password.)

-
In the Response Output, configure the following parameters.
- In the Target URL field of the operation, enter the
-
Similarly create an operation by name
logoutas in the previous step. - Publish the app.
- Copy the
service URLfrom the App Service Document in the Publish > Environment page.
 "services_meta": {
      "custom": {
       "type": "integsvc",
       "version": "1.0",
       "url": "https://test11.testtest.net:11111/services/custom"
      }
     }
- Now, create a custom identity service.
-
In the Custom Identity Service Endpoint, paste the
service URLthat you copied from the App Service Document.You can now test the login from your authentication server of the custom back-end.