Configuring Keep IDP with VoltMX Foundry Identity Service
Keep implements what essentially amounts to an OAuth2 Provider (called IDP-lite) and Volt MX Foundry implements an Integration Service adapter for OAuth2 providers. The following is a guide for creating a Foundry Identity Service using Keep’s OAuth provider.
KEEP Setup
Warning. This is subject to change. Consult Keep documentation (or code, or experts) for the latest steps. Currently, these general steps must be performed:
- Deploy
oauth.nsfand configure KEEP to recognize that file - Add
OAuthAdminrole for the ACL entry that gives your server manager access to theoauth.nsf
To deploy and configure the NSF, place the following in the domino data directory (you may need to create the keepconfig.d folder if it doesn’t already exist):
- [data folder]/oauth.nsf
- [data folder]/keepconfig.d/oauth.json
An example of oauth.json is shown below. Expiration times can be adjusted. Make sure to replace the KEEP URL to match your KEEP host (a fictitious Quickstart KEEP url is shown in this example.)
{
  "oauth": {
    "active": true,
    "database": "oauth.nsf",
    "url": "http://yourquickstarthost-qs-keep-8880.qs.hcllabs.net",
    "authCodeExpiresIn": 120,
    "accessTokenExpiresIn": 3600,
    "refreshTokenExpiresIn": 525600
  }
}
Note if you are using Domino+KEEP docker image, the oauth.nsf should already be “deployed” in the image (though not fully configured as of this writing). If for some reason you need to create oauth.nsf, it can be created from a template as follows:
- Start the notes client
- File - Application - new (or Ctrl+N) a. Pick (the target) server b. Set file name to oauth.nsf c. (Set title as you deem fit) d. Pick
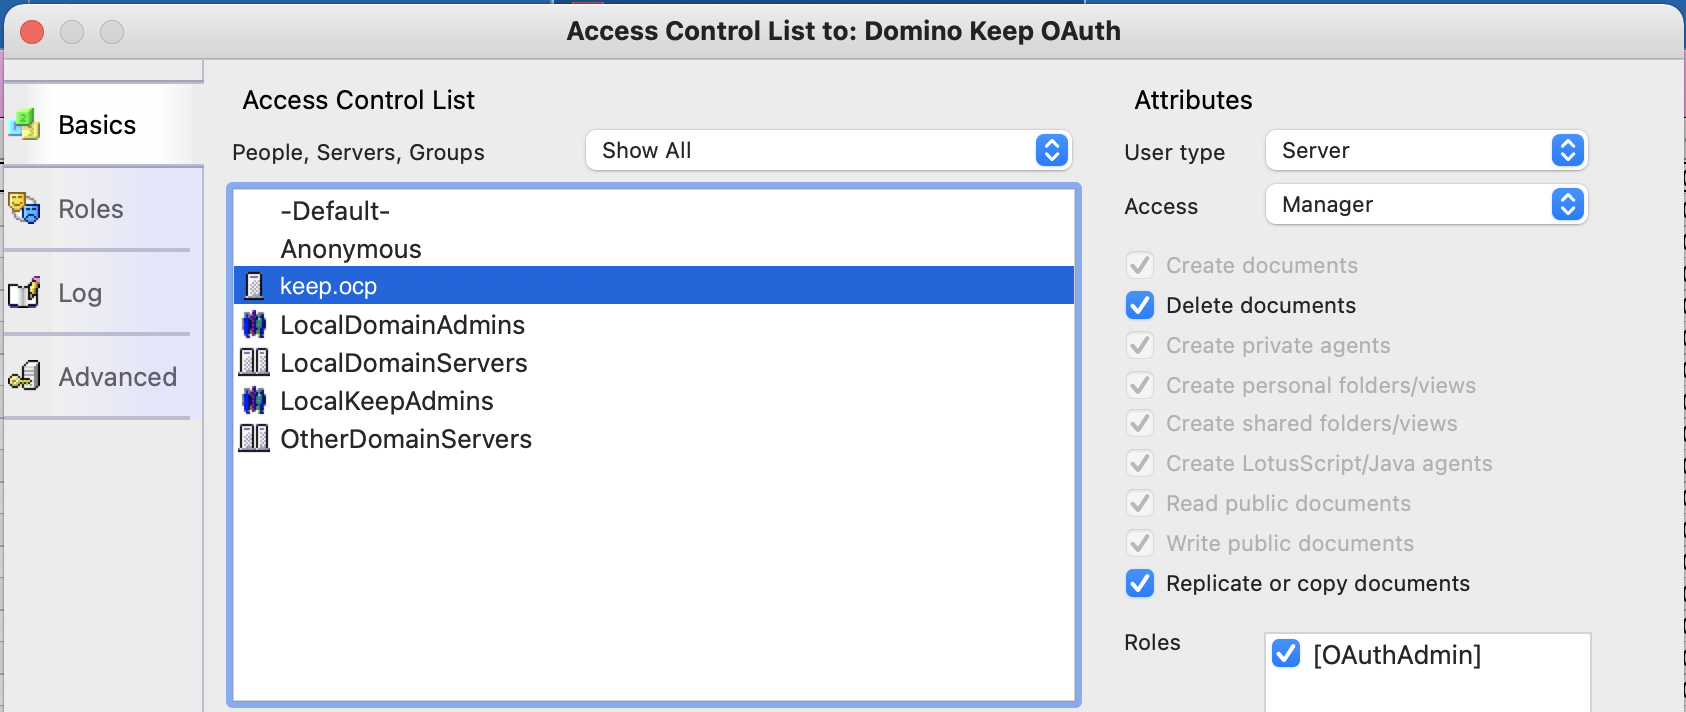
KeepOauth.ntfas the application template - Assign the role
[OAuthAdmin]to the server and your administrative user or usergroup (we suggest[LocalKeepAdmins]using your notes client.Make sure there is an ACL entry of typeserver(for your server) that has Manager access and hasOAuthAdminrole (make sure the checkbox is checked).
If you don’t have the ability to connect a Notes client to your Domino server then:
- Add the
oauth.nsfto your list of KEEP databases - Use postman or cUrl to add the
OAuthAdminrole (see example, but note that headers are removed for clarity):
 curl --location --request PUT 'http://yourkeepserver.io:8880/api/admin-v1/acl/entries/CN%3Dyourkeepserver%2FO%3Dyourorg?dataSource=oauth.nsf' \
--data-raw '{
    "name": "CN=yourkeepserver/O=yourorg",
    "level": "MANAGER",
    "roles": ["OAuthAdmin"],
    "type": "SERVER",
    "flags": ["NODELETE"]
}'
Note: The part after /entries/ before ?dataSource must be URL encoded
Create Foundry Identity Service
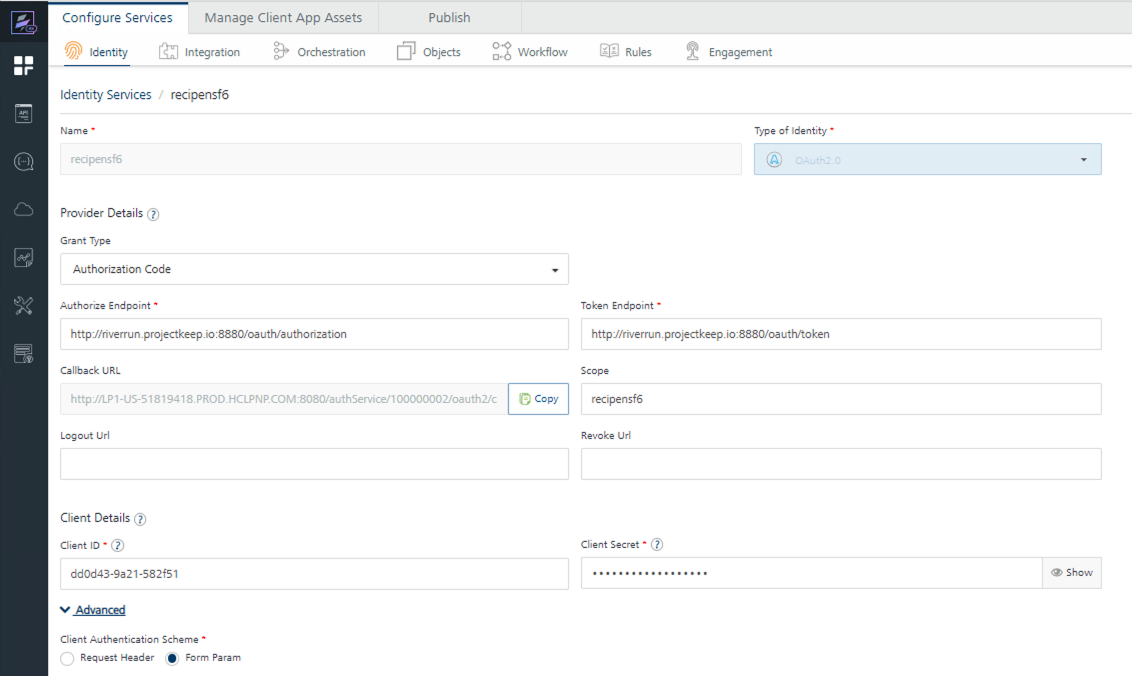
Some things to note when creating an identity service in Volt MX Foundry using Keep IDP-lite (also refer to the screenshot below):
Create a new Identity service in the Foundry browser console:
- Type of identity = OAuth 2.0
- Grant Type = Authorization Code
- Authorize Endpoint =
[your Keep API server]/oauth/authorization - Token Endpoint =
[your Keep API server]/oauth/token - IMPORTANT - make sure to select
Form ParamunderAdvanced{: .alert .alert-danger} - Take note of the
Callback URL - Pause here for a moment (don’t save yet), and complete the steps for setting up Keep databases and applications
- Scope = database
name(API Name) for the database added in the next step; if more than one database, you should be able to enter a list of database names; check Keep documentation to see how the names are delimited (perhaps a comma or space, but to keep it simple, just enter one db name if uncertain about how to specify multiple) - Client ID =
App idfrom the application created in the next section below - Client Secret = Obtained when you first create the application (next section)
- Now you can
save
Keep Application and Database Setup
From the Keep Admin browser client:
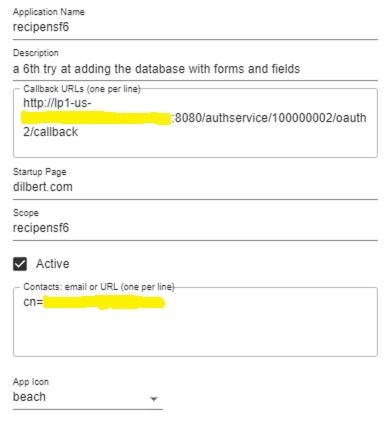
- Add a database, and note its name (API name, when you create the DB in Keep)
- Create an application, and note its client id, and client secret
Note:
- When you create the application, you’ll need the callback URL defined earlier
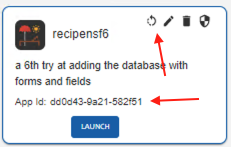
- App id (Client ID) is available any time you view a created application. The secret is shown only when the the secret is created the first time. If you forget the secret, generate a new one (click the circular arrow).
YMMV