Domino Adapter tutorial
About this task
The tutorial guides you through the Domino Adapter process in Volt MX Go. You will create an app in Volt Foundry and connect the app to your Domino database as an endpoint via the Domino REST API. You will then configure a data model and test the methods, including standard CRUD operations, for interacting with the data model.
For more information, see Data models and Methods.
At the end of this tutorial, you can manually create an app in Volt Foundry and create an Identity Service and Object Service to connect your app to your Domino database via Domino REST API. You will also be able to test the methods for interacting with the data model.
Before you begin
Before starting this tutorial, you must meet prerequisites based on the situational scenario that applies to you:
- The All access scenario is for a user with all the necessary access rights to install and configure Volt MX Go and with the correct access to all required Domino databases and the Domino REST API.
- The Limited access scenario is for a user who is most likely a Volt Foundry Administrator that doesn't have all the necessary access to all the required Domino databases and the Domino REST API. In this case, you must coordinate with a Domino/Domino REST API administrator to obtain the required access and fulfill other requirements.
Kindly follow and complete the prerequisites that apply to your situation.
Volt MX Go prerequisites
-
You have completed the Volt MX Go installation.
-
You have a Volt Foundry admin account.
Domino/Domino REST API prerequisites
Tip
Contact your Domino administrator/Domino REST API administrator for any needed assistance.
- You have set up Domino REST API in the Domino server containing the Domino database you are importing.
- You have at least Designer access to the Domino database where you are creating or updating a schema.
- You have at least an Editor access to the Domino Keep Configuration database
keepconfig.nsfto create a scope and OAuth application for the Domino application. -
You have the correct access level to the Domino database to test the CRUD operations.
For more information on access levels, see Access Levels in the ACL
 in the HCL Domino documentation
 -
You have accessed Domino REST API
-
You have configured a schema, activated the forms of the schema, and added a
dqlmode having similar fields to thedefaultmode to each activated form. For more information, see Schema Management. -
You have configured a scope for your schema. For more information, see Scope Management
. -
You have created an OAuth application
:- having your configured scope added to the Scope field.
- having a placeholder callback URL that you will replace with the callback URL from the Identity Service you will create.
-
You have taken note of the Domino REST API URL, and the App ID and App Secret
of the OAuth application
Volt MX Go prerequisites
-
You have completed the Volt MX Go installation.
-
You have a Volt Foundry admin account.
Domino/Domino REST API prerequisites
-
You have contacted the Domino/Domino REST API administrator to:
- ensure you have at least Designer access to the Domino database you will be accessing
- ensure you have the correct access level to the Domino database to test the CRUD operations.
- configure a schema for the Domino database that you will be using with:
- All necessary forms:
- having active status
- having a
defaultmode and adqlmode, and both modes having matching fields
- All necessary views having active status
- All necessary agents having active status
- All necessary forms:
- configure a scope or scopes for your schema
-
create an OAuth application:
- having your configured scope or scopes and
$SETUPadded to the Scope field. - having a placeholder callback URL that will be replaced with the callback URL from the Identity Service you will configure later in this tutorial
- having your configured scope or scopes and
-
provide you with Domino REST API URL, and the Client ID and Client Secret of the OAuth application.
Log in to Volt Foundry
-
Open the Volt Foundry hostname concatenated with
/mfconsole/in your browser.Tip
Use the Console URL in the Install Complete window or from the Installation Complete details that appear in the command line to log in to Volt Foundry.
-
Enter your username and password on the Sign in to your account page.
- Click Sign In.
The Volt MX Foundry Console opens with the Apps page shown by default.
Create an app in Volt Foundry
- On the Apps page, click Add New.
- A new app is added, and you are directed to the Configure Services → Identity page of the new app.
- Click the Edit App Name icon to give a unique name to your app.
Tip
For more information, see How to Add Applications in the HCL Volt MX documentation.
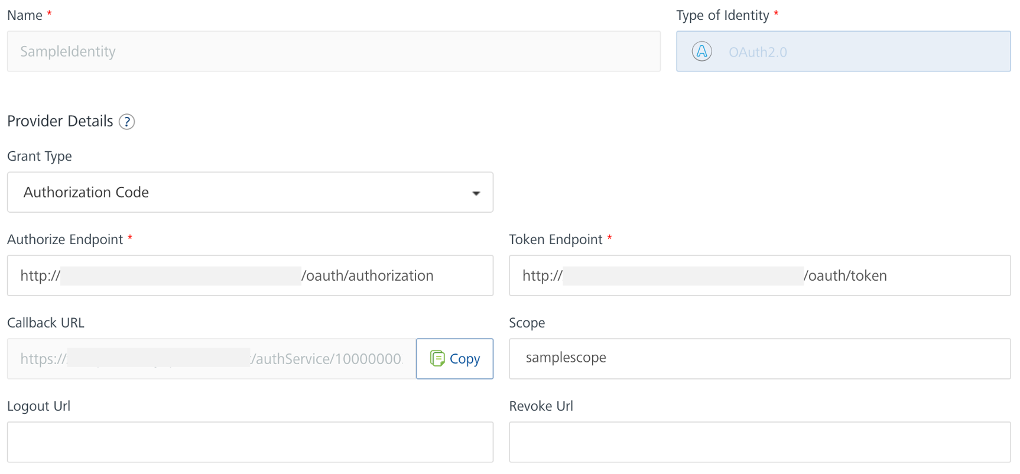
Configure an Identity service
- On the Identity page, click Configure New.
- Enter a name for the identity service in the Name text box.
- From the Type of Identity drop-down list, select
OAuth2.0. -
Under Provider Details:
- Select
Authorization Codein the Grant Type dropdown list. -
Enter the Domino REST API server URL concatenated with
/oauth/authorizationin the Authorize Endpoint field.Example:
[Domino REST API server URL]/oauth/authorization -
Enter the Domino REST API server URL concatenated with
/oauth/tokenin the Token Endpoint field.Example:
[Domino REST API server URL]/oauth/token -
In the Callback URL text box, click Copy.
You need to save the copied callback URL and use it to update the placeholder callback URL in the OAuth app in Domino REST API.
-
Enter the name of the scope, configured in the OAuth application in the Domino REST API, in the Scope text box.
Important
Make sure that the name of the scope you enter in the Scope text box matches the name of the scope that's configured in the OAuth app in Domino REST API.
- Select
-
Under Client Details:
- Select Basic authentication as the Client Assertion Type.
- Enter the App ID of the OAuth app in Domino REST API in the Client ID text box.
- Enter the App Secret of the OAuth app in Domino REST API in the Client Secret text box.
Tip
The App ID and App Secret are generated when an OAuth app is added on Domino REST API. For more information, see Application Management
in the Domino REST API documentation. -
Under Advanced:
- Select Form Param as the Client Authentication Scheme.
- Use the default for the rest of the settings.
-
Click Save.
Update callback URL of OAuth app in Domino REST API
- Log in to Domino REST API.
- Select Application Management – OAUTH from the home page or Applications from the side navigation pane to access the Application Management page.
- Click the Edit Application icon corresponding to your OAuth app.
- Update the Callback URLs field with the callback URL you copied from your Identity Service.
- Click Update.
- Close Domino REST API.
- Send the copied callback URL to the Domino REST API administrator and request to update the callback URL of the OAuth app.
- Get confirmation that the callback URL of the OAuth app is already updated before proceeding with verifying your Identity Service.
Verify if configured Identity service works
Note
Ensure the callback URL in the OAuth app you are using has been updated before performing this procedure.
- Log in to Volt Foundry.
- On the Apps page, click your Volt Foundry app.
- On the Identity tab under Configure Services, click your Identity Service.
- Click Test Login to verify if the configured Identity service works.
- If the configuration works, you might need to enter your Domino credentials in the HCL Domino Login dialog and click Login. In the Permission Requested dialog, click Allow. You might also only see the Permission Requested dialog without needing to enter anything.
- If the configuration doesn't work, an error message is shown.
Add an environment
- On the left pane on the Volt MX Foundry Console, click Environments.
- On the Environments page, click Add New. The Add a New Environment dialog opens.
-
In the Environment Name text box, enter an environment name.
Note
Your environment name can only contain letters, numbers, and hyphens (-). A hyphen can't appear at the beginning or at the end of a name. A number can't appear at the beginning of a name. A name should be a minimum of three characters and a maximum of 20 characters long.
-
On the Server tab, enter the URL of your Volt Foundry in the URL text box. The URL format is:
<http or https>://<server_host>:<server_port>For example:
http://mbaastest30.hcl.net:53504 -
Click Test Connection to verify that the entered URL is correct. If the test is successful, a check mark appears beside the Server tab.
-
Click Save.

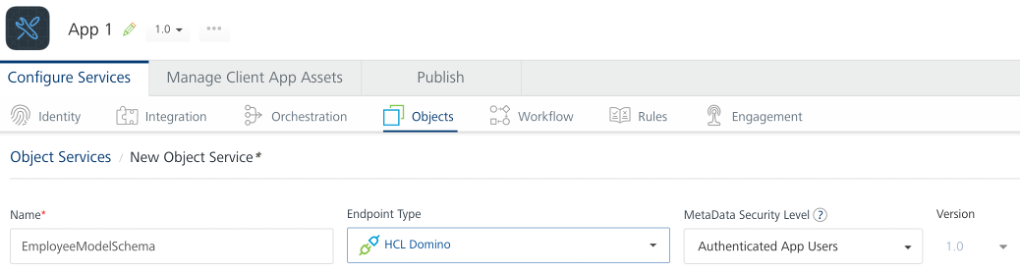
Configure an object service for Domino
- In the left pane on the Volt MX Foundry Console, click Apps.
- On the Apps page, select the app you created.
- Go to Configure Services → Objects, and then click Configure New.
- Enter the object service name in the Name text field. For example,
EmployeeModelSchema. - Select HCL Domino under Business Adapters for the Endpoint Type.
-
Set the Metadata Security Level to Authenticated App Users to restrict the download of object service metadata to users that have successfully authenticated using the Identity Service.
-
Under Connection Parameters:
- Enter the Domino REST API server URL in the Domino REST API Base URL text field.
-
Enter a value in the Connection Timeout text field. By default, the value is set to 30 ms.
Note
The Connection Timeout is the period for waiting for a new connection to happen before aborting the connection attempt, and is in milliseconds.
-
Enter true or false in the Return documents from Bulk Update text field. By default, the value is set to true.
Note
Entering true in the Return documents from Bulk Update text field ensures the return of documents updated using the BULK UPDATE method. For more information, see Methods.
Tip
To test the connection parameters, select the environment you added from the Select an Environment drop-down list and then click Test Connection. You will see a Connection Successful message if the configured connection parameters are correct.
-
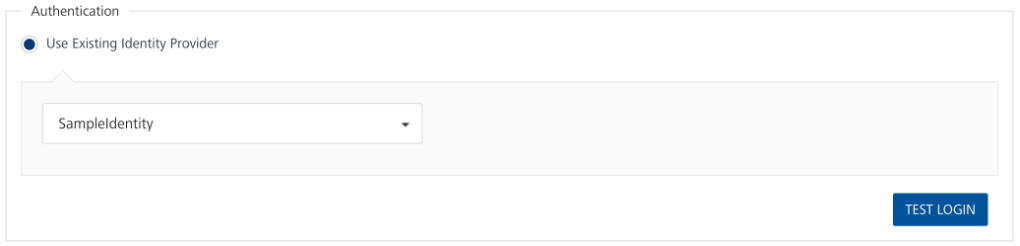
Under Authentication:
- Select the Use Existing Identity Provider radio button.
- Select the identity service you configured in the drop-down list.
Tip
Click Test Login to test the authentication. If the configuration works, you might need to enter your Domino REST API administrator username and password in the Domino REST API login dialog and then click Allow in the Domino REST API Access consent required dialog. You might also only see the Permission Requested dialog without needing to enter anything. A Test Login Successful message is then displayed.
-
Click Save and Configure.
Generate a data model
- On the Data Model tab, click Generate.
- In the Domino REST API Access consent required dialog, click Allow. The Import Objects from Backend dialog appears.
-
Expand the scope, Forms, View Entities, and Other Metadata.
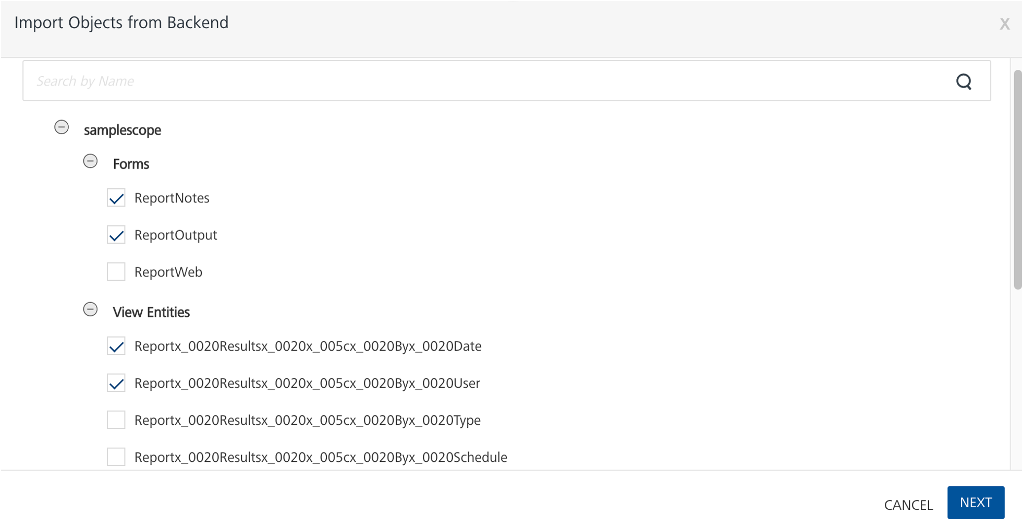
Tip
Use the Other Metadata in cases where you want to request Domino information not included in Domino data documents but still necessary for creating a Domino application in Volt MX Go. For more information, see Other Metadata.
-
Select the checkboxes corresponding to the forms and view entities you want to import.
-
Click Next. The BACKEND OBJECT NAME and DATA MODEL OBJECT NAME of the selected forms and view entities are shown.
Tip
- You can change the data model object names of the selected forms and view entities.
- For more information on naming limitations, see Known limitations.
The example image shows the data model object names after being renamed. It also shows the
UserInfo, which is an Other Metadata.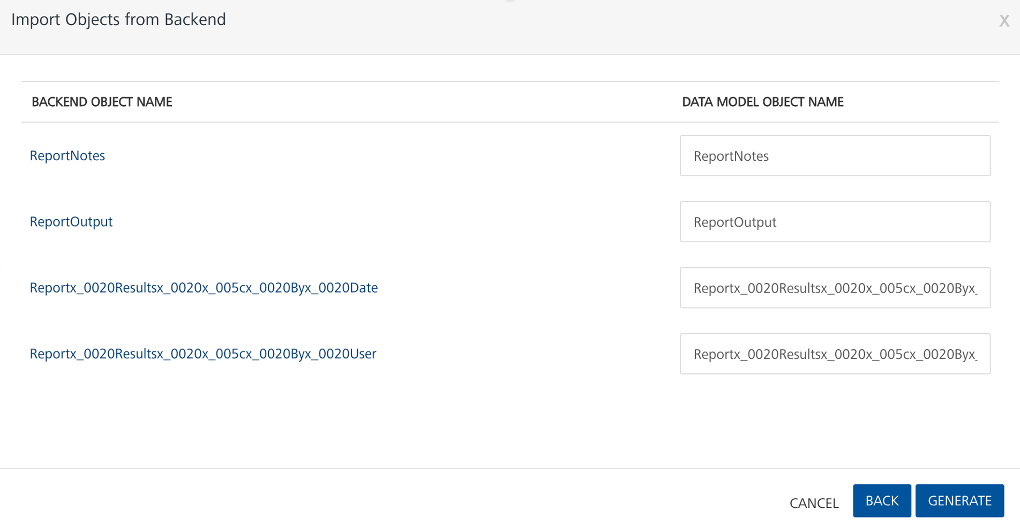
-
Click Generate. The forms and view entities are now added to the Data Model.
Test methods for interacting with the data model
The following produres enable you to test the different methods for interacting with the configured data model.
Note
There are some special characters that you cannot use as string values when performing the methods for interacting with the data models. For more information, see Special characters.
Test the GET method by viewing a record
- Click the Mapping tab, and then click the expand icon corresponding to a data model name to display a list of available methods.
- From the list, click GET.
- Expand the base mapper1, and then select the Test tab.
-
Click Send.
All records are displayed on the Response console.
-
Click Save after viewing.
To view a filtered record
- Expand the base mapper1, and then select the Test tab.
-
Enter a query parameter in the Enter the Query Params text box.

-
Click Send.
The record is displayed on the Response console.
-
Click Save after viewing.
For more information on supported parameters, see Supported OData query parameters for form-based GET method and Supported OData query parameters for view-based GET method.
Test the POST method by creating a record
- Click the Mapping tab, and then click the expand icon corresponding to a data model name to display a list of available methods.
- From the list, click POST.
- Expand the base mapper1, and then select the Test tab.
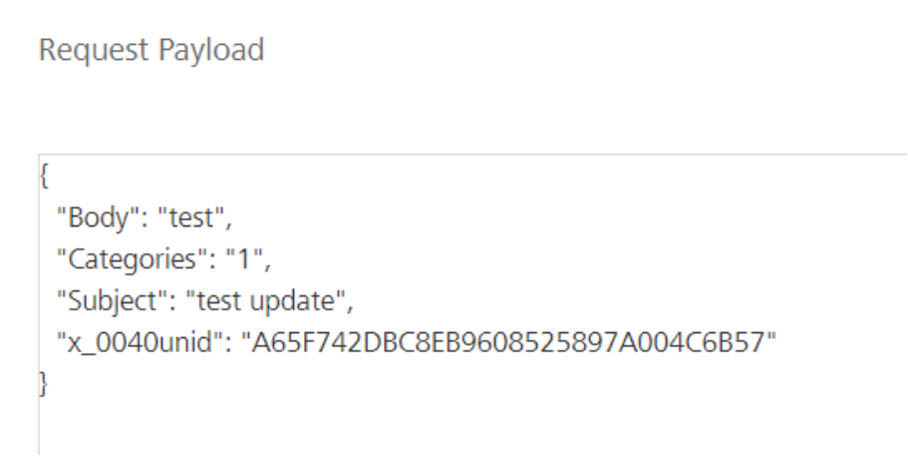
- In the Request Payload, the fields of the data model should be displaying.
-
Beside the fields, input the values, then click Send.
The ID of the record is displayed on the Response console after the successful insertion of the record.
Tip
Save the ID for updating or deleting the record using PUT or DELETE method, respectively.
-
Click Save after viewing.
Test the PUT method by updating a record
- Click the Mapping tab, and then click the expand icon corresponding to a data model name to display a list of available methods.
- From the list, click PUT.
- Expand the base mapper1, and then select the Test tab.
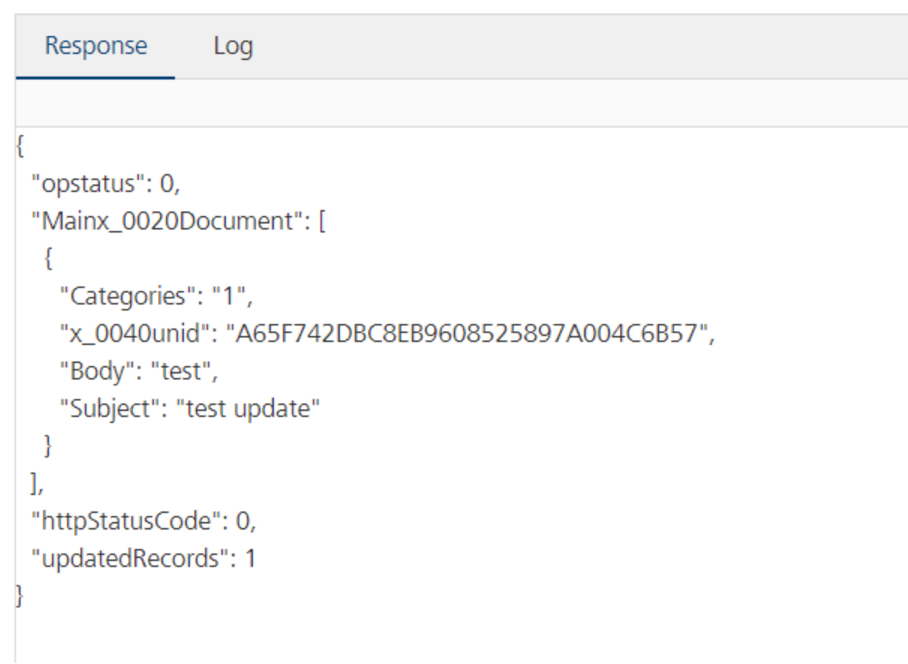
- In the Request Payload, the fields of the data model should be displaying.
-
Beside the fields, input the updated values, then click Send.
Note
All fields, updated or not, must be specified to maintain the fields in the note after the update.
The Response console shows the fields with updated values and the number of updated records.
-
Click Save after viewing.
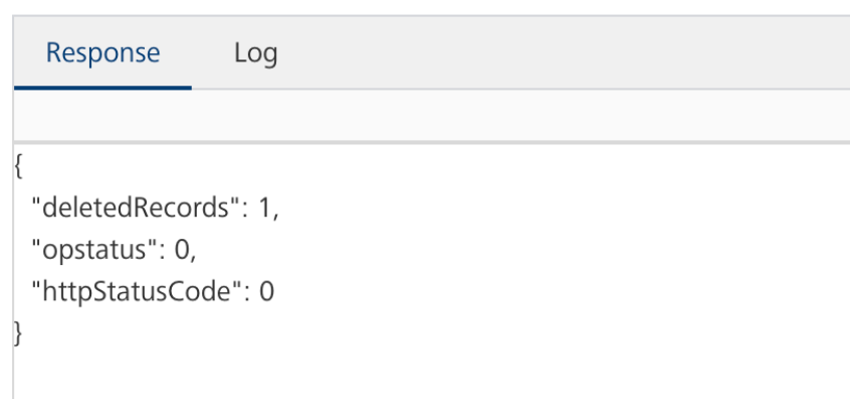
Test the DELETE method by deleting a record
- Click the Mapping tab, and then click the expand icon corresponding to a data model name to display a list of available methods.
- From the list, click DELETE.
- Expand the base mapper1, and then select the Test tab.
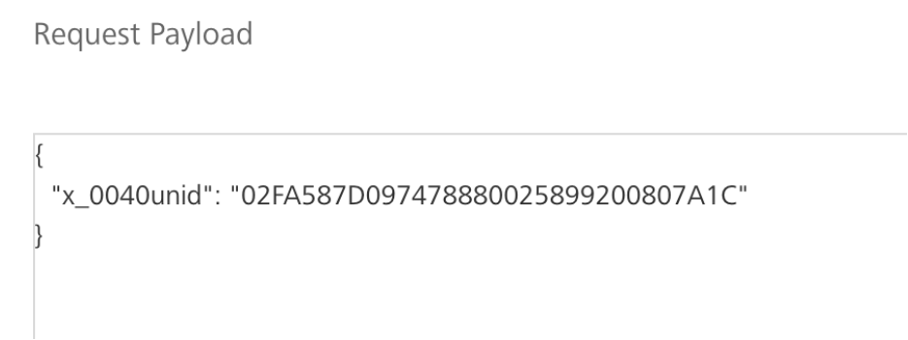
- In the Request Payload, the field of the data model should be displaying.
-
Beside the field, input the ID of the record to be deleted, then click Send.
The Response console shows the number of deleted records.
-
Click Save after viewing.
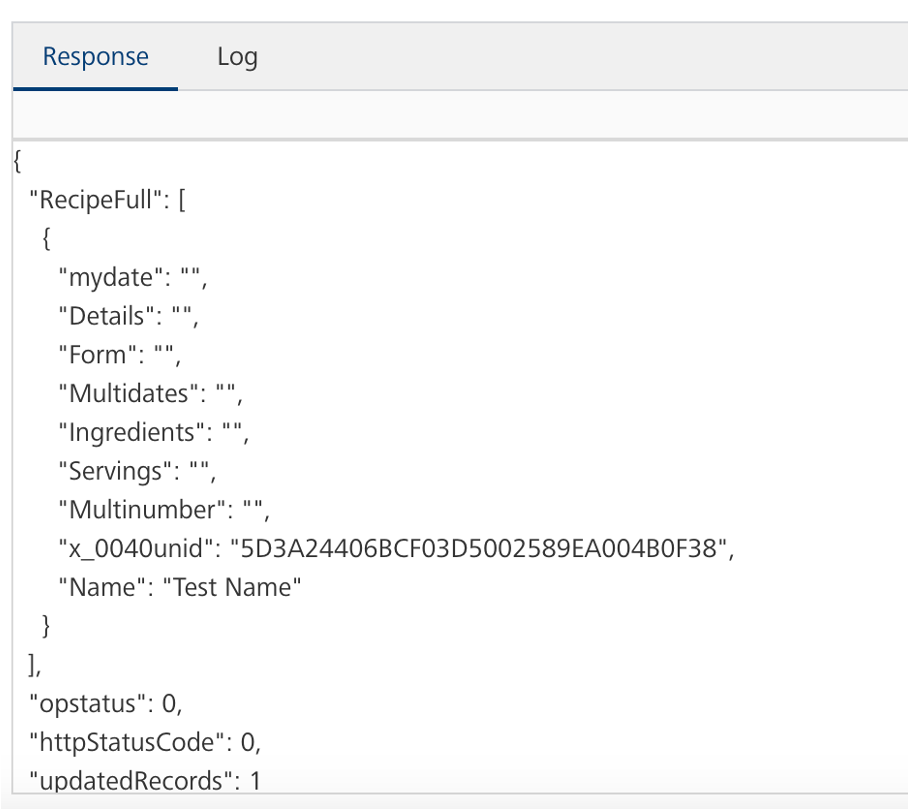
Test the PATCH method by updating a record
- Click the Mapping tab, and then click the expand icon corresponding to a data model name to display a list of available methods.
- From the list, click PATCH.
- Expand the base mapper1, and then select the Test tab.
- In the Request Payload, the fields of the data model should be displaying.
-
Beside the fields, input the updated values, then click Send.

The Response console shows the fields with updated values and the number of updated records.
-
Click Save after viewing.
Test the BULK UPDATE method for updating a collection of records
- Click the Mapping tab, and then click the expand icon corresponding to a data model name to display a list of available methods.
- From the list, click BULK UPDATE.
- Expand the base mapper1, and then select the Test tab.
-
Enter a
$filterODATA query parameter in the Enter the Query Params text box.Important
You must use the $filter ODATA query parameter to tell Domino REST API which documents to update. Otherwise, an error occurs.
In the following example image,
$filter=Subject eq ‘old subject’is used as the ODATA query parameter.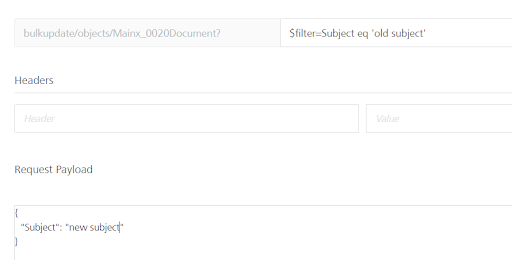
-
In the Request Payload, specify the field to update and the updated value, and then click Send.
The Response console shows all the documents with the specified field having the updated value. As shown in the example image,
Subjectis the updated field with an updated value ofnew subject.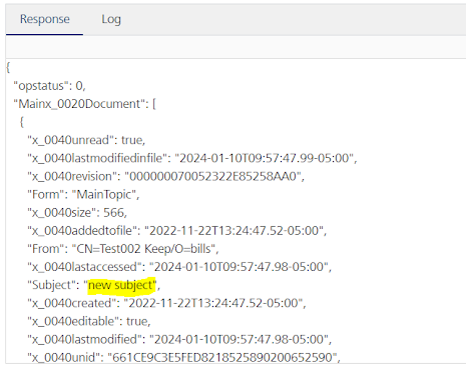
-
Click Save after viewing.