Schema Management
Overview
The Schema Management page in the Admin UI allows you to define, view, and modify schemas, which determine what data is accessible via the REST API for reading and writing.
The schema is the shape of data available and is a JSON file in the design resources of the Domino database. It gets created by a developer with Designer access to the Domino database. This creates an alias to the schema. This, along with a scope, provides access to the database via the Domino REST API. One Domino database can have multiple schemas, which is useful to provide different data sets or different levels of access to data.
For more information on schemas, see Schema and Scope.
Access Schema Management
- Log in to the Admin UI.
-
On the home page, select Database Management - REST API to open the Schema Management page.
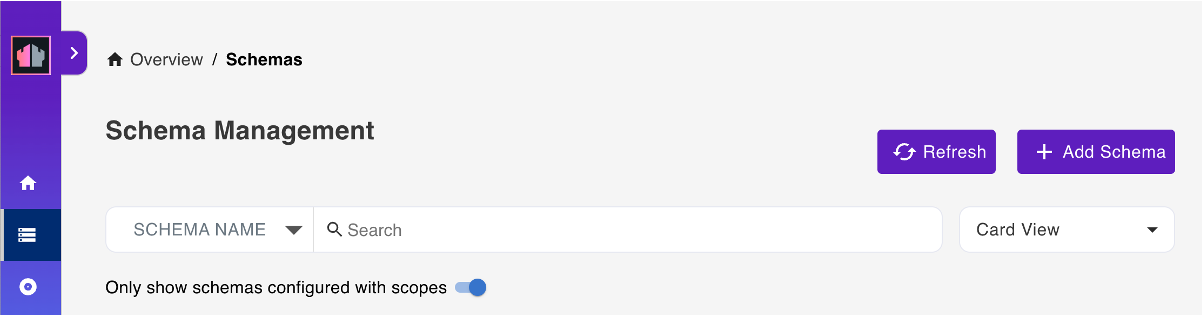
You can also access the Schema Management page by clicking Schemas in the side navigation pane.
View schemas
On the Schema Management page, you can see existing schemas in different layouts:
- Stack View
- Card View
- Alphabetical View
- NSF View
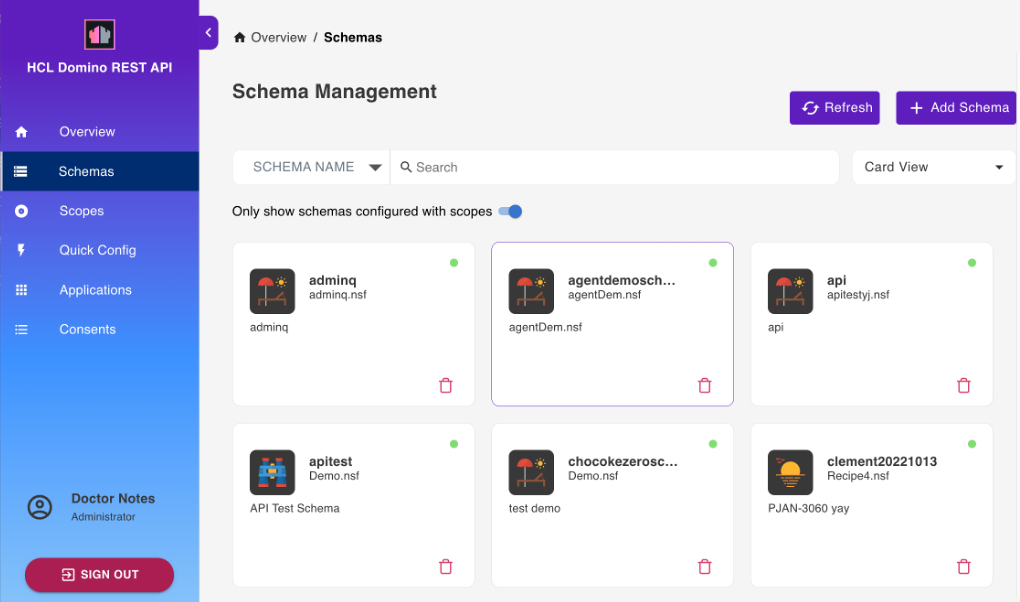
Use the Search field and the search filter to find schemas by Schema Name or by NSF Name.
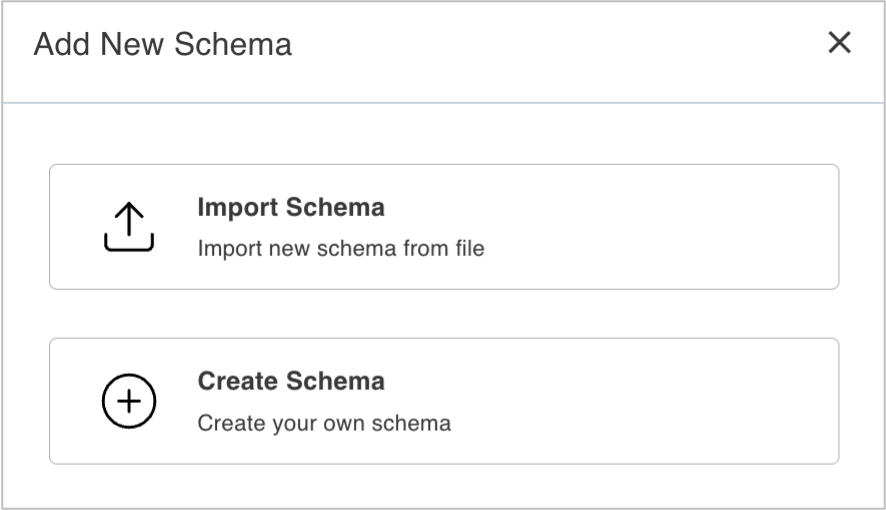
Add a schema
You can add a schema by creating your own schema or importing a schema.
-
On the Schema Management page, click Add Schema.
-
In the Add New Schema dialog, click Create Schema.
-
In the Create Schema dialog:
-
Select a database from the Database drop-down list.
You can also enter the database name in the Database field to filter the list of available databases.
-
Select an Icon.
- Enter a Schema Name and a Schema Description.
- Click Save Schema.
-
Use this option if you want to import a new schema from a JSON file produced by exporting database schema as JSON file.
- On the Schema Management page, click Add Schema.
- In the Add New Schema dialog, click Import Schema.
-
Select the JSON database file and click Open. The JSON database file is the exported file from another database or within your server.
-
In the Import Schema dialog:
- Choose the
.nsfdatabase file from the Import Into Database dropdown list. The default.nsfis from the imported database JSON file. - Update the Icon, Schema Name, Schema Description, and Formula Engine as needed.
- Click Save Schema.
- Choose the
The nsf database file and schema are added to the schema list.
Note
The imported schema name must be unique. You'll be warned if you try to save a schema to a database that already has a schema with the same name.
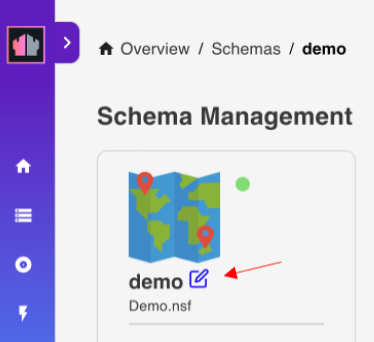
Edit a schema
- On the Schema Management page, select the schema you want to edit.
-
In the schema details card, click the edit icon.
-
In the Edit Schema dialog, you can:
- Select a new icon from the drop-down icon list.
- Update the Description field.
-
Enter a valid Notes formula in DQL Formula to limit DQL usage.
The formula must evaluate to
@Truefor DQL to be allowed. The default is@True, which means no limitations. -
Update the Configuration settings.
Configuration setting Description DQL Access Allows DQL queries to run against the elements of the schema. A mode named dqlmust be created on each form specifying the fields allowed for that form.In $DATA Scope Makes the schema available in the system $DATAscope. Disable to limit access to the schema to those with the specific scope.Enable Code feature under development Require Revision Requires the provision of the correct revision version of the document to update the document through an update endpoint. Prevent Design Refresh Flags the schema written to the database, so the Domino design task won't replace or delete the schema. 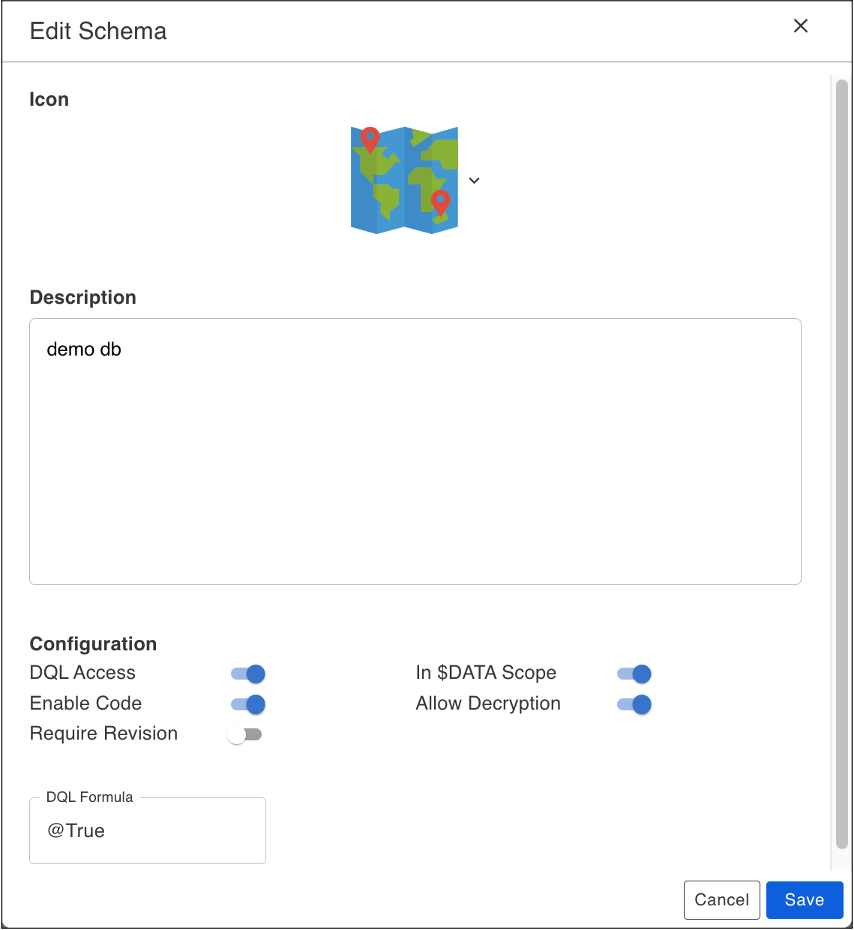
-
Click Save.
Delete a schema
- On the Schema Management page, select the schema you want to delete and click the Delete Schema icon.
- In the confirmation dialog, click Yes.
List database forms
On the Schema Management page, select a schema. The Database Forms tab is displayed by default showing all the forms for the selected schema.
You can click the Show Active toggle to the on position to only show active forms.
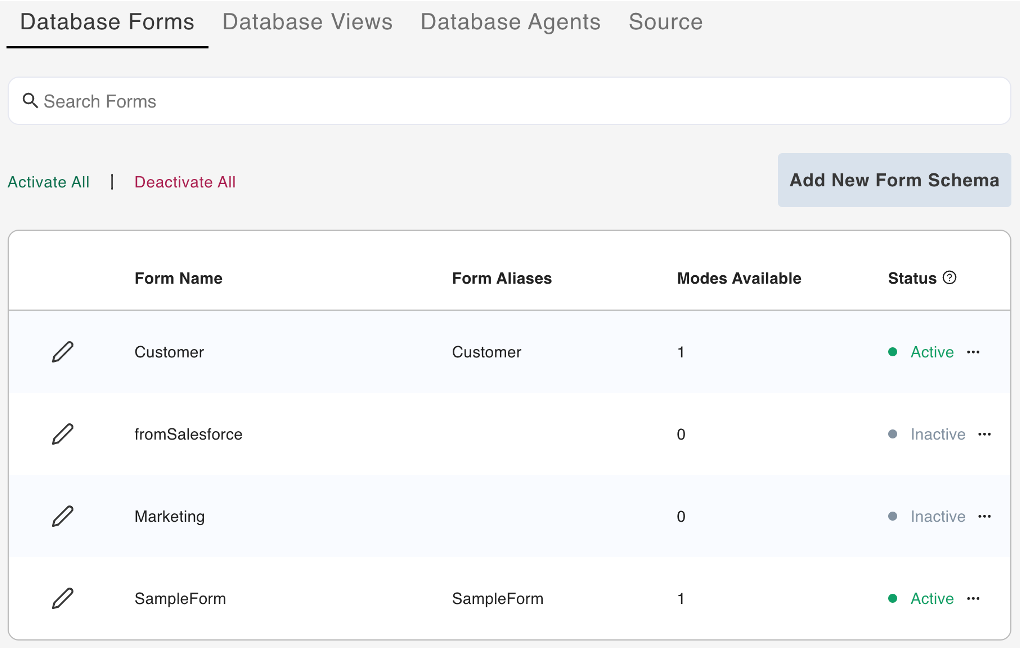
Add new form schema
The Add New Form Schema feature enables the creation of a new custom form through which you can set up a schema. The feature doesn't create a new form on the backend, so it won't exist in the database. Everything related to the new form is contained within the schema. Therefore, if you delete the form, it's only removed from the list of forms on the Database Forms tab.
- Click Add New Form Schema.
- In the Add New Form Schema dialog, enter your schema name and click Create.
- On the Schema Management - <schema name> page, select a form from the Show fields from dropdown field to display the fields of the selected form. You can also select All Fields from the dropdown field to display all the fields from all the available forms.
- Select the fields that you want to add to the mode.
- Configure the Field Setting and Mode Settings as needed for each added field.
- Click Save.
The new form is now added to the list of forms and has an Active status.
Note
- Created custom forms can't be deactivated and can only be deleted. To delete, click the menu icon beside the form's status, select Delete, and click Yes in the confirmation dialog.
- You can identify a custom form by the marker beside the form name and by the custom form text below the form name.
Activate a form
You can activate forms one at a time or simultaneously.
Select the form that you want to activate, click the corresponding menu icon beside the form's status, and then select Activate. The activated form now has an Active status.
Tip
To deactivate a form, click the menu icon and select Deactivate. In the confirmation dialog, click Yes. The form now has an Inactive status.
Click Activate All. All forms are now activated with default settings and have Active status.
Tip
-
Clicking Deactivate All deactivates all active forms and removes all the configurations you have made to each of the forms. In the confirmation dialog, click Yes to confirm. All forms now have an Inactive status.
-
Clicking Deactivate All won't deactivate forms created using the Add New Form Schema feature.
Change form configuration
-
On the Database Forms tab, click the pencil icon corresponding to the activated form that you want to edit.

Note
Clicking the pencil icon corresponding to an inactive form shows the Activate Form dialog, which requires you to confirm the activation of the form. If you click OK, the form is activated, and you are directed to the form Access Mode page.
The Access Mode page opens showing the
defaultaccess mode.
-
Under Show fields from, hover over a field item and click the + icon. This adds the field in the form. Repeat this for all the fields to be added.
Tip
- Click Add All Fields icon to add all the available fields to the form.
- Click Refresh List of Fields icon to refresh the list of available fields.
- Use the Search Field search box to search for a field by field name.
- Hover over the Info icon beside the field name to show the field property. The field can be editable, which means that the field has Read/Write access setting. The field can also be either computed, computed when composed, or computed for display, which means that the field has Read Only access setting.
- Enter a custom field name in the Add custom field and click the + icon to add a custom field to the form.
- Click Delete Fields, select the fields to remove, and then click Remove to remove the selected fields from the form.
-
Under Field Setting, you can set the Field Name, Field Type, and the read or write access of the field in the form.
Tip
- Click the Multi-Value toggle to the on position to specify a Field Group. The Multi-Value toggle isn't clickable to the off position if you specified a field group.
- Click the Required toggle to the on position to specify that the field is a required field. When set to the on position, the word Required is added below the name of the field in the added field list.
- When you add a datetime field to a form schema, ensure that you select the appropriate field type. For more information, see Set the correct field type for a datetime field.
Encryption feature
The encryption feature is available starting from the Domino REST API v1.1.0 release. Make sure to set up Domino REST API for encryption, decryption, and signing before executing the following steps for encryption and signing.
Click the Encrypt toggle to the on position to enable encryption. For more information on encryption and signing, see Using encryption, decryption, and signing during development.
-
Under Mode Settings:
-
Click the pencil icon corresponding to a mode formula. A dialog opens.
The following image shows the opened Formula for Delete Access dialog.
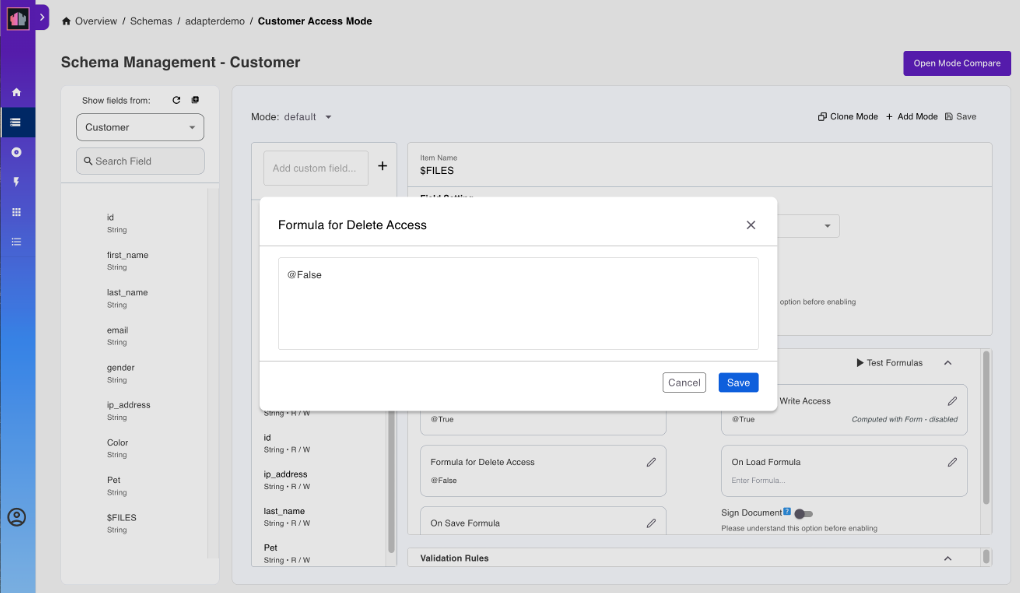
-
In the text field in the dialog, edit the
@Trueor@Falseentry and click Save to close the dialog.
Tip
- You can configure the Formula for Write Access to be computed with form. For more information, see Set computed with form.
- As a provided option, you may test the formula using the Test Formulas.
Signing feature
The signing feature is available starting from the Domino REST API v1.1.0 release. Make sure to set up Domino REST API for encryption, decryption, and signing before executing the following steps for encryption and signing.
Click the Sign Document toggle to the on position to enable this feature. For more information on encryption and signing, see Using encryption, decryption, and signing during development.
-
-
(Optional) Under Validation Rules:
- Click Add Rule if you want to add a validation rule to validate the value of a field. The Add Rule dialog opens.
- Enter the validation formula in the Formula field and the error message in the Error Message field.
- Click Add.
Example of validation rule
The image shows an example of an added validation rule requiring that the value of the
first_namefield must be Adam.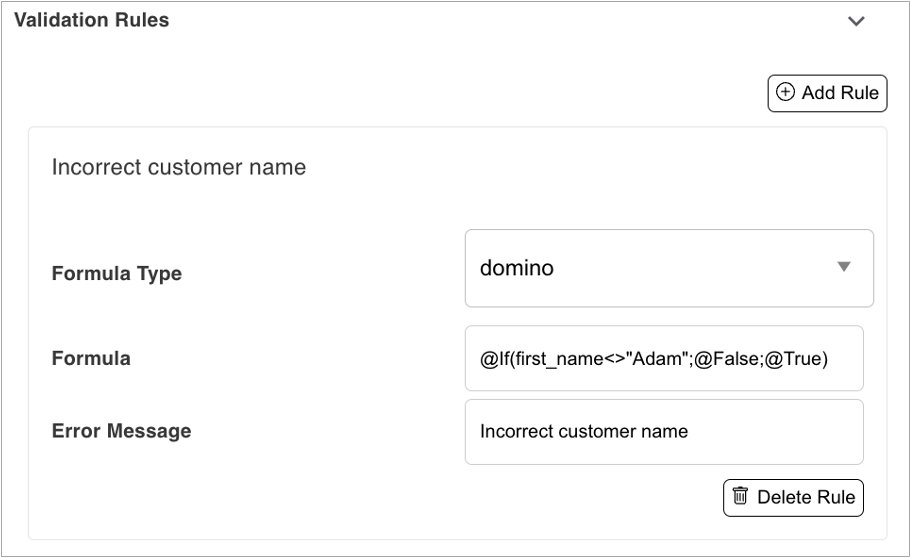
Tips for validation rules
- You can add a validation rule for each field you added to the database form.
- To delete a validation rule, select the validation rule and then click Delete Rule. In the confirmation dialog, click Delete.
-
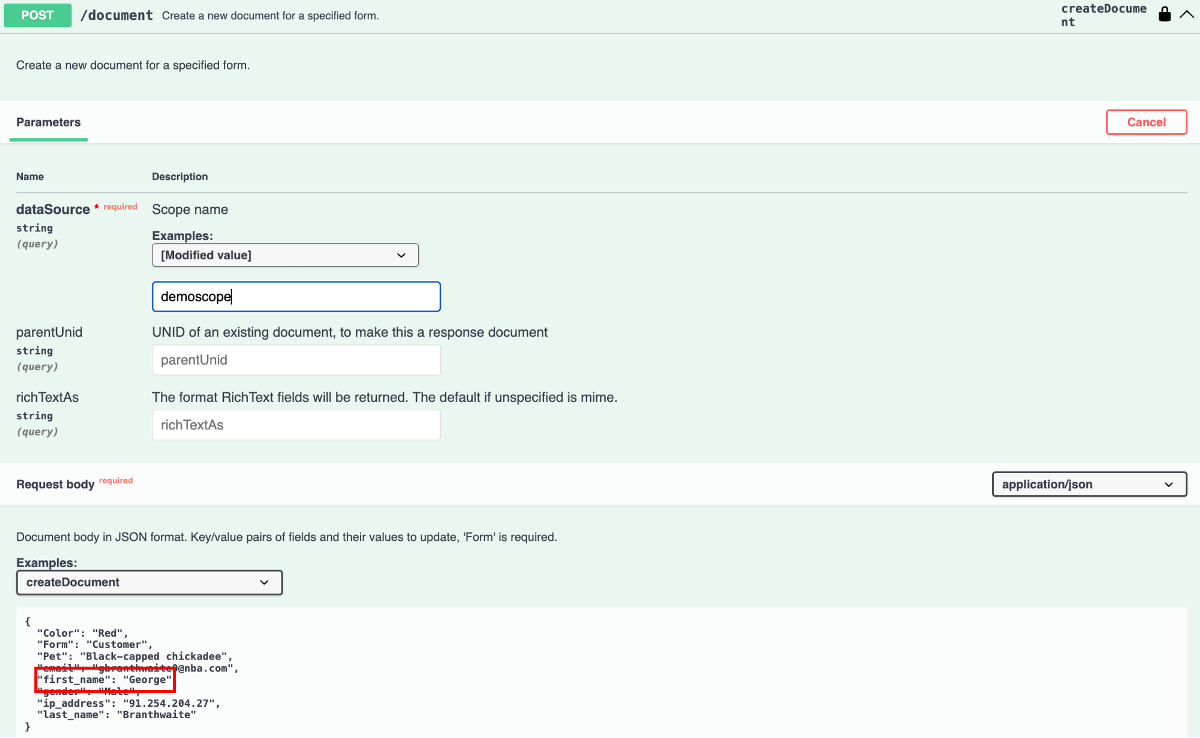
You can go to OpenAPI to check if the added validation rule works. As an example, an error occurs showing the provided error message when creating a document with the
first_namefield having a value of George since it is not equal to the value set by the formula, which is Adam.The image shows the document being created with an incorrect value for the first_name field. Click the image to enlarge it.
The image shows the error message. Click the image to enlarge it.

-
Click Save.

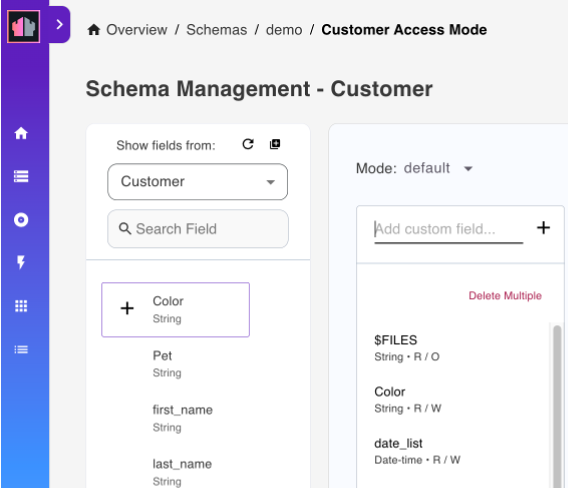
Add a mode
- On the Database Forms tab, click the pencil icon corresponding to the activated form that you want to add a mode. The form Access Mode page opens showing the
defaultaccess mode. - Click Add Mode.
-
In the Add New Mode dialog, enter the name of the new mode and click Save. The new mode has been added to the
Modelist.The following image shows an example of the added mode, which is the
dql.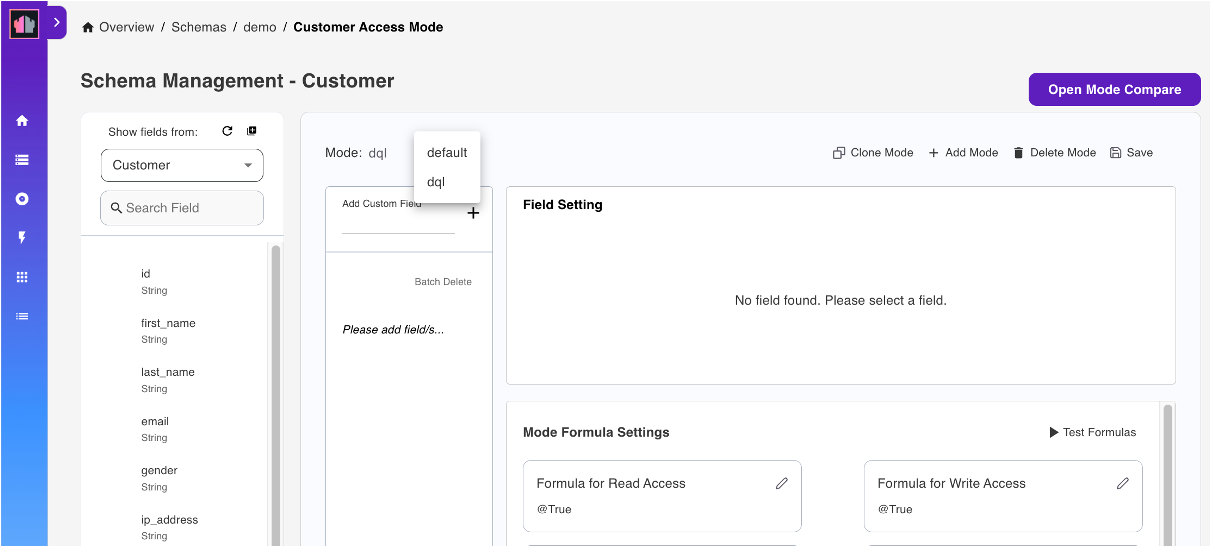
-
Add fields and set the read or write access formula for each of the added fields.
- Click Save.
Clone a mode
Use Clone Mode to add a new mode based on an existing mode in the same schema.
- On the Database Forms tab, click the pencil icon corresponding to the activated form that you want to clone a mode. The form Access Mode page opens showing the
defaultaccess mode. - From the Mode dropdown list, choose the mode you want to clone, for example the
defaultmode. - Click Clone Mode.
-
In the Clone <mode name> dialog, enter the name of the mode and click Save.
The new mode cloned from an existing mode is now available. You can remove or add fields to the new mode and read or write access formula for each of the fields.
-
Click Save.
Compare modes
Use this function to see the differences between the modes of a selected form. To use this function, you must have at least two modes in your selected form.
- On the Database Forms tab, click the pencil icon corresponding to the activated form that you want to compare the modes. The form Access Mode page opens showing the
defaultaccess mode. - Click Open Mode Compare. The Mode Compare - <form name> page opens.
- Select the modes to compare from the drop-down lists in the comparison columns. The comparison result is displayed.
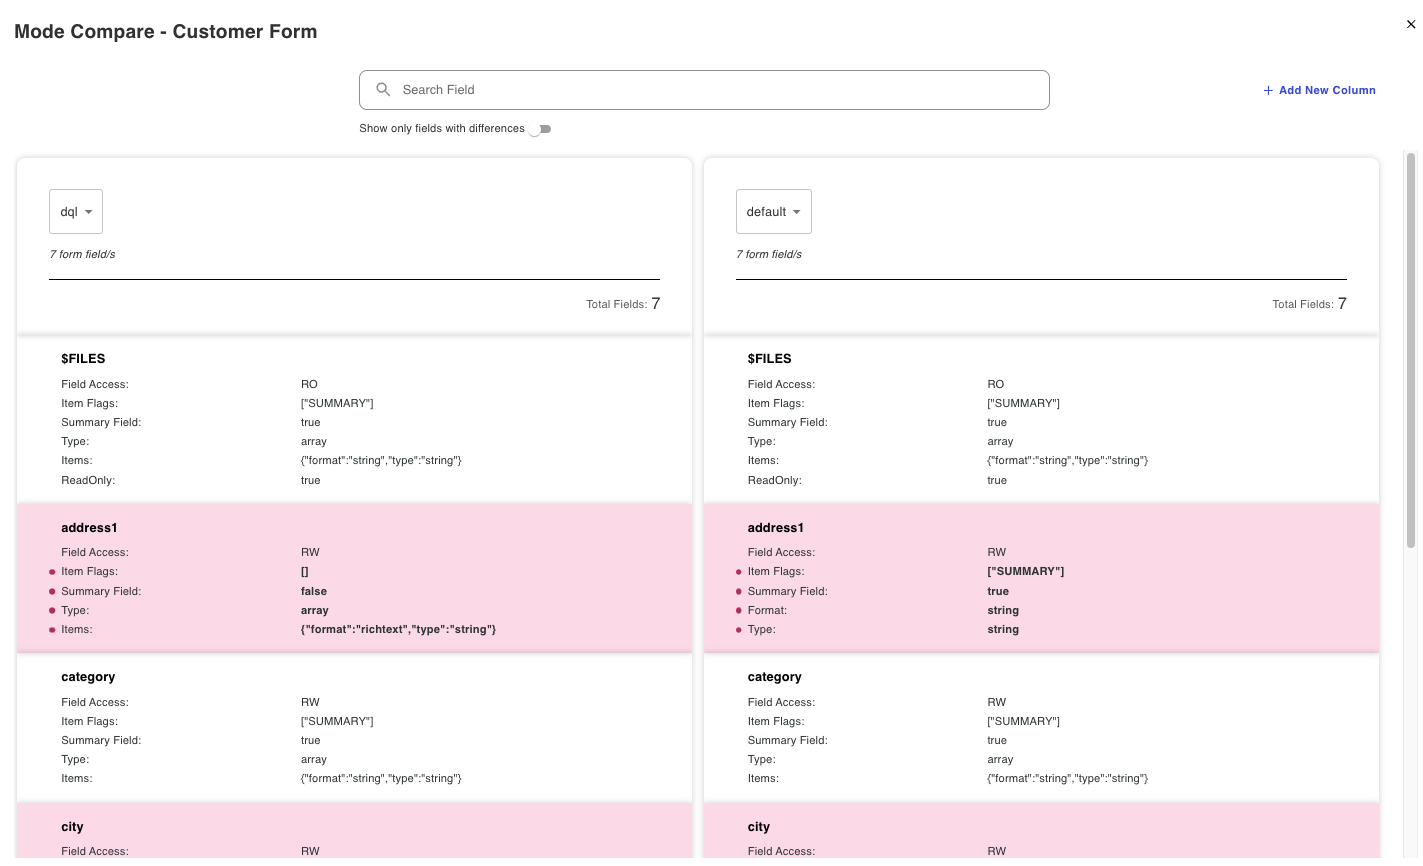
Info
- A field available in only one mode is highlighted, and then indicated as Field not existing in the other mode.
- Click the Show only fields and formulas with differences toggle to only show fields and formulas with differences.
- Fields with differences are highlighted.
- Formulas with differences are highlighted and marked with a red dot.
- In case there are too many fields, and you want to find a specific field, you can enter the field name in the Search Field to only display the specific field if available.
- Click Add New Column to add more modes in the comparison.
- Click the close icon to close the Mode Compare - <form name> page.
List database views
- On the Schema Management page, select a schema.
-
Select Database Views from the menu bar. This displays all the views for the selected database schema.
Tip
Click the Show Active toggle to the on position to only show active views.
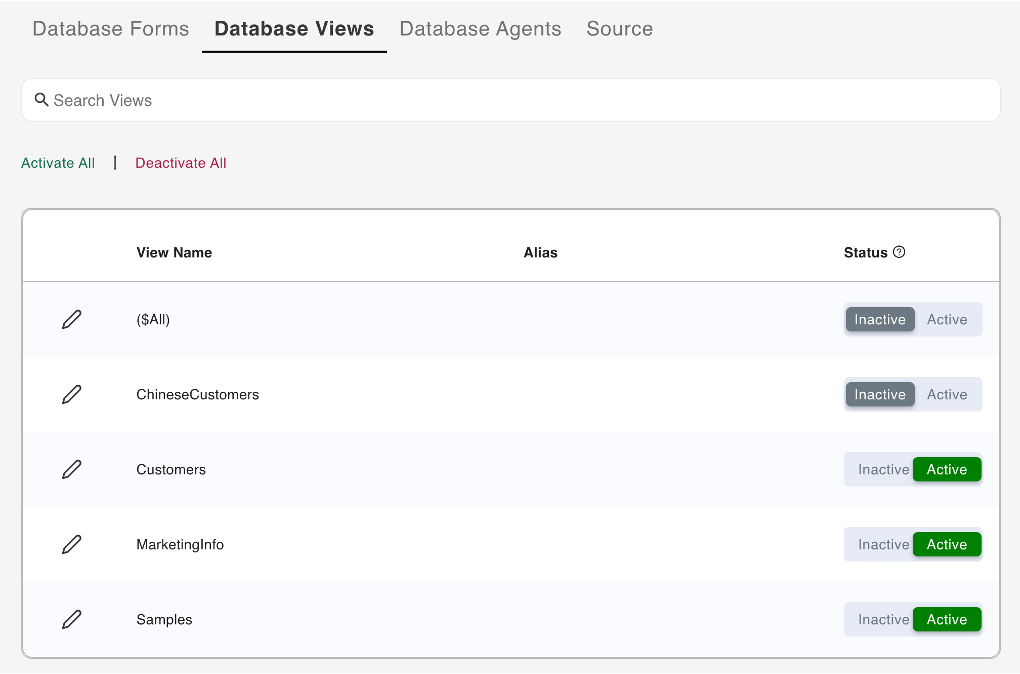
Activate a view
You can activate views one at a time or simultaneously.
Select the view that you want to activate, and then click the corresponding Active option under Status.
Tip
Clicking the Inactive option corresponding to a view deactivates the view. On the Reset Views Columns dialog, click Yes to confirm deactivation of the view.
Click Activate All.
Tip
Clicking Deactivate All deactivates all active views and removes all configurations you have made to each of the views. On the Reset ALL View Columns dialog, click Yes to confirm deactivation of all views.
Edit a view
See Edit a database view of a schema for more information.
List database agents
- On the Management Schema page, select a schema.
-
Select Database Agents from the menu bar. This displays all the agents for the selected database schema.
Tip
Click the Show Active toggle to the on position to only show active agents.
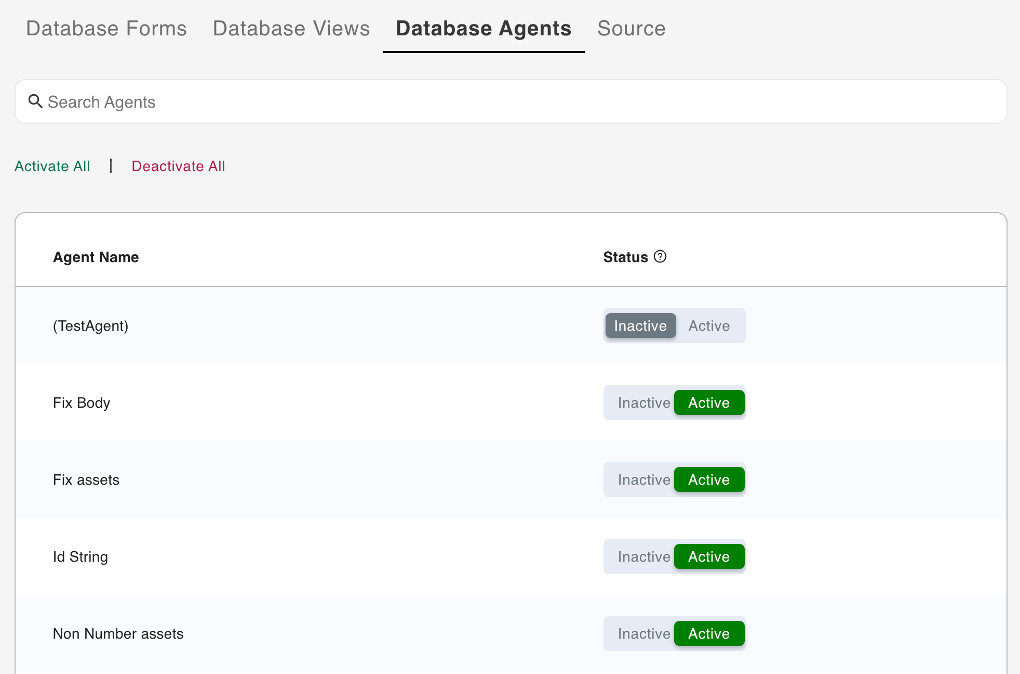
Activate an agent
You can activate agents one at a time or simultaneously.
Select the agent you want to activate, and then click the corresponding Active option under Status.
Tip
Clicking the Inactive option corresponding to an agent deactivates the agent.
Click Activate All.
Tip
Clicking Deactivate All deactivates all active agents. On the Reset ALL Agents dialog, click Yes to confirm the deactivation of all agents.
View Source
The Source tab allows you to view the database schema details in JSON format.
- On the Schema Management page, select a schema from the list of schemas to load the schema details.
-
Select Source from the menu bar to show the details for the selected schema in the following view mode:
- Text View - shows the text view of the details of the selected schema in JSON format
- Tree View - shows the collapsible view of the details of the selected schema in JSON format
Note
-
To edit the database schema JSON details, see Edit database schema JSON.
-
To export the schema in a JSON file, see Export schema as JSON file.