Set up an external IdP for Admin UI login
About this task
The task guides you in setting up an external IdP to use for logging in to the Admin UI.
Client Ids
When configuring an external identity provider using OpenID Connect (OIDC) or OIDC-idpcat with HCL Domino and the Domino REST API, you must specify a client ID. The default recommendation is to use Domino as the client ID for the Domino REST API server. However, your identity provider administrator might require a different value depending on your organization’s configuration.
A separate client ID is required to support the Admin UI. To do this, you need to configure a separate client in your external IdP. You may specify the value of the client ID, or it might depend on your organization’s IdP configuration.
Before you begin
If you are going to use Microsoft Entra ID as your external IdP:
- Make sure you have already registered an application in the Azure portal for use by the Domino REST API server. For more information, see Configure Microsoft Entra ID as IdP.
- Make sure the that scope
$SETUPis added to the registered application for use by the Domino REST API server.
Set up an external IdP
Configure an external IdP of your choice. For more information, see configuring external IdP.
Important
When configuring your external IdP, make sure to set {{ origin }}/admin/ui/callback as one of your redirect URIs.
Setup Microsoft Entra ID as external IdP for Admin UI login
Note
When configuring Microsoft Entra ID as your external identity provider (IdP), you must specify a client ID. This value must match the application (client) ID of the client application you configure in Microsoft Entra ID.
The client ID described here applies only to the Admin UI. A separate client ID (application registration) is required to support the Domino REST API server. For more information, see Configure Microsoft Entra ID as IdP.
-
Register an application.
-
Go to the Azure portal and sign in.
Tip
Make sure you’re in the correct directory. Select your profile icon in the upper-right corner of the Azure portal, then select Switch directory. Use an account in the same directory where you plan to register the application.
-
In Microsoft Entra ID, select App registrations, then select New registration.
-
On the App registrations page, enter the application registration details described in the following table.
Form input name Description Name Enter a descriptive name for the application. Supported account types Choose who can sign in. Redirect URI Specify where authentication responses should be sent.
Select Single-page application (SPA) as the platform and use{{ origin }}/admin/ui/callbackas the Redirect URI.
where:{{ origin }}is a template placeholder for the base URL where the Domino REST API server is hosted.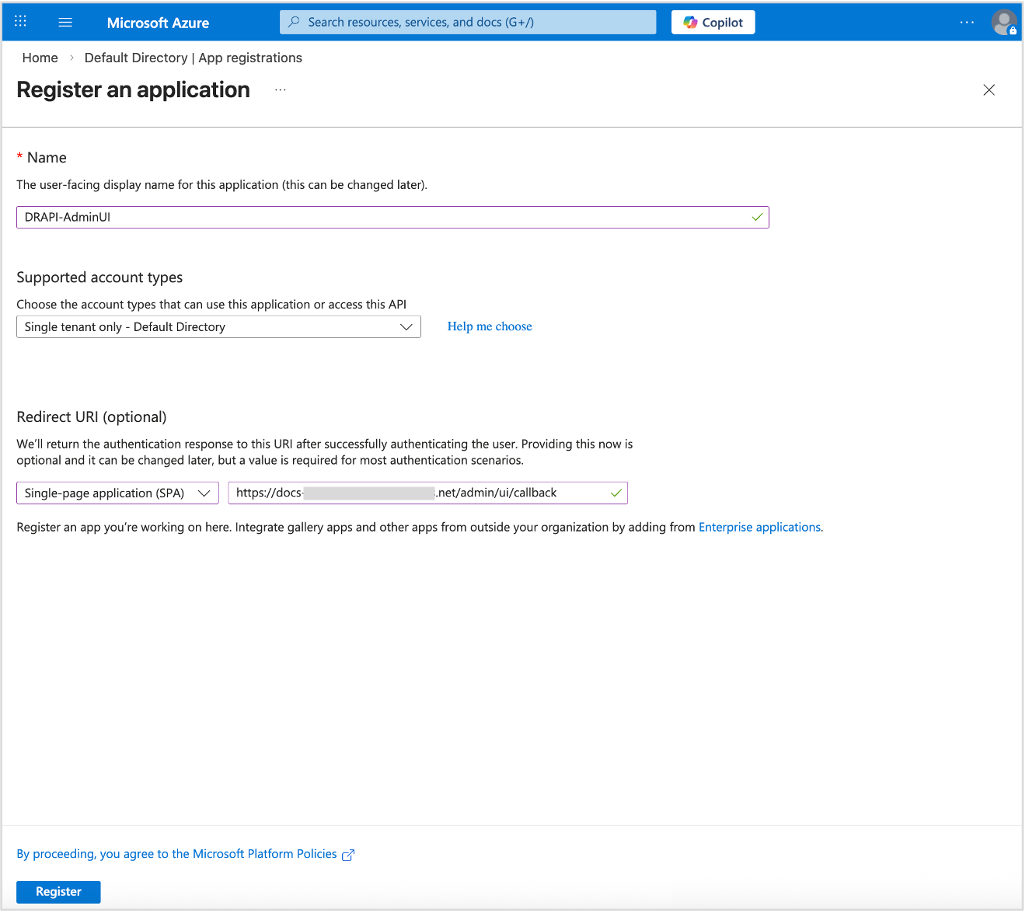
-
Click Register.
After the registration, you will see the Overview page. Take note of the value of the Application (client) ID.
-
-
Add client credentials.
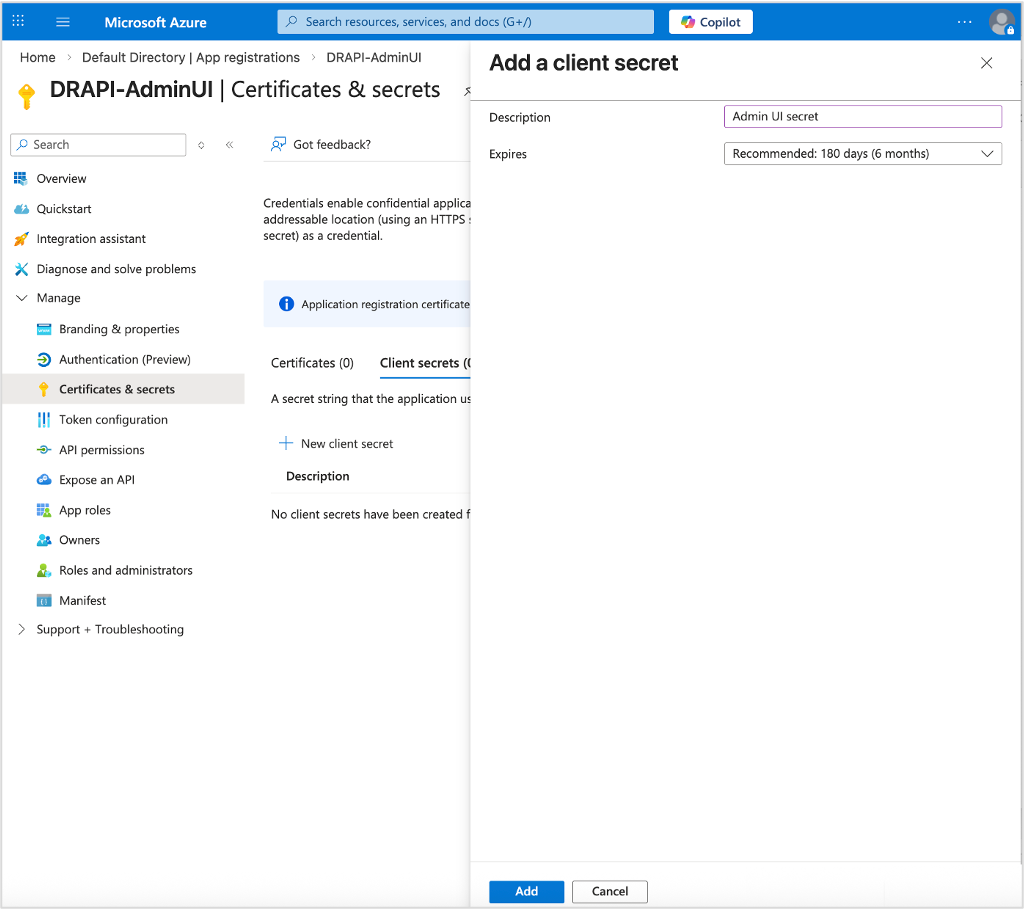
- Under Manage, select Certificates & secrets → Client secrets → New client secret.
-
Add a description for your client secret, and select an expiration for the secret or specify a custom lifetime.
-
Click Add.
-
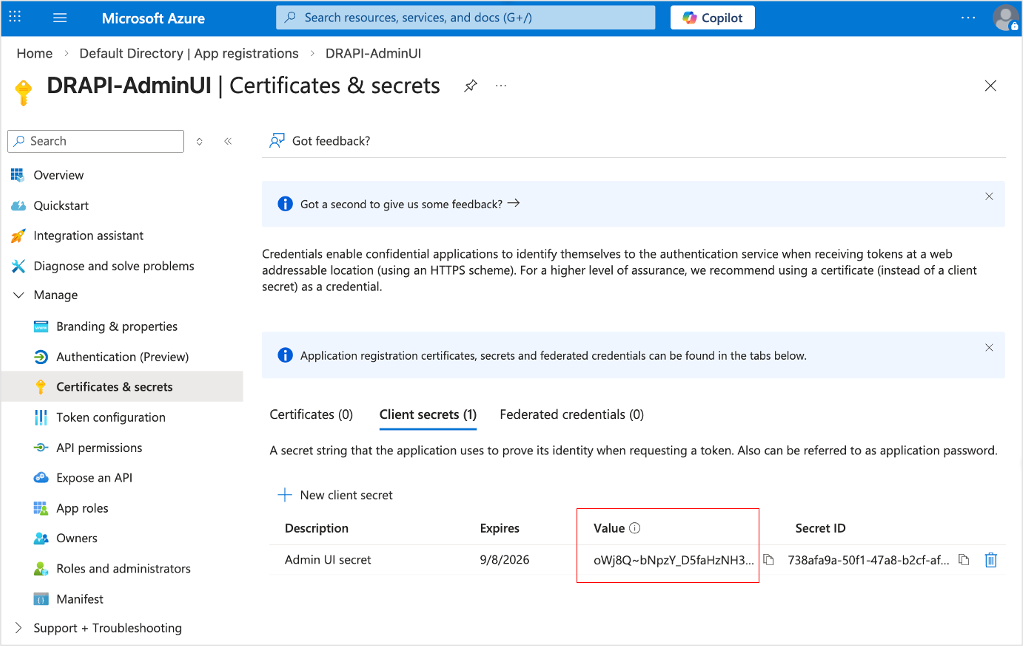
Record the client secret Value. This secret value is never displayed again after you leave the page.
-
Add the Application ID URI.
- Under Manage, select Expose an API.
-
At the top of the page, select Add next to Application ID URI.
This defaults to
api://<application-client-id>. Take note of this value as it is needed in the configuration in the Domino REST API.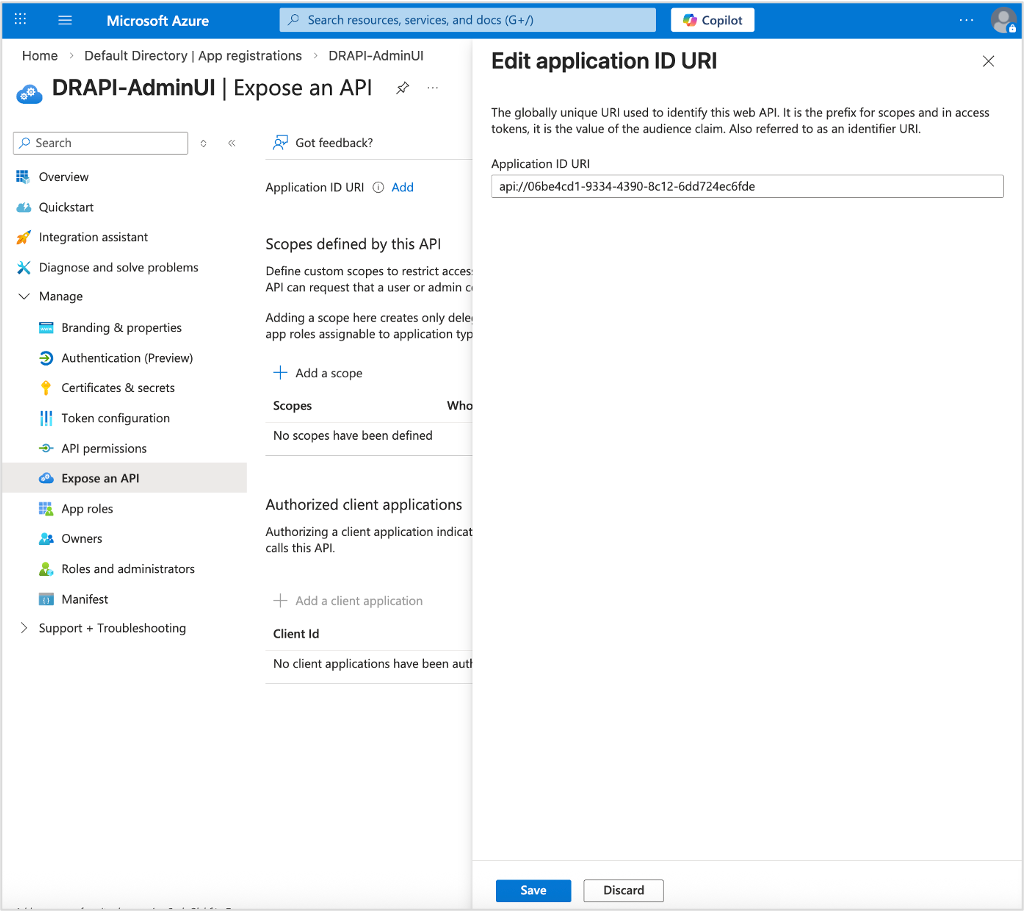
-
Configure API permissions.
- Under Manage, select API permissions. The API permissions page opens with the
User.Readpermission already configured. - Click Add a permission. The Request API permissions pane opens.
-
Select the APIs my organization uses tab, and then select the application you configured for use by the Domino REST API server from the list. See the Before you begin section for details.
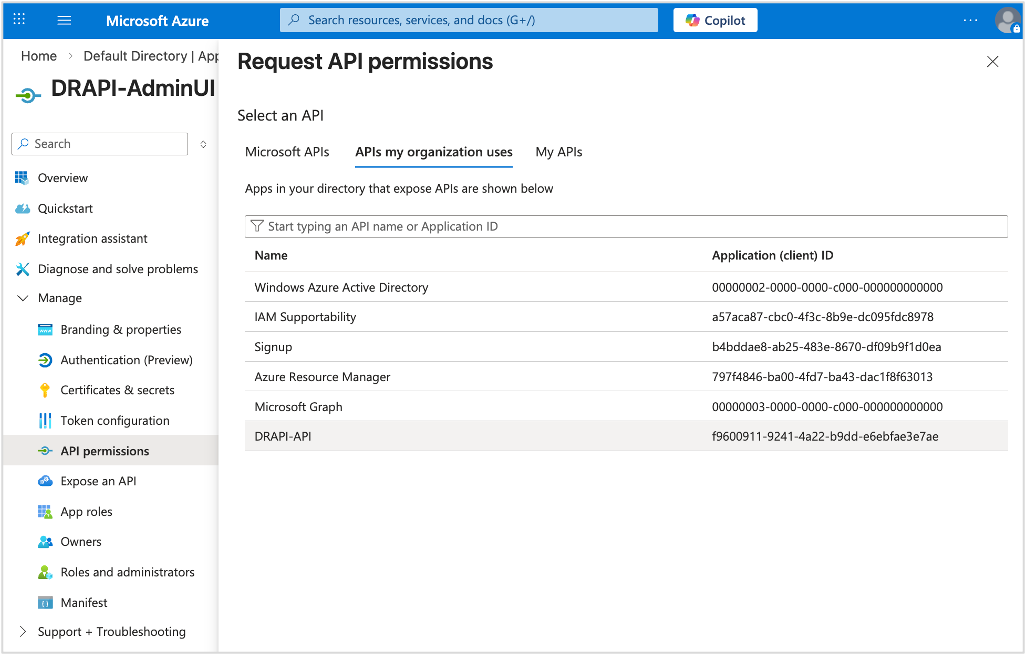
In the example image, it shows the selection of the DRAPI-API application, which is the application used by the Domino REST API server as stated in the Before you begin section.
-
Under Select permissions, select the required scopes and click Add permissions. Make sure that the scopes
$SETUPand$DATAare selected.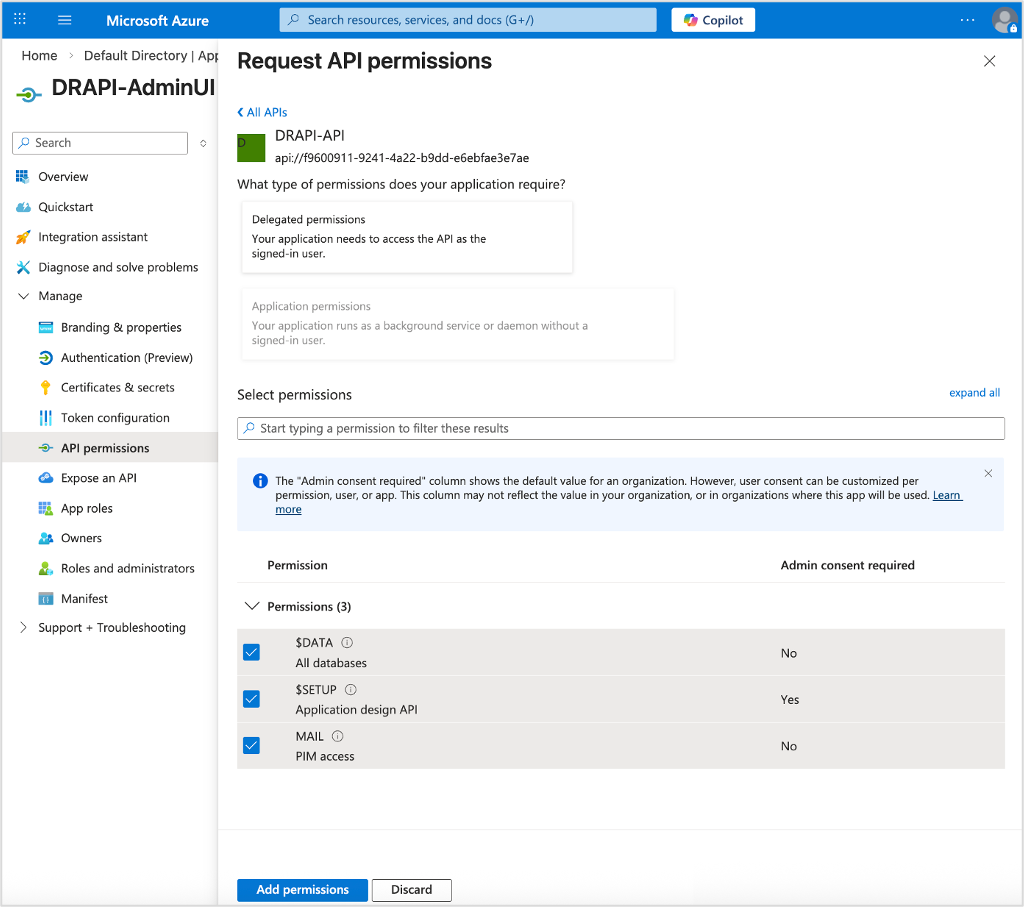
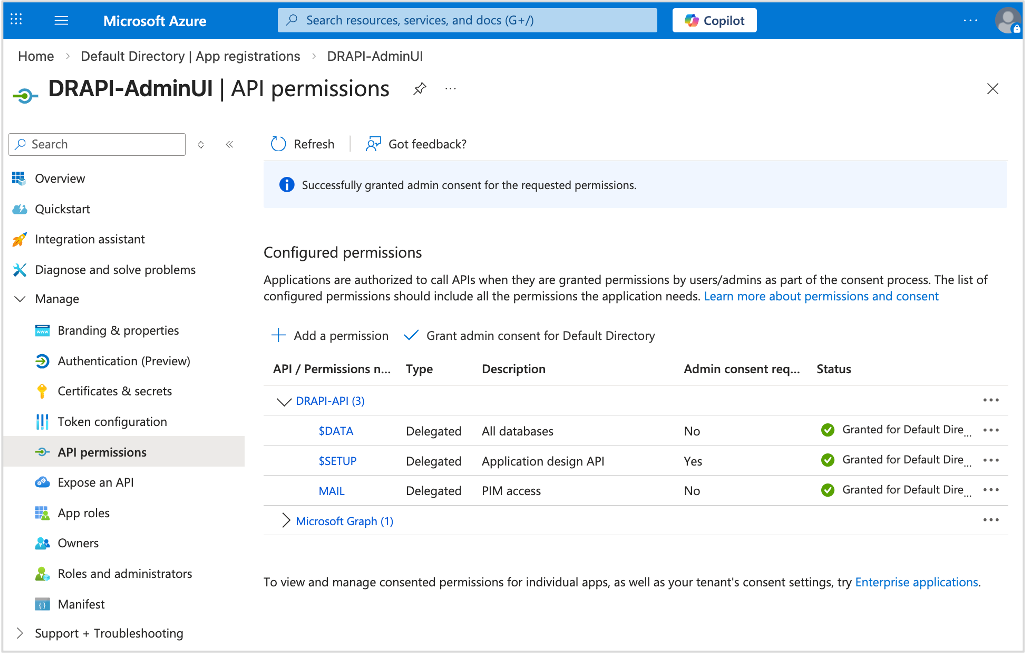
After adding permissions, you should see the selected permissions under Configured permissions on the API permissions page.
-
Click Grant admin consent for {your tenant} to grant admin consent to the permissions configured for the application.
-
In the Grant admin consent confirmation dialog, click Yes. After granting consent, the permissions that required admin consent are shown as having consent granted.
- Under Manage, select API permissions. The API permissions page opens with the
-
Assign an owner.
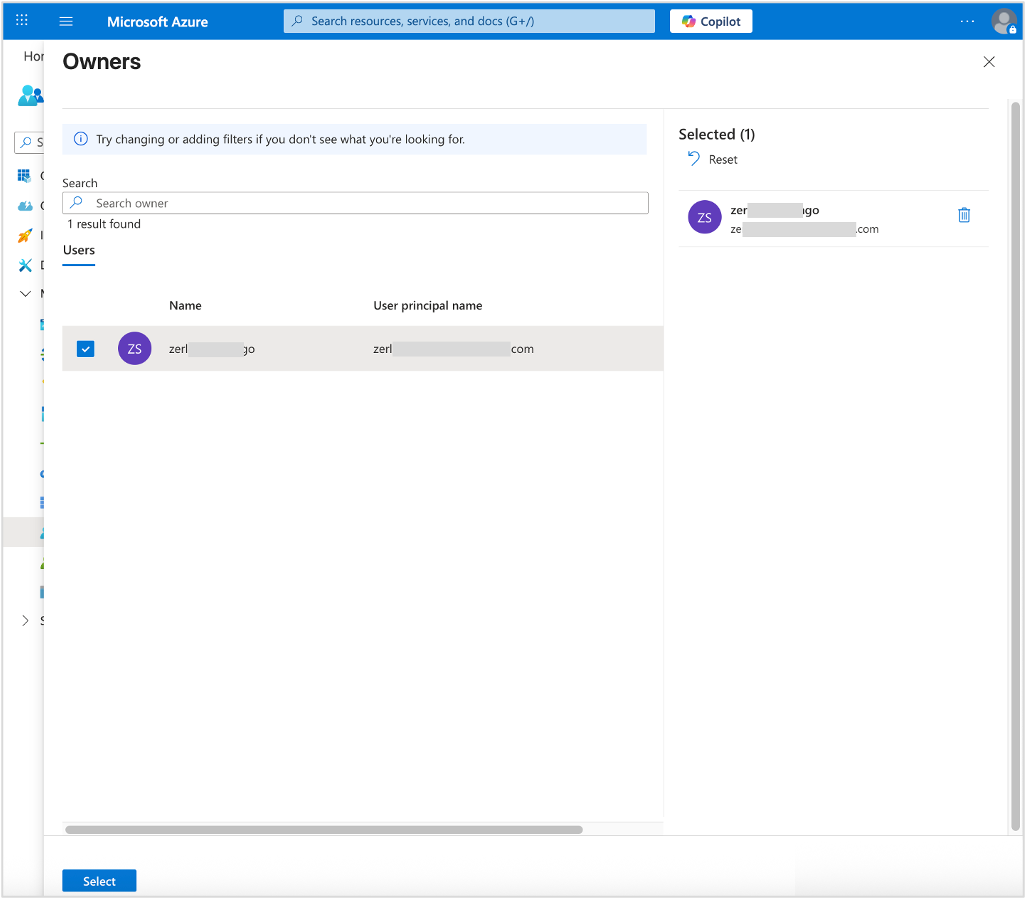
- Under Manage, select Owners, and then select Add owners. The Owners pane opens.
-
Search for and select the user account that you want to be an owner of the application.
-
Click Select to add the user account that you chose as an owner of the application.
-
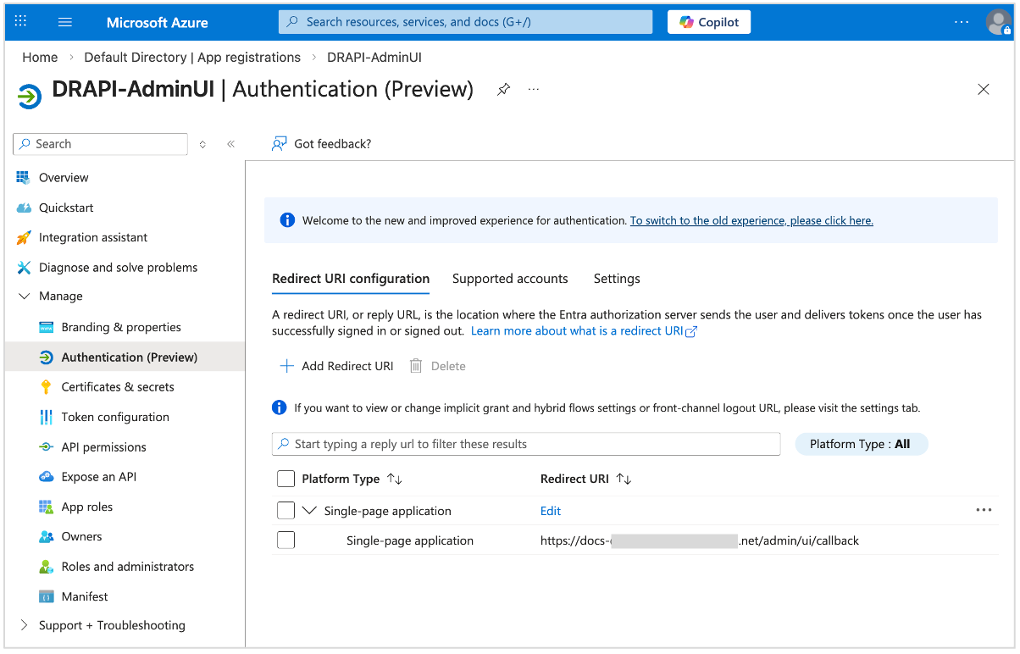
Check authentication.
- Under Manage, select Authentication.
-
On the Redirect URI configuration tab, make sure that the selected and entered values are correct.
-
On the Supported accounts tab, make sure the correct supported account type is selected.
-
On the Settings tab, make sure Access token is selected.
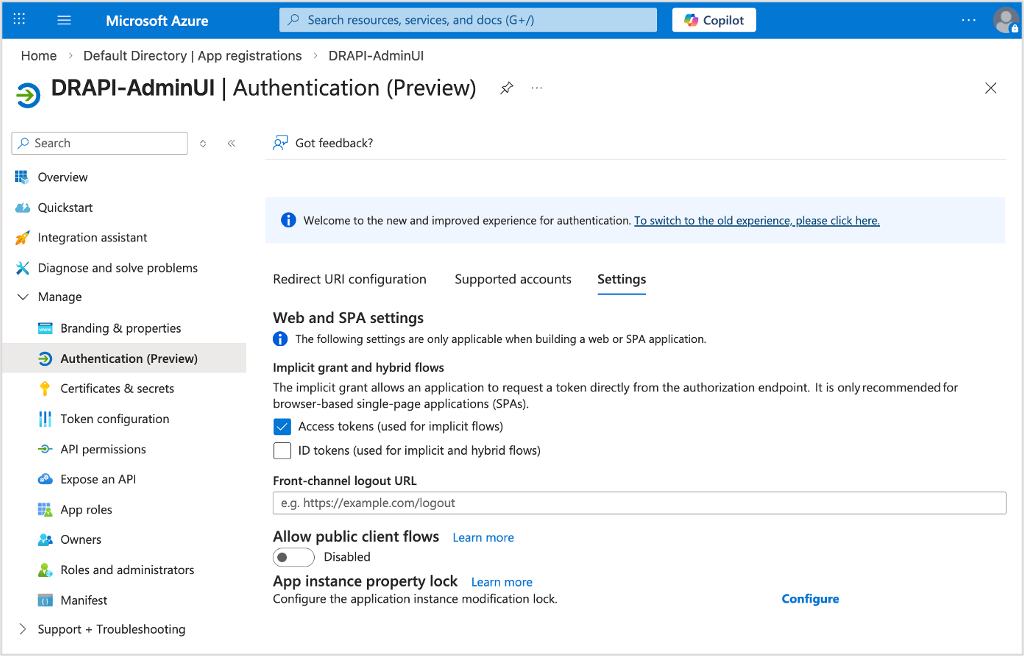
-
Click Save if you made any changes.
-
Adjust app manifest.
- Under Manage, select Manifest. A web-based manifest editor opens, allowing you to edit the manifest.
-
Change the value of
accessTokenAcceptedVersionfromnullto2.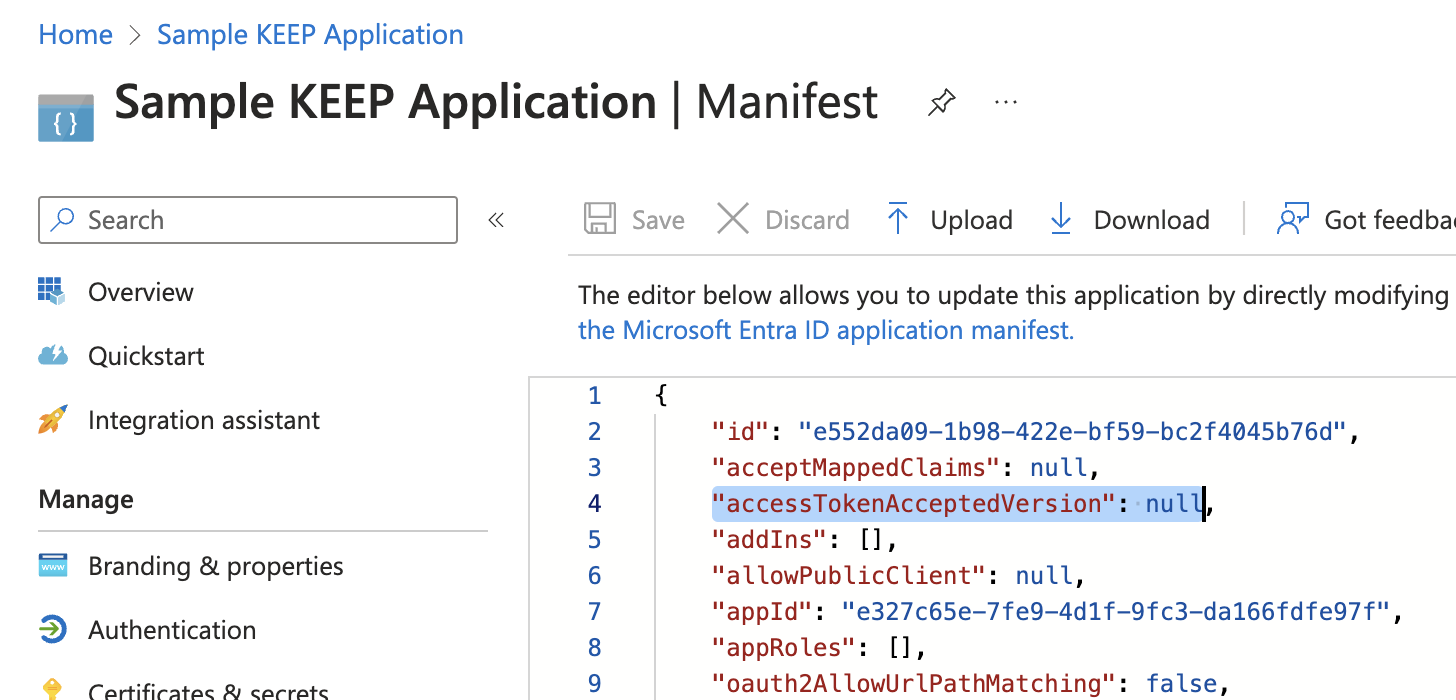
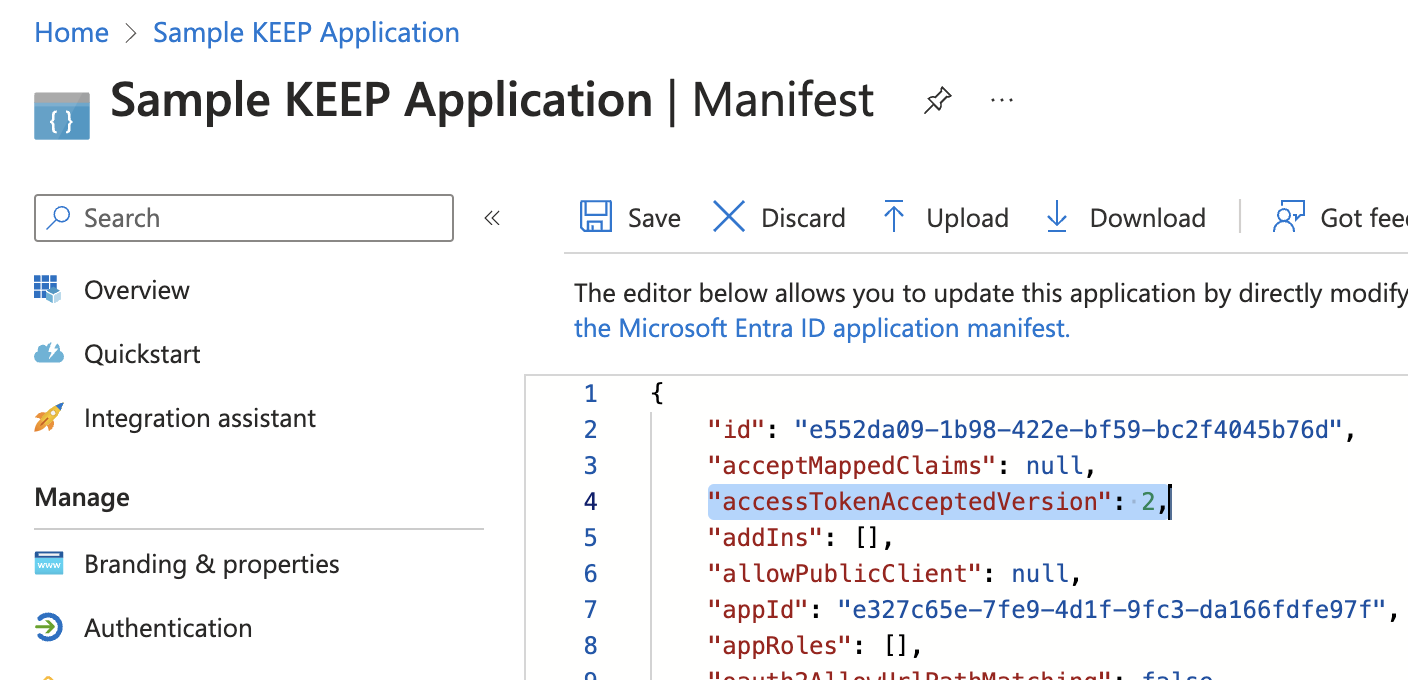
-
Click Save.
-
Check application endpoints.
Select Endpoints in the top menu to open the Endpoints page, which shows the authentication endpoints for the application. Take note of the following endpoints:
OpenID Connect metadata documentOAuth 2.0 authorization endpoint (v2)OAuth 2.0 token endpoint (v2)
Set up Admin UI configuration
To use the configured external IdP for Admin UI login, you need to include the adminui property in the configuration file of external IdP saved in keepconfig.d. For more information about the adminui property, see JWT parameters.
Set up Admin UI configuration to use Microsoft Entra ID as external IdP
-
Open the JSON file you used in configuring Domino REST API to use Microsoft Entra ID as an external IdP that is saved in the
[notesdata]/keepconfig.ddirectory. -
Add the following JSON object to the Microsoft Entra ID configuration in the JSON file.
    "adminui": {
        "active": true,
        "client_id": "[value of Application (client) ID]",
        "application_id_uri": "[value of the Application ID URI]"
  }
where:
- The
client_idparameter should have the value of the Application (client) ID of the registered application in Azure portal. - The
application_id_uriparameter should have the value of the Application ID URI of the registered application in Azure portal. It should end with/.
Check the Overview page of the application in the Azure portal. Refer to the following example image:
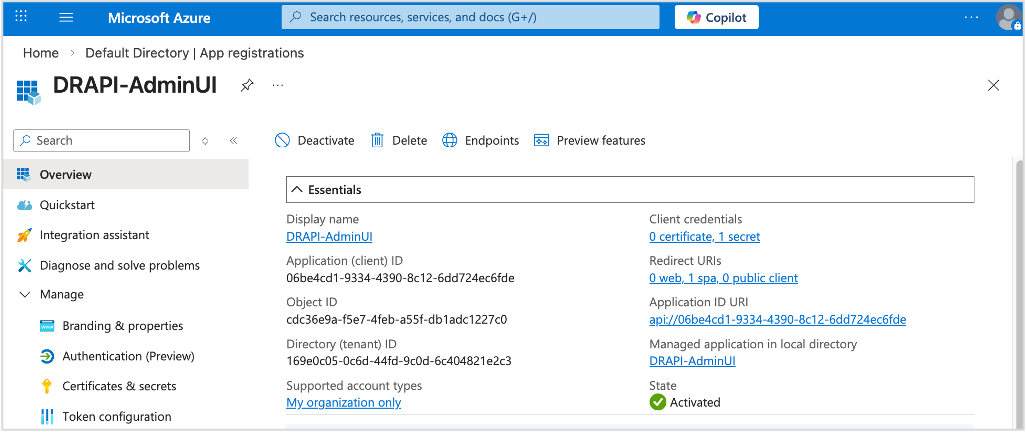
After adding the JSON object, the configuration should be similar to the following:
{
      "jwt": {
            "AzureIdP": {
                  "active": true,
                  "providerUrl": "[value of the OpenID Connect metadata document endpoint of the app used by the Domino REST API server]",
                  "aud": "[value of the Application (client) ID of the app used by the Domino REST API server]",
                  "iss": "[issuer value]",
                  "algorithm": "RS256",
                  "adminui": {
                        "active": true,
                        "client_id": "[value of Application (client) ID]",
                        "application_id_uri": "[value of the Application ID URI]"
                  }
            }
      }
}
For more information on the definitions and values of the
providerUrl,aud, andisskeys, see Configuration in Domino REST API for details of the Microsoft Entra ID configuration. - The
-
Save the changes and restart Domino REST API.
Additional information
Admin UI external IdP login
The Admin UI shows the OIDC logins and the Domino REST API login, which uses the Domino REST API IdP. To prevent the Admin UI from showing all IdP logins, set the value of the AdminUIOIDCLogin parameter to false. To disable the login with password button, set the AdminUIKeepLogin parameter to false. For more information on how to modify the configuration, see Modify configuration parameters.
Example Admin UI configuration to use Keycloak as external IdP
The following is an example configuration for Keycloak IdP:
{
  "jwt": {
    "KeycloakIdP": {
      "active": true,
      "providerUrl": "https://{keycloak_host}/realms/{realm_name}",
      "adminui": {
        "active": true,
        "client_id": "{client_id}"
      }
    }
  }
}