Customize OAuth consent screen
Important
Modifying the look and feel of the consent screen is a complex process and should only be attempted due to corporate identity requirements. Proceed with caution and ensure you are proficient in HTML, CSS, CSP, and JavaScript.
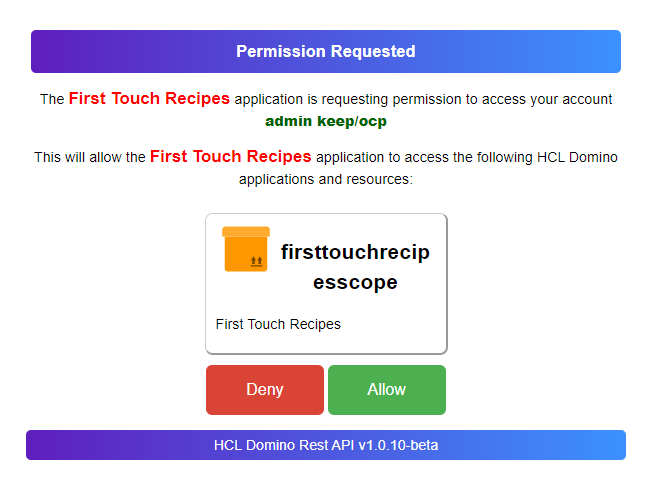
The OAuth consent screen, as shown by the example image above, uses 3 files:
authorization.htmllocated inresources/oauthauthorization.csslocated inresources/webrootauthorization.jslocated inresources/webroot
They are located inside the jar or the container and need to be extracted from there. You can't modify the original file.
The most likely change might be adjustment of the CSS values. You must do this in a CSS file. The CSP will not entertain inline styles. Host your custom CSS in keepweb.d, so it is accessible on the same host.
The HTML file uses the Mustache templating system to fill in the values for the current consent request. In a nutshell: Mustache variables look like this: {{ }}. A good introduction tutorial can be found here.
About this task
Steps to be taken to alter the look & feel of the consent screen
Prerequisites
-
You must be proficient in using the HTML, CSS, CSP and Javascript
-
You must understand Mustache.
- You must understand the URLs of the Domino REST API and the difference between a file location and its URL
Content Security Policy in place!
The consent screen uses a tight CSP. You can't use inline CSS or JavaScript, or load CSS or JavaScript from a different server.
Procedure
There are 2 steps required: configure the REST API to load an alternate screen and creating a modified screen. In the simplest case, editing the html file and point to a different or additional CSS file. The worst case: you try to mess with the JavaScript, which we strongly discourage.
Pointing to a different HTML file
You need to create or edit a json file in keepconfig.d that has the oauth key. This can be an existing file with oauth or a new and otherwise empty file
{
  "oauth": {
    "alternateConsentDir": "some-directory-that-must-exist"
  }
}
That directory must contain you custom authorization.html. It doesn't need to be accessible via http(s), since the REST task will pick it up. You can use keepconfig.d for this. For CSS and JS, you need http(s) accessible locations like keepweb.d that's visible as /keepweb.
Use a name matching the purpose
Use a filename for the JSON file that reveals its purpose. To learn more on how JSON files in keepconfig.d are processed, see Configuration management and overlay hierarchy.
Modifying the HTML files
The HTML file contains only HTML and links to CSS and JavaScript. It does not contain inline CSS or inline JS. The HTML body consists of 4 main sections:
- error DIV: usually hidden, shows up when things go wrong
splashScreen: The initial screen shown while consent is checking if there is an active user session or an existing consentloginScreen: Initially hidden, shows up when user needs to loginconsentScreen: Initially hidden, shows up when user needs to provide their consent. Contains{{ mustache }}variables
List of Mustache variables
| Name | Purpose |
|---|---|
{{ client_name }} |
Application name as configured in the Admin UI |
{{ claims }} |
Repeat element for each scope requested, closes with {{ claims }} |
{{ logoURL }} |
Points to the scope icon configured in the Admin UI |
{{ claim }} |
Scope name as configured in the Admin UI |
{{ description }} |
Scope description as configured in the Admin UI |
{{ client_id }} |
UniqueId of the requesting application |
{{ state }} |
application state, required by OAUTH flow (don't touch) |
{{ redirect_uri }} |
sends you to your app, configured in Admin UI (don't touch) |
{{ scope }} |
requested scopes, matched again app configuration (don't touch) |
{{ response_type }} |
response type, required by OAUTH flow (don't touch) |
Don't alter any of the input fields (they are hidden anyway) or the button ids. You can modify anything inside the form tag before the first input element.
Good luck with the changes.
When things go wrong
If you encounter any issues with the OAuth consent screen, you can revert to the default settings by removing the alternateConsentDir in the oauth section of your JSON configuration file.