OAuth Consents
Overview
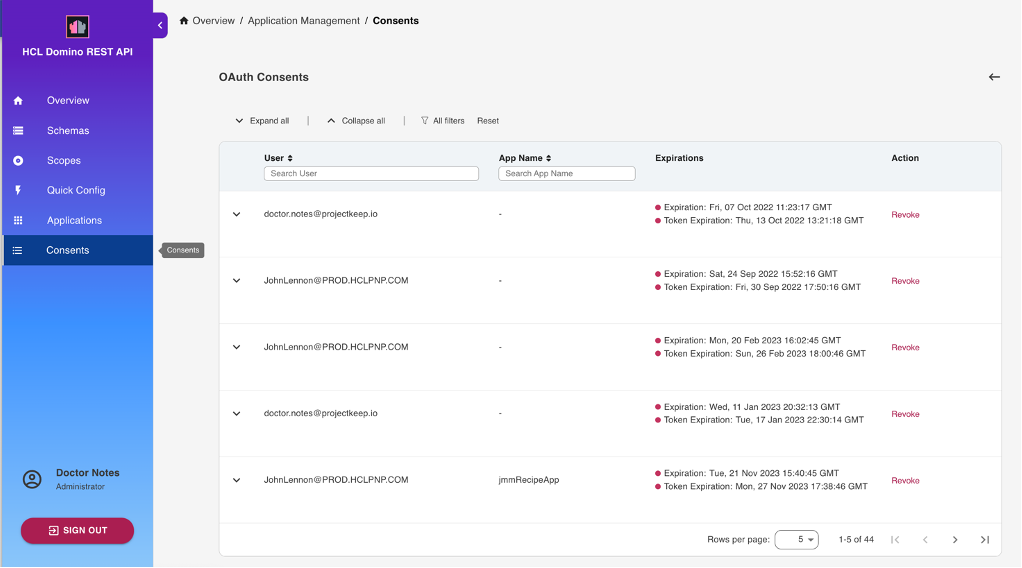
The OAuth Consents page in the Admin UI allows users to view, filter, inspect, and revoke OAuth authorizations granted for applications that integrate with the Domino REST API. It is essential to manage user consent and application permissions effectively.
In the Domino REST API context, an OAuth consent is a record that a specific user has authorized an application to access certain Domino resources, using standard OAuth/OIDC authorization flows.
Access OAuth Consents page
- Log in to the Admin UI.
- In the side navigation pane, click Consents to open the OAuth Consents page. The page displays a list of all currently visible OAuth consents.
Note
Users in the LocalKeepAdmins group or with Manager access level in the oauth.nsf ACL can view all consents and revoke them.
View OAuth consents
The OAuth Consents page displays existing OAuth consents along with related details such as the user identity, application name, and expiration information.
You may:
- Use Search User to find consents by username.
- Use Search App Name to find consents by application name.
- Sort by user or app name in alphabetical/reverse order using the sorting arrow icons.
- Adjust the number of rows shown per page.
- Navigate using pagination arrows.
- Click the expand arrow icon next to an OAuth consent to display its scopes and callback URL.
- Click Expand all to display the scopes and callback URLs for all existing OAuth consents, and Collapse all to hide them.
Filter OAuth consents
The Filter pane allows you to filter which OAuth consents to display based on the following key attributes:
| Filter | What it controls |
|---|---|
| Status | Shows all consents versus only active consents. |
| App name | Shows only consents with application. |
| Expiration | Shows consents regardless of expiration, with expiration, or matching a specific expiration date. |
| Token Expiration | Shows consents regardless of token expiration, with token expiration, or matching a specific token expiration date. |
| Scopes | Shows consents matching selected scopes. |
To use the filters:
- Click All filters to open the Filter pane.
- Set desired conditions.
- Click Show Results.
To clear all filters, click Reset.
Revoke authorized user consent
When an application should no longer have access to a user’s resources:
- Find the appropriate OAuth consent in the list.
- Click Revoke for that user/app pair.
- Confirm by clicking Yes in the Revoke Consent dialog.
The consent is immediately removed, and the app will no longer have ongoing delegated access.