Configure Keycloak
Keycloak is an Open Source Identity and Access Management solution sponsored by RedHat.
Keycloak can be used to produce JWT Access Token for Domino REST API. Keycloak has many features like default configuration, user federation, identity brokering and social login. Those are topics not covered here. Consult the Keycloak Tutorial or the Keycloak documentation to learn more. This page focuses on the settings required for Domino REST API.
Client Ids
When configuring an external identity provider using OpenID Connect (OIDC) or OIDC-idpcat with HCL Domino and the Domino REST API, you must specify a client ID. The default recommendation is to use Domino as the client ID for the Domino REST API server. However, your identity provider administrator might require a different value depending on your organization’s configuration.
Separate client IDs (application registrations) are required to support the Admin UI and Office Forms Based Authentication (OFBA). To support these features, configure at least the following clients in your identity provider:
- A client used by the Domino REST API server. You can name the client
Dominoor any descriptive name. The client secret might be managed throughidpcat.nsf. - A client used by the Domino REST API Admin UI. You can name the client
keepadminuior any descriptive name. Configure this client if you want administrators to authenticate through the external identity provider. - A client used for OFBA round-trip editing of Office documents. You can name the client
keepofbaor any descriptive name.
You should also create separate clients for each custom application that connects to the Domino REST API.
About this task
This section describes key concepts and provides the steps required to configure Keycloak successfully for Domino REST API.
Keycloak concepts
Only concepts relevant to Domino REST API are listed:
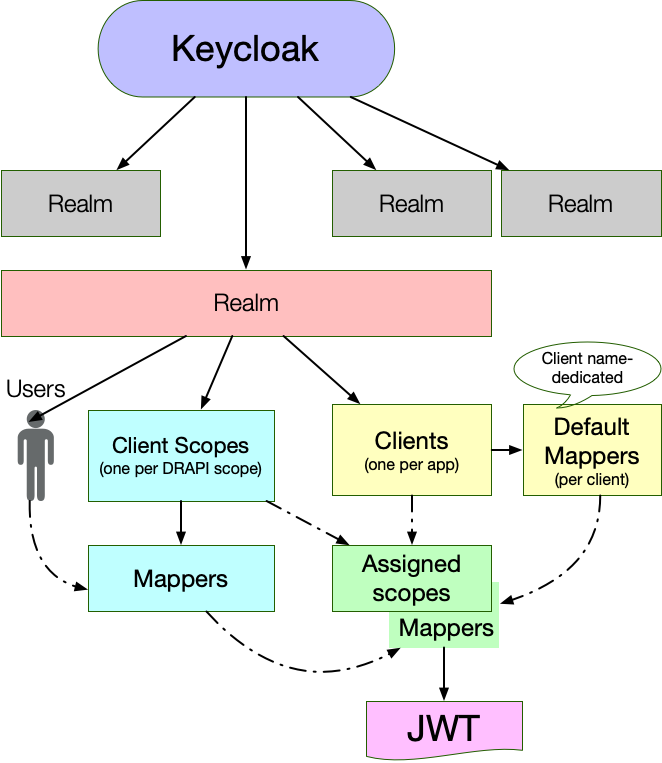
- Realm: The starting point for Keycloak identity management, contains all other elements.
- Client: Each accessing application, client app, Single Page App or server app will have a client entry. The client entry contains application Id and, if required, the application secret. Furthermore it has mapper and client scopes assigned to it.
- Client Scopes: Each scope in Domino REST API will have a client scope in Keycloak, so the Keycloak admin can assign them to clients
- Mapper: Configuration entry to determine what information is available in a client and/or Client scope. Each Client has a default entry for Mappers independent from assigned Client Scopes
- Users: Standard attributes assigned to users like username, firstname, lastname, email, credentials as well as any custom attributes. Domino REST API, for example, use
CNfor the Domino style name.
Procedure
In this example, you will learn and create a realm, a user, client scopes, client and client scope mappers inside the Keycloak app.
Note
The screenshots were captured using Keycloak version 25.0.
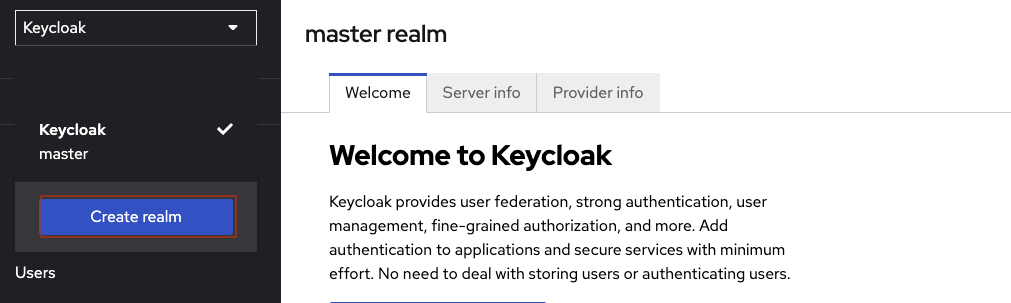
- Login to Keycloak.
-
Create a realm.
-
Click the Keycloak dropdown menu at the top left corner, and then click Create Realm.
-
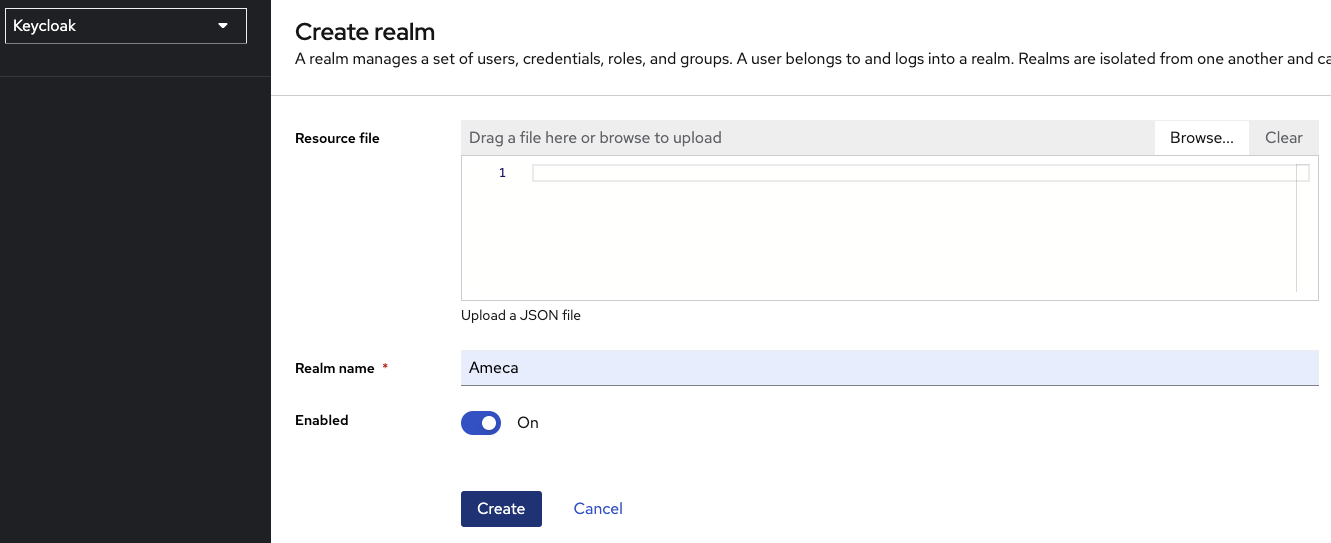
Fill in the Realm Name. For example Ameca.
-
Click Create.
-
-
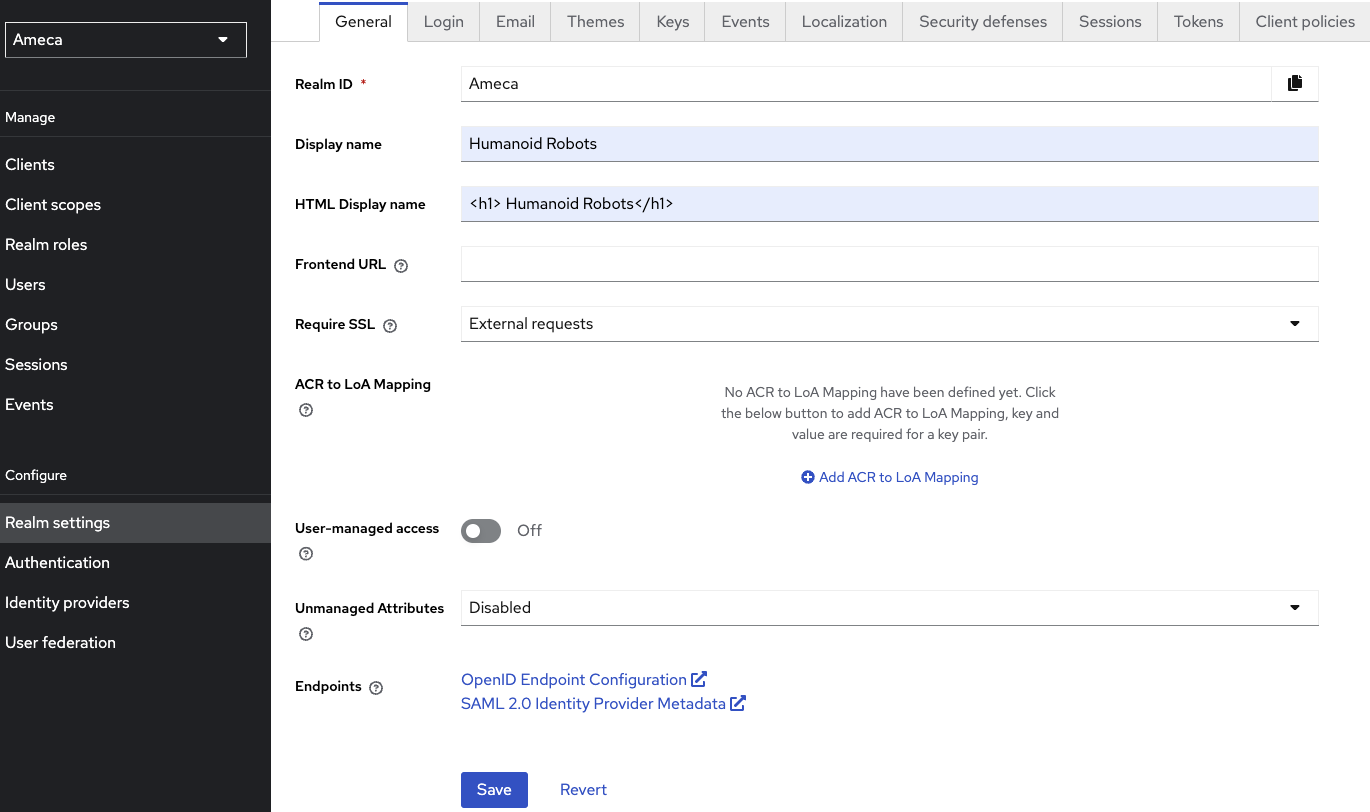
Configure realm settings.
- Click Realm settings.
-
Fill in the fields applicable to your project. Mandatory fields are those fields with red asterisk (*).
Display name:
Humanoid Robots.HTML Display Name:
<h1> Humanoid Robots </h1> -
Click Save.
-
Click User Profile tab.
-
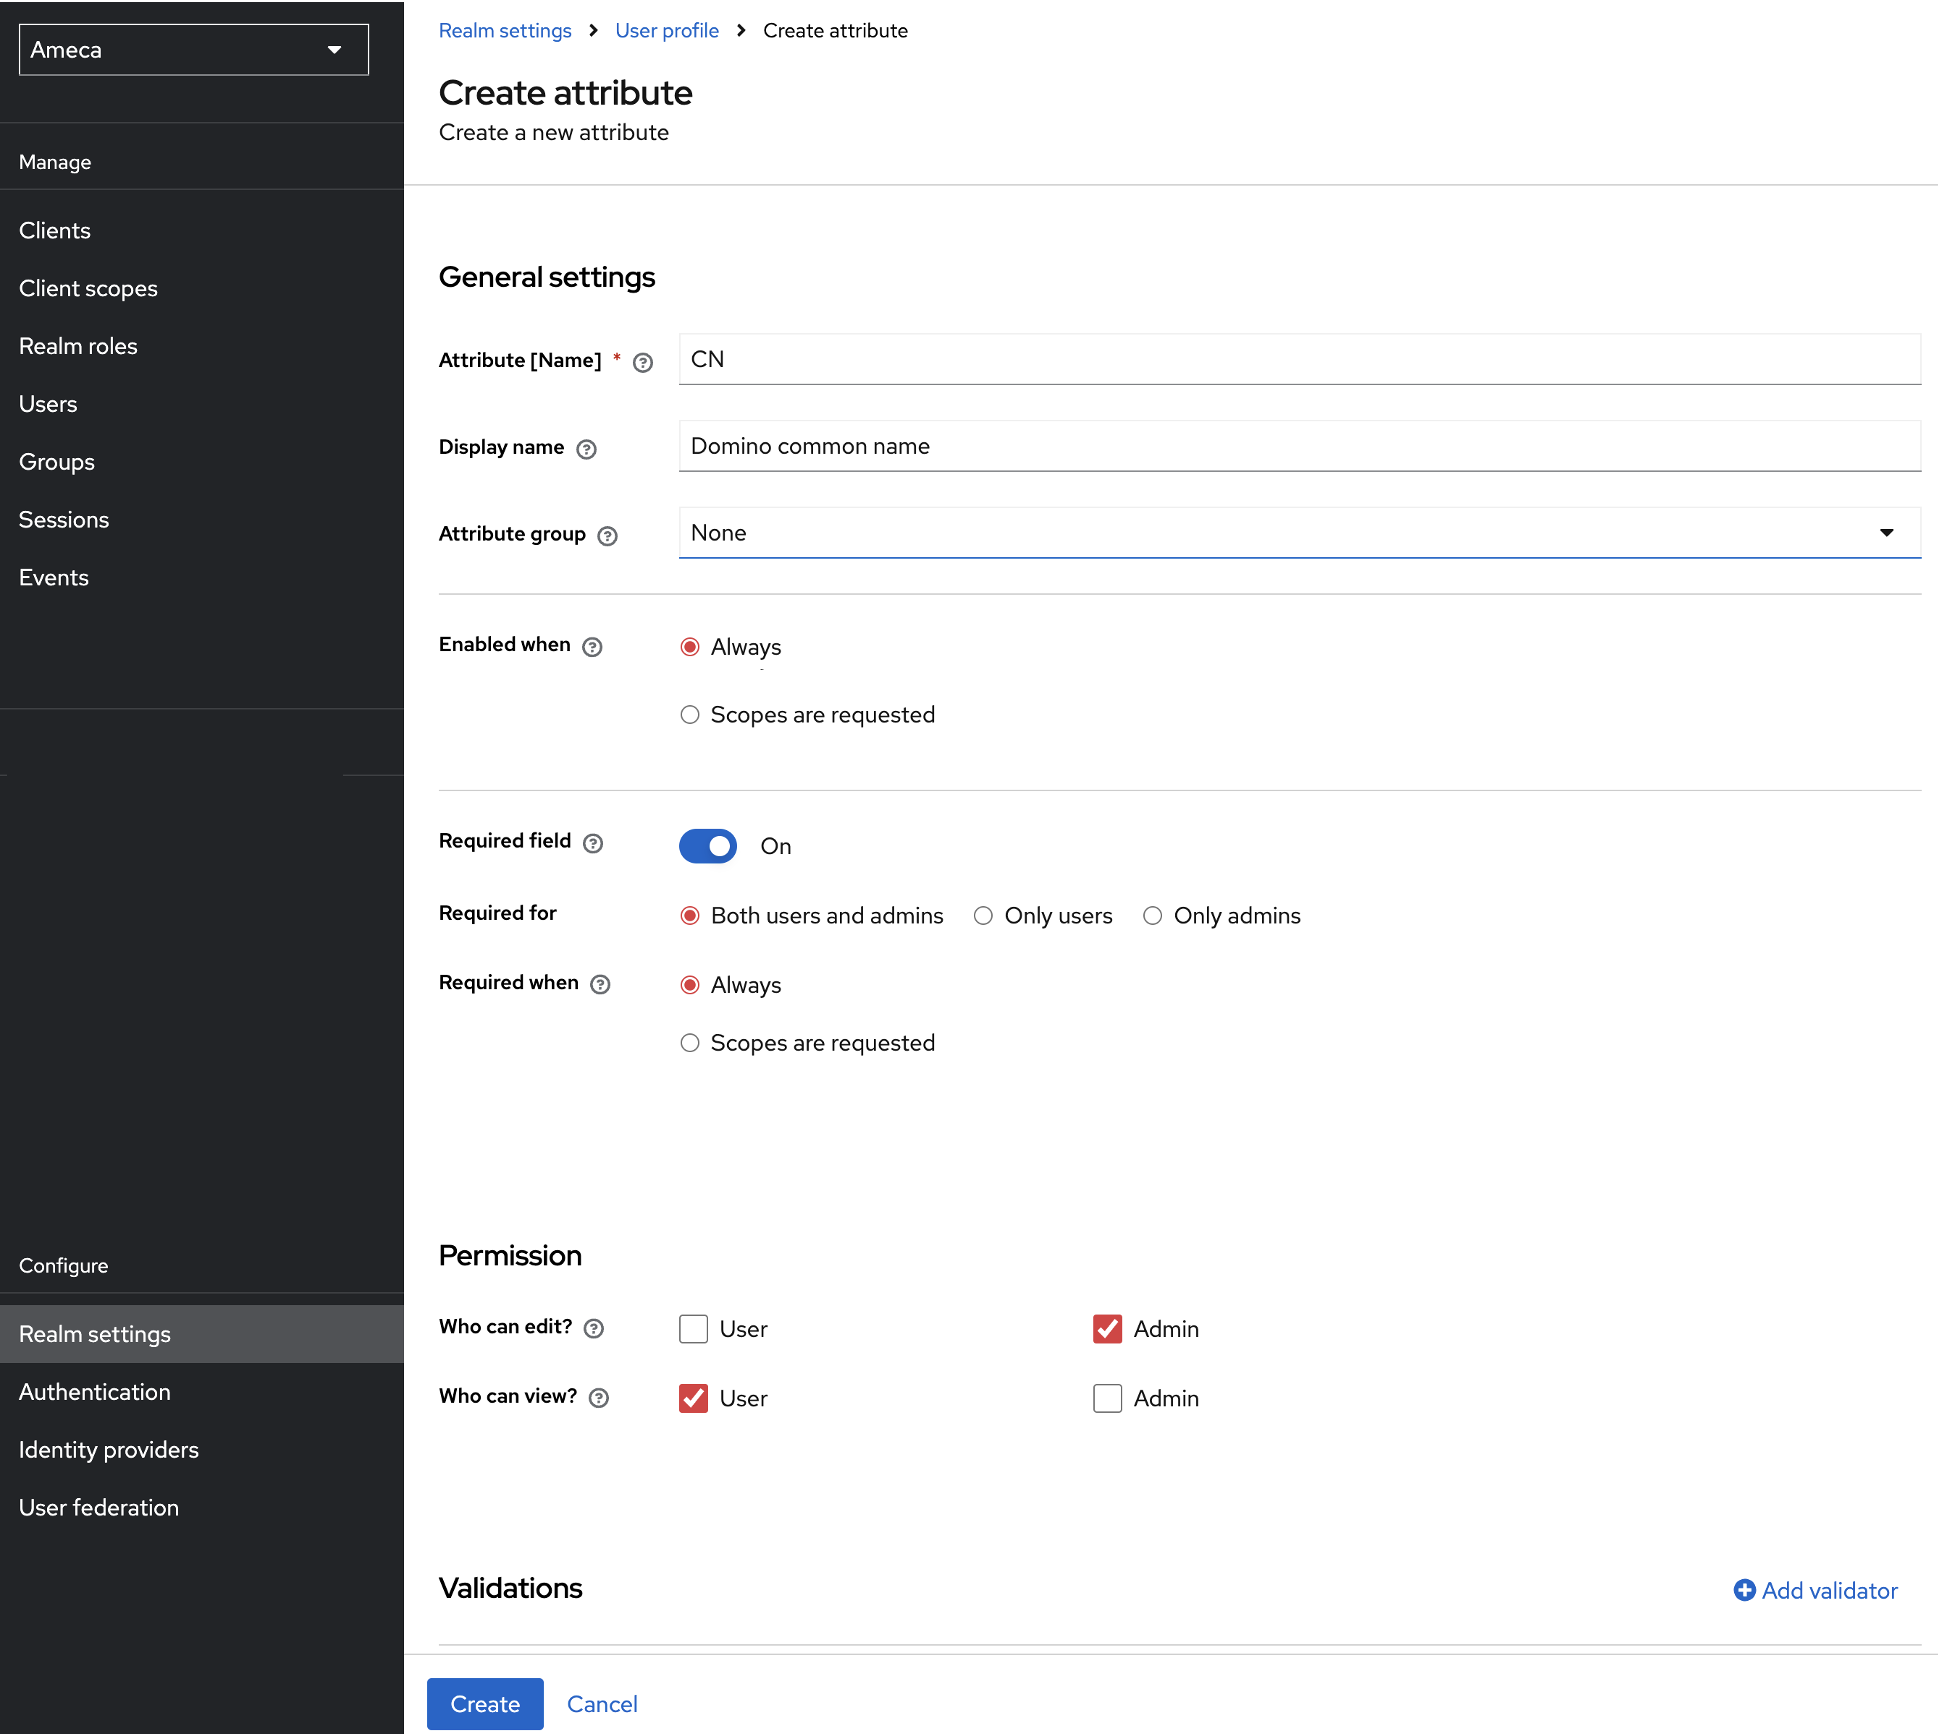
Create an attribute.
Creating an attribute is optional.
CNis used here to store the Domino style name, such asCN=John Doe/O=Mauraders.- Click Create Attribute.
-
Fill in the fields applicable to your project. Mandatory fields are marked with with red asterisk *.
-
Fill in the Attribute name. For example
CN -
Fill in the Display Name. For example
Domino common name -
Set Required field toggle to
Onposition. -
Under Permission section, select the User checkbox for the Who can view? option.
-
Click Create.
-
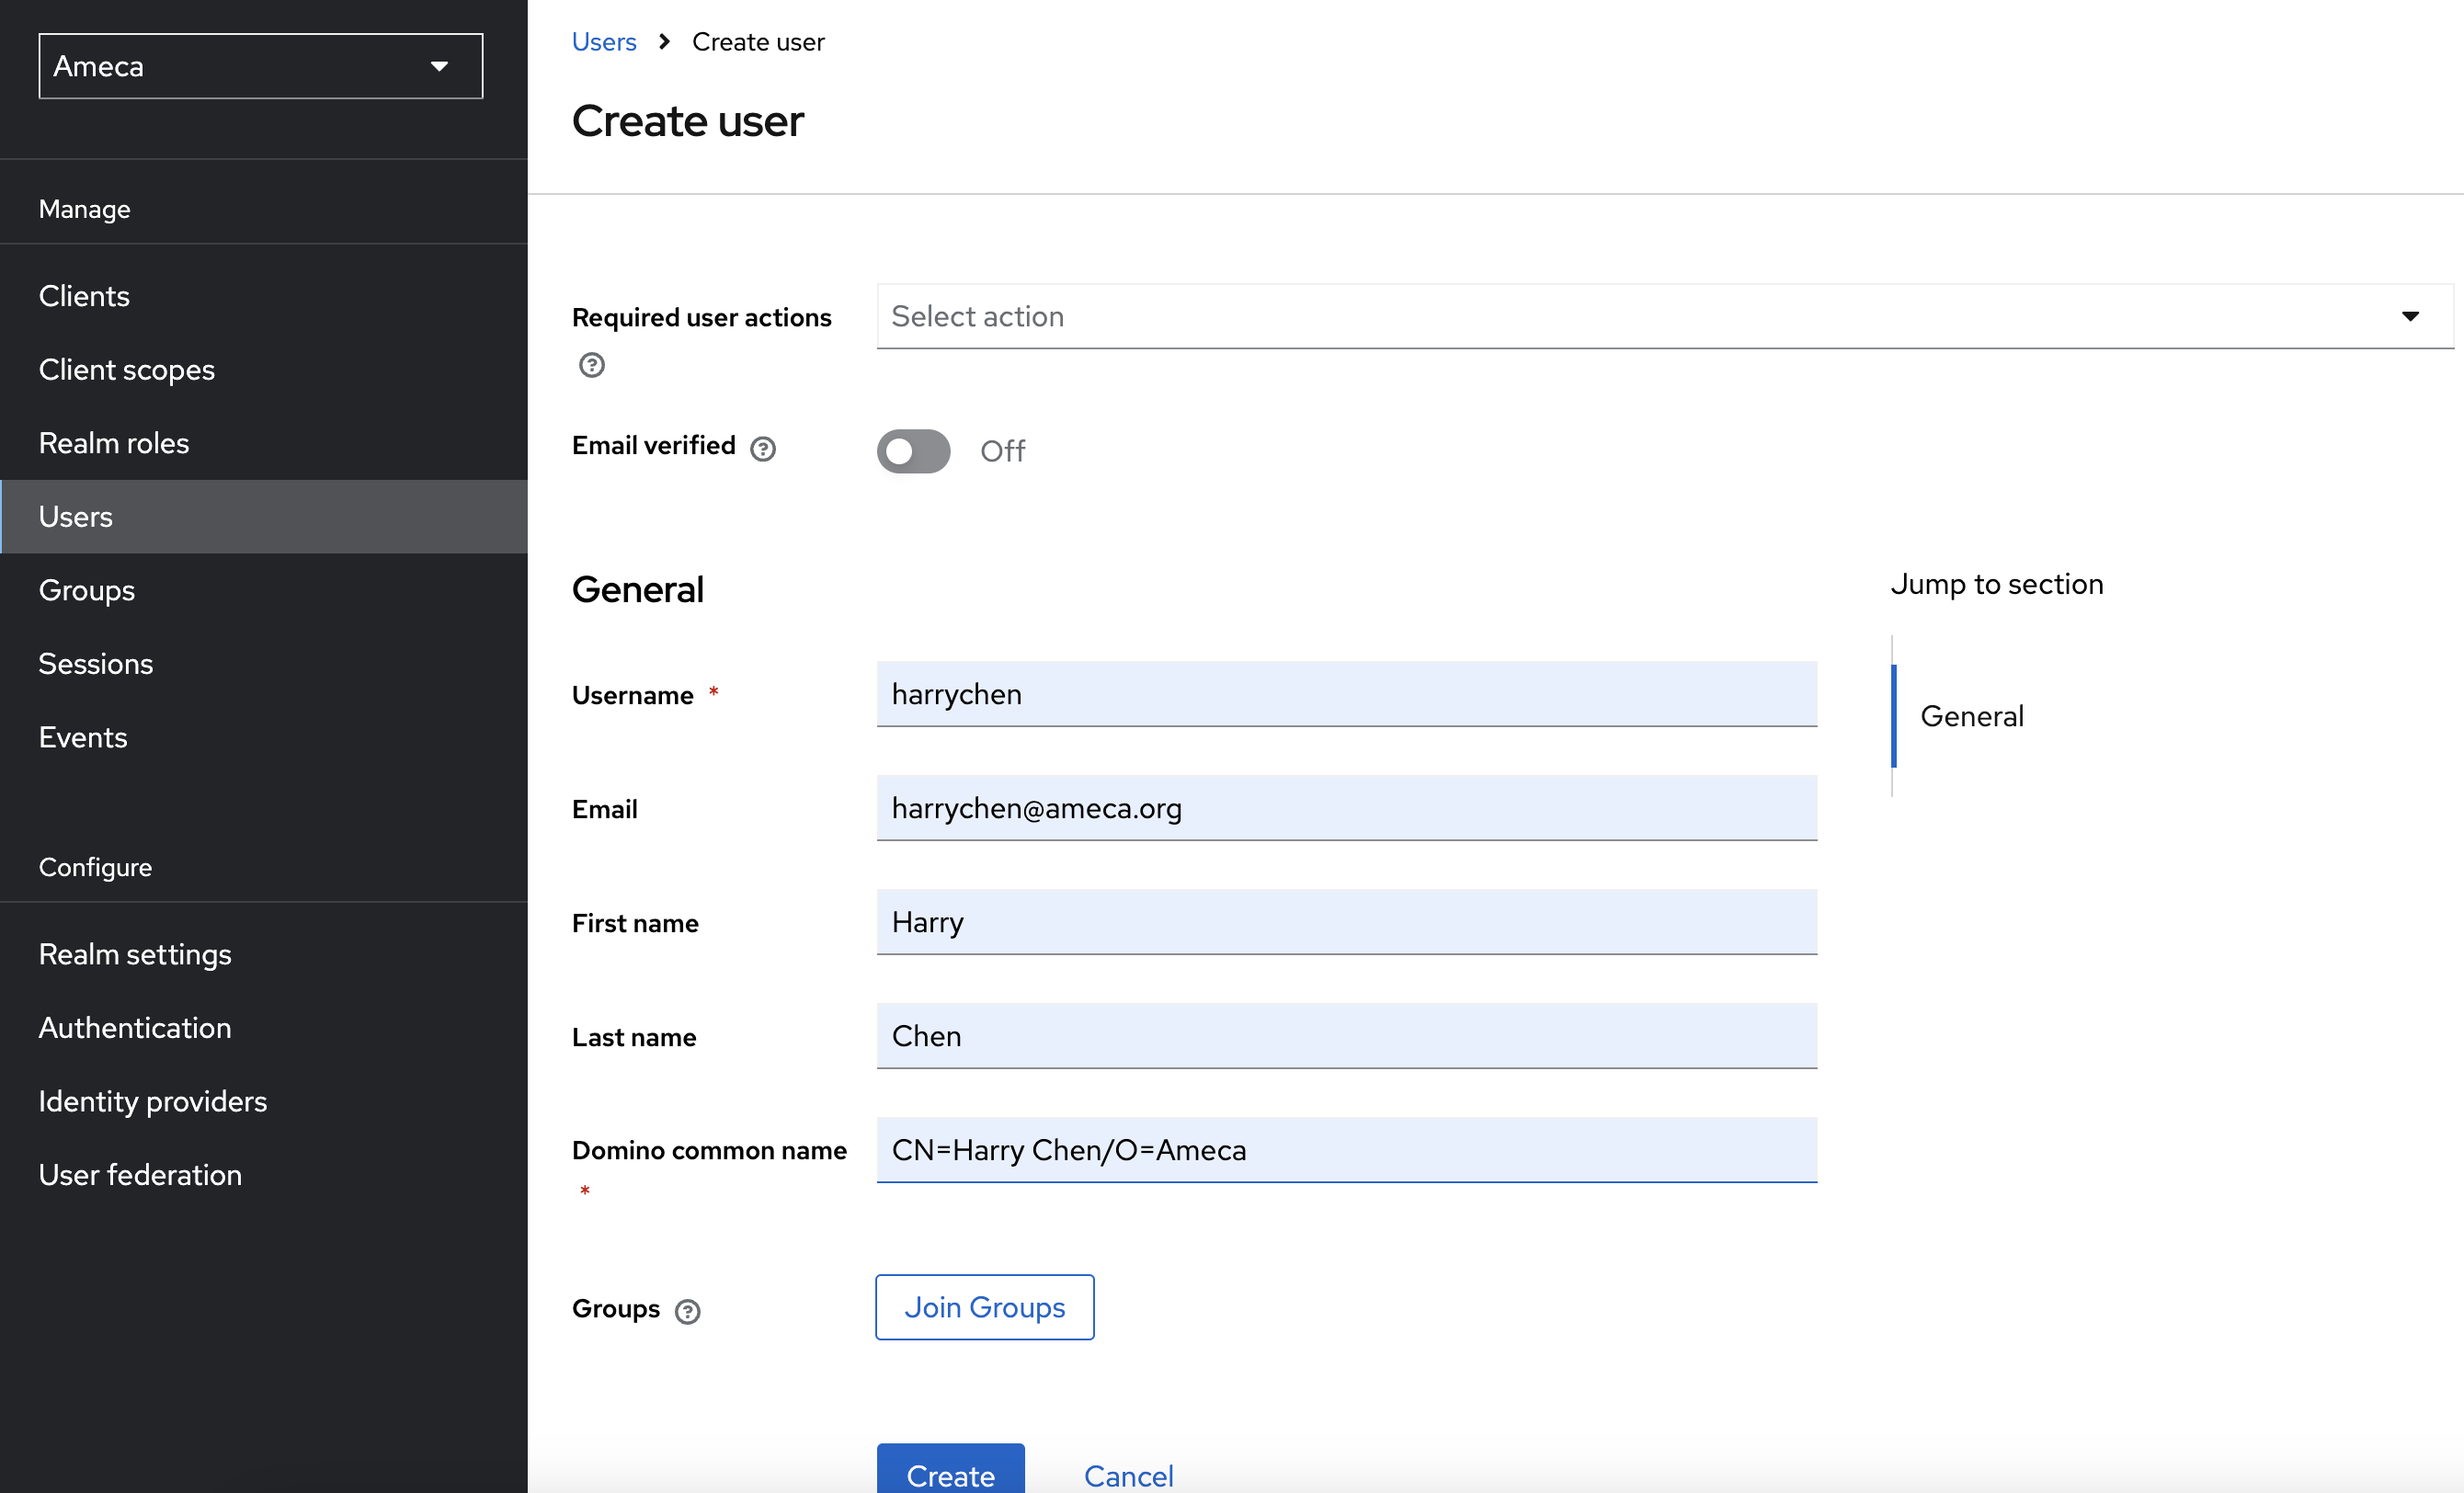
Add a user.
-
Click Users.
-
Click Create new user, if there are no existing users. Otherwise, click Add user, if there are existing users.

-
Fill in the mandatory fields as minimum requirements to save. You can see here the user profile attribute you created on the Realm Settings. For example, Domino common name. For a direct access grant you must have first name, last name and eMail, even if they're not marked mandatory.
Fill in the following:
Username:
harrychen.Email:
harrychen@ameca.orgFirst name:
HarryLast Name:
ChenDomino common name:
CN=Harry Chen/O=Ameca -
Click Create. The user has been created.
-
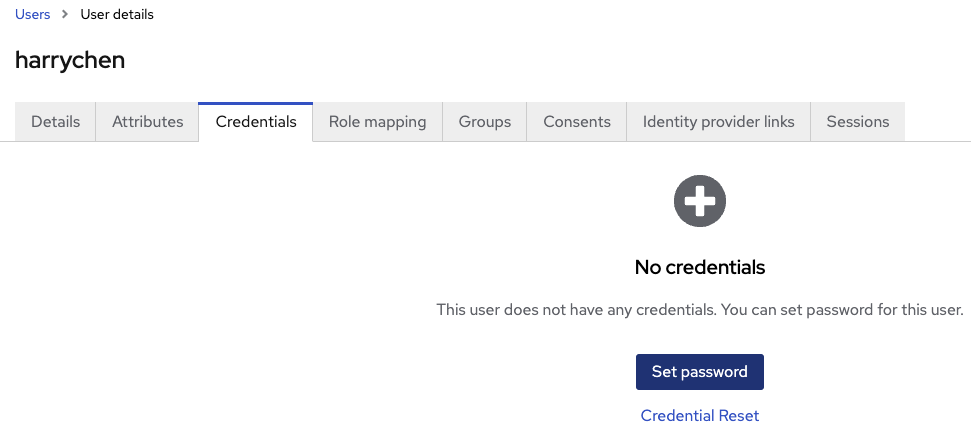
On your user details, for example user
harrychen, click the Credential tab.You need configure User credentials. For this example username and password are used, but it could be a social or federated login. Check Keycloak for details.
-
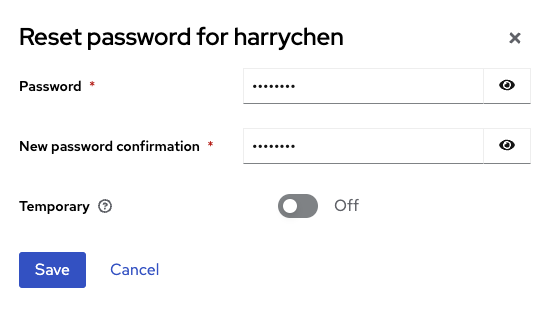
Click Set password.
-
Fill in the Password and New password confirmation with same phrases.
- Set Display on consent screen toggle to
offposition. -
Click Save.
-
-
-
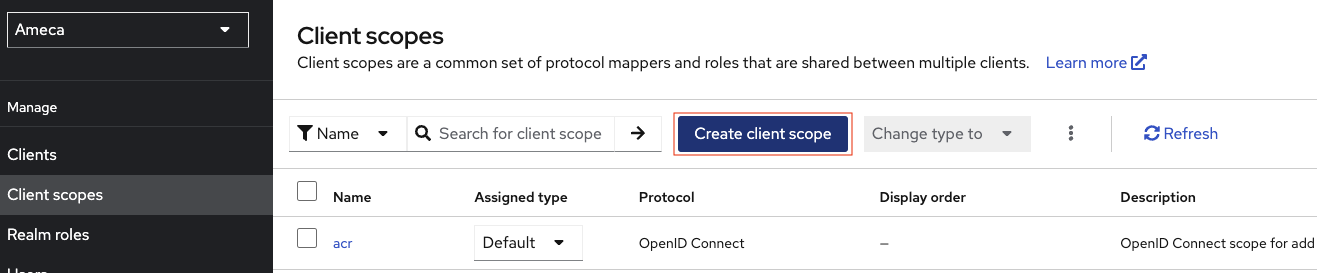
Click Client scopes.
Each Domino REST API scope in Domino, that you want to make accessible in Keycloak, will need a client scope in Keycloak. This includes all named scopes (the lowercase ones), and the special scopes like
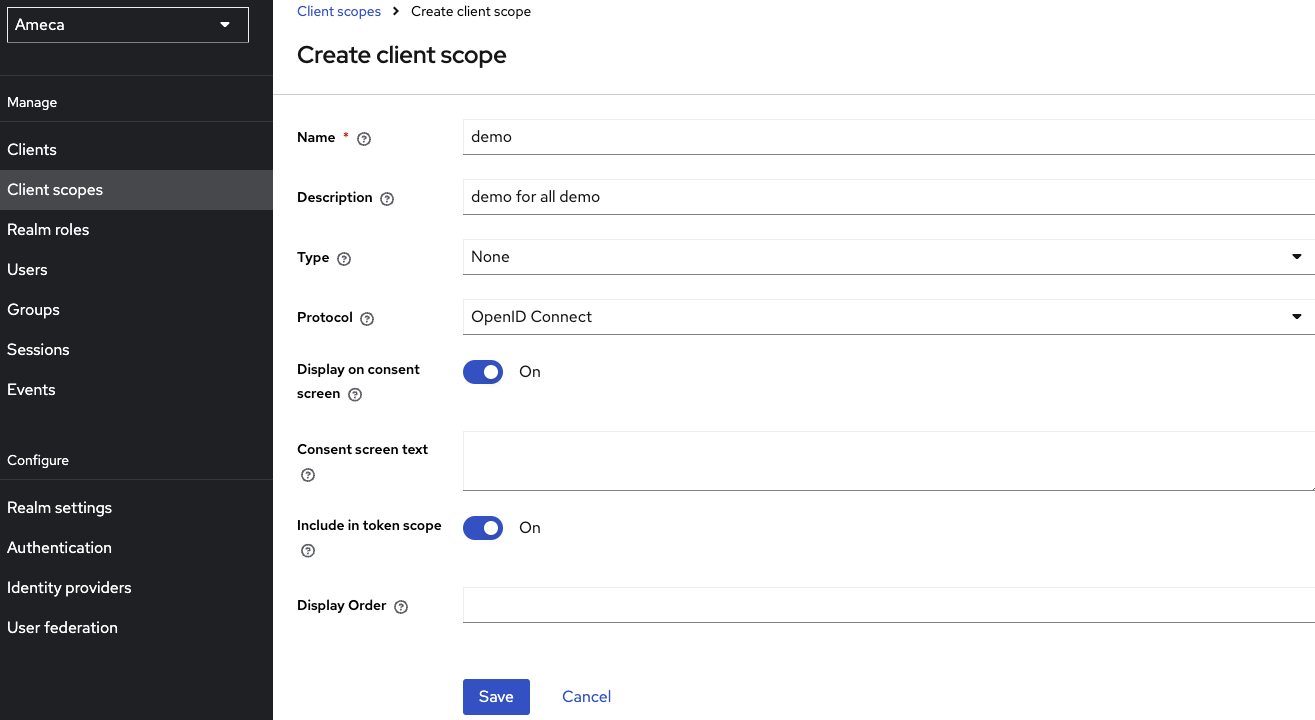
$DATAorMAIL.Click Create client scope. Creating a client scope doesn't automatically expose it, for that, assign it to one or more clients. In this example, create a client scope named
demo.
- Fill in the client scope name. For example,
demo. - Fill in Description. For example
demo for all demo. - Set Display on consent screen toggle to
Onposition. - Set Include in token scope toggle to
Onposition. - Click Save.
The configuration so far will identify a user presenting the access token to Domino REST API, but not yet provide any access. You need to specify what scopes this application will be allowed to access. You can use one or more (lowercase) scopes or some of the special scopes MAIL, $DATA or $DECRYPT. Multiple scopes are separated using a space.
Create another specific client scope, like $DATA.
- Fill in the client scope name. For example,
$DATA. - Fill in Description. For example
all data for database. - Set Display on consent screen toggle to
Onposition. - Set Include in token scope toggle to
Onposition. - Click Save.

- Fill in the client scope name. For example,
-
Create a client.
-
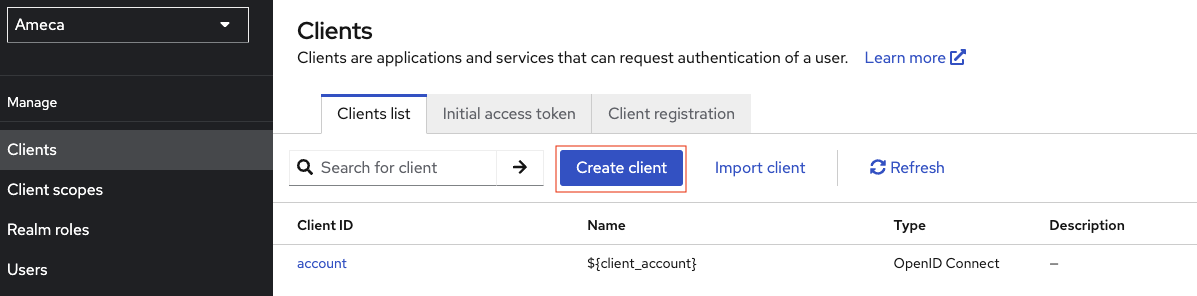
Click Clients, and then click Create client.
-
On the General Setting section, fill in the following fields, and the click Next.
Client ID:
thespian.Name:
thespian.Description:
ameca's client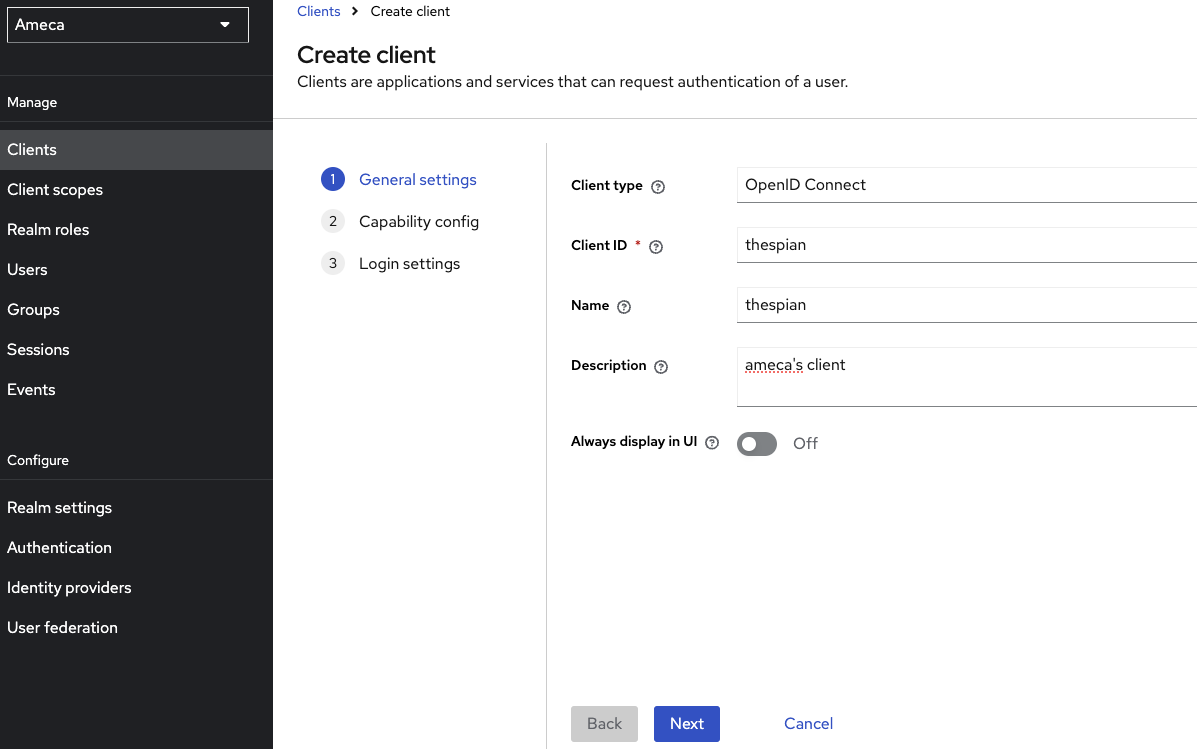
-
On the Capability config section, turn
offthe Client Authentication and click Next. When it's ON, the OIDC type is set to confidential access type. When it's OFF, it's set to public access type. Confidential is used when an application server, using client_id and client_secret accesses Domino REST API, while public access is for situations where you can't have a client secret like a single page app or a mobile app accessing the API directly,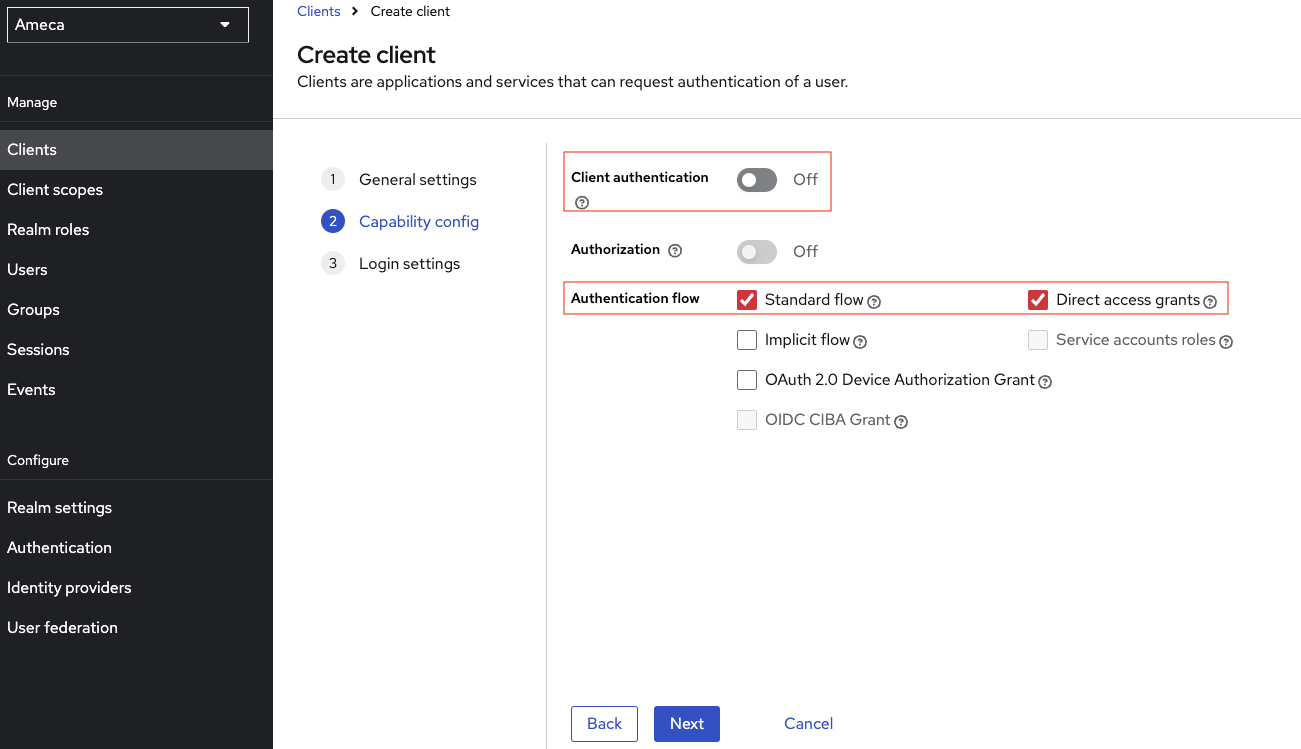
-
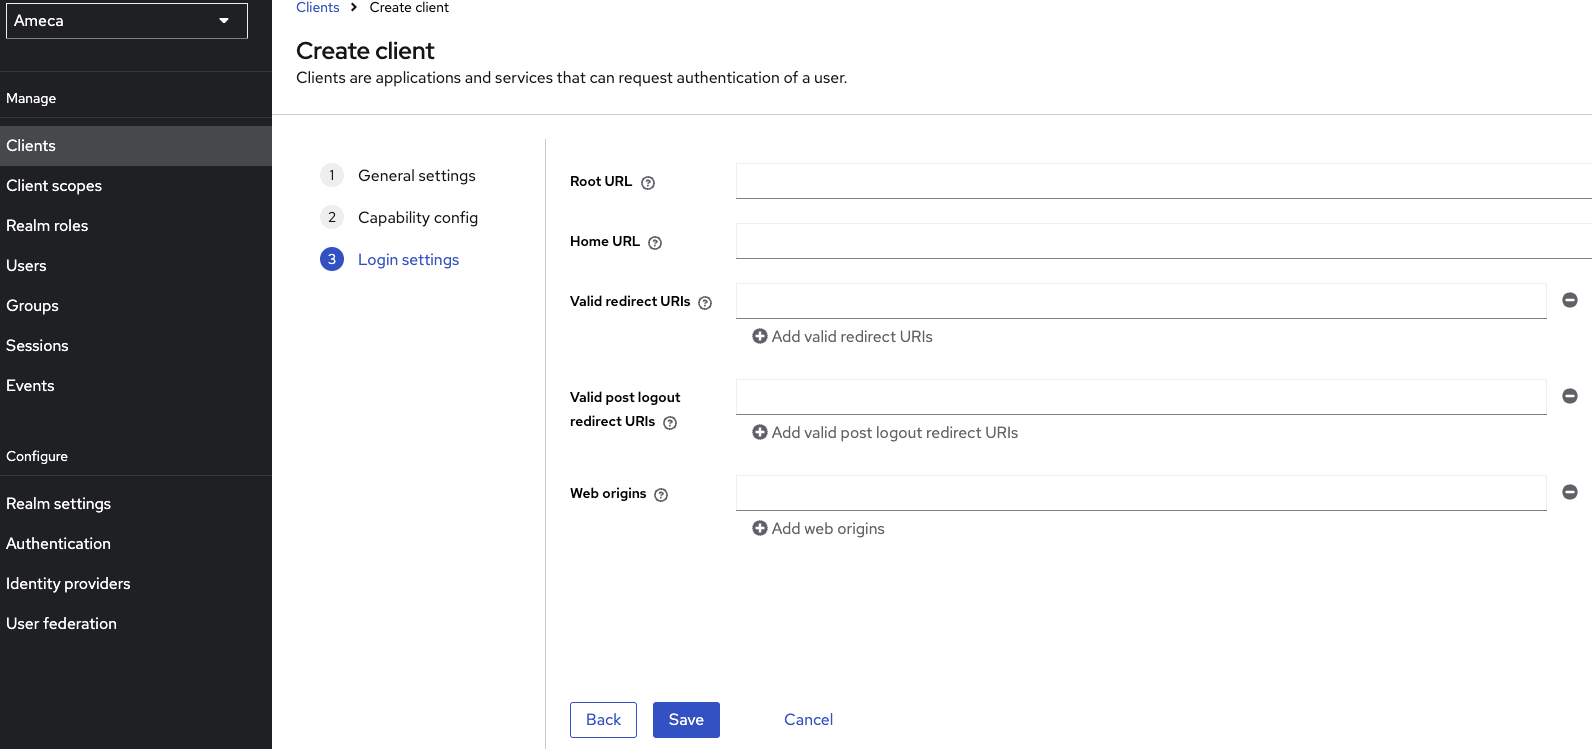
On Login Settings section, click Save.
-
-
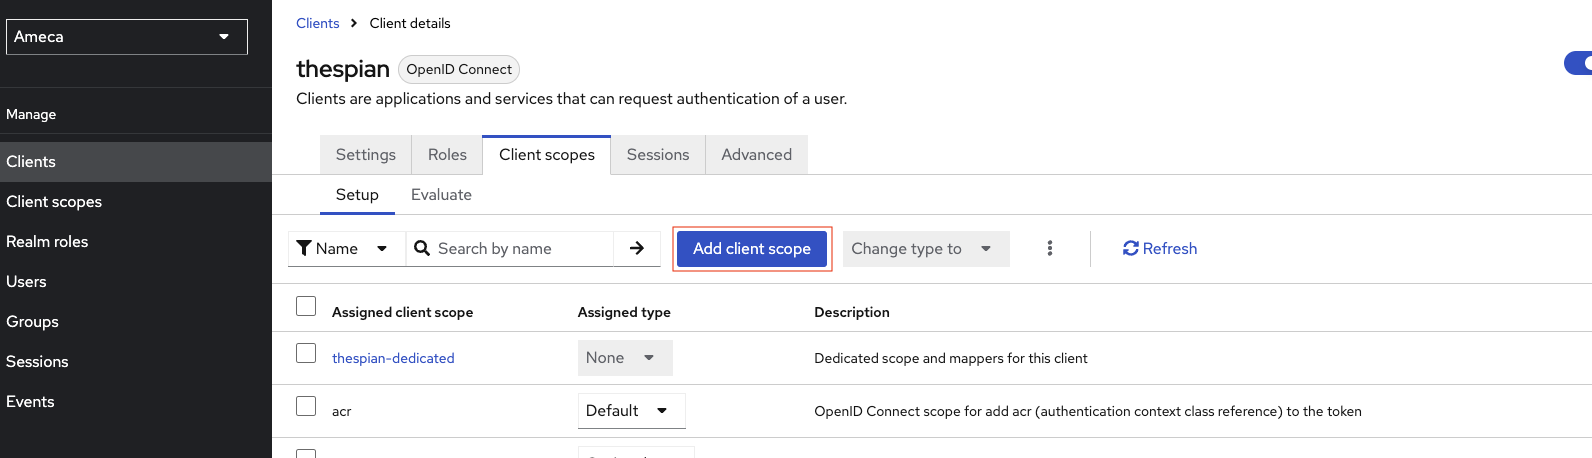
On the saved client's ID, for example thespian, click Clients scopes tab.
-
Click the thespian-dedicated. This is the client's dedicated scope once the client is created. It is used to hold mappers that are independent from scopes, like user attributes.
-
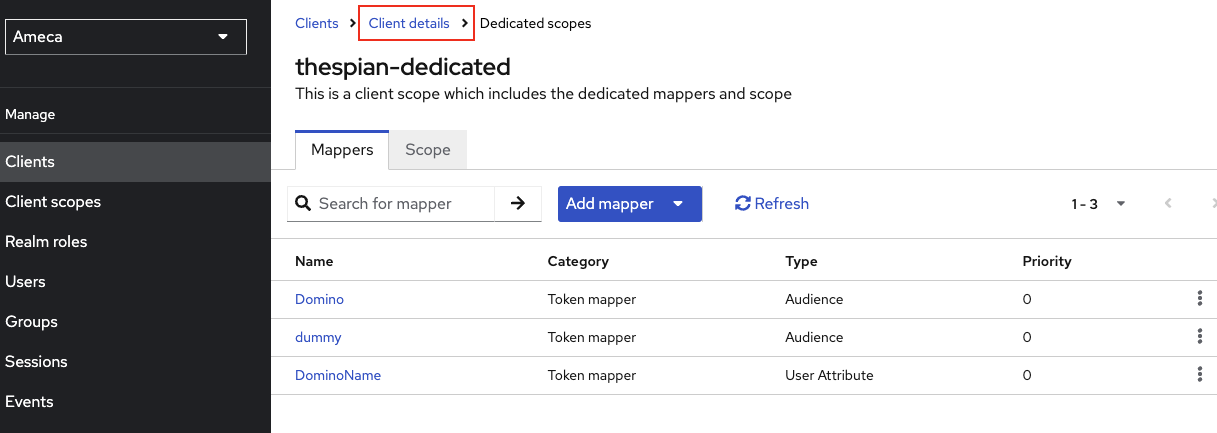
Click Configure new mapper or if there are existing mappers, click Add mappers → by Configuration. You need to add few mappers inside the dedicated client scope.
In this example, you need to have 2 Audience mappers and 1 User Atrribute, inside the thespian-dedicated client scope.

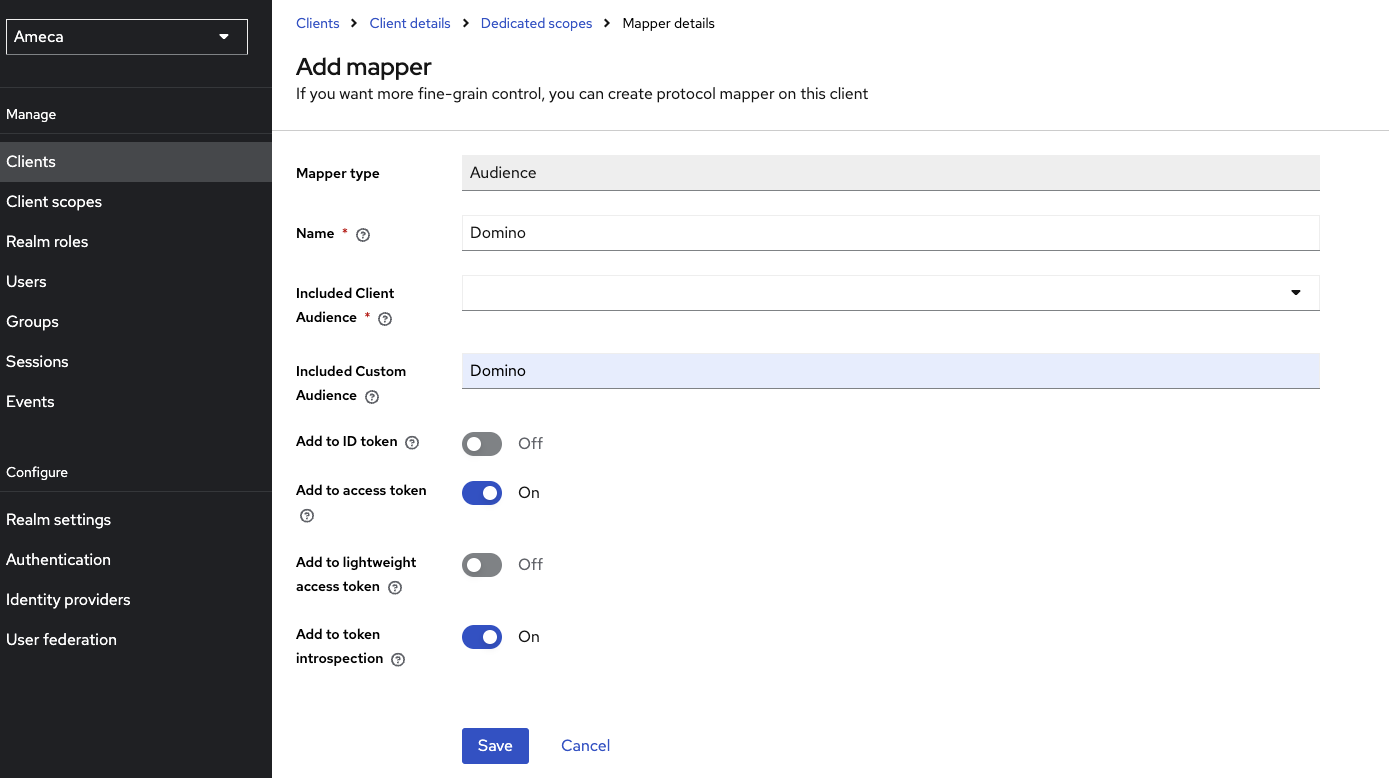
Mapper-1 as Audience mapper
- Click Audience mapping in the list.
- Fill in the name, for example
Domino. - Fill in the Included Custom Audience, for example
Domino. - Set Add to access token toggle to
Onposition. -
Click Save.
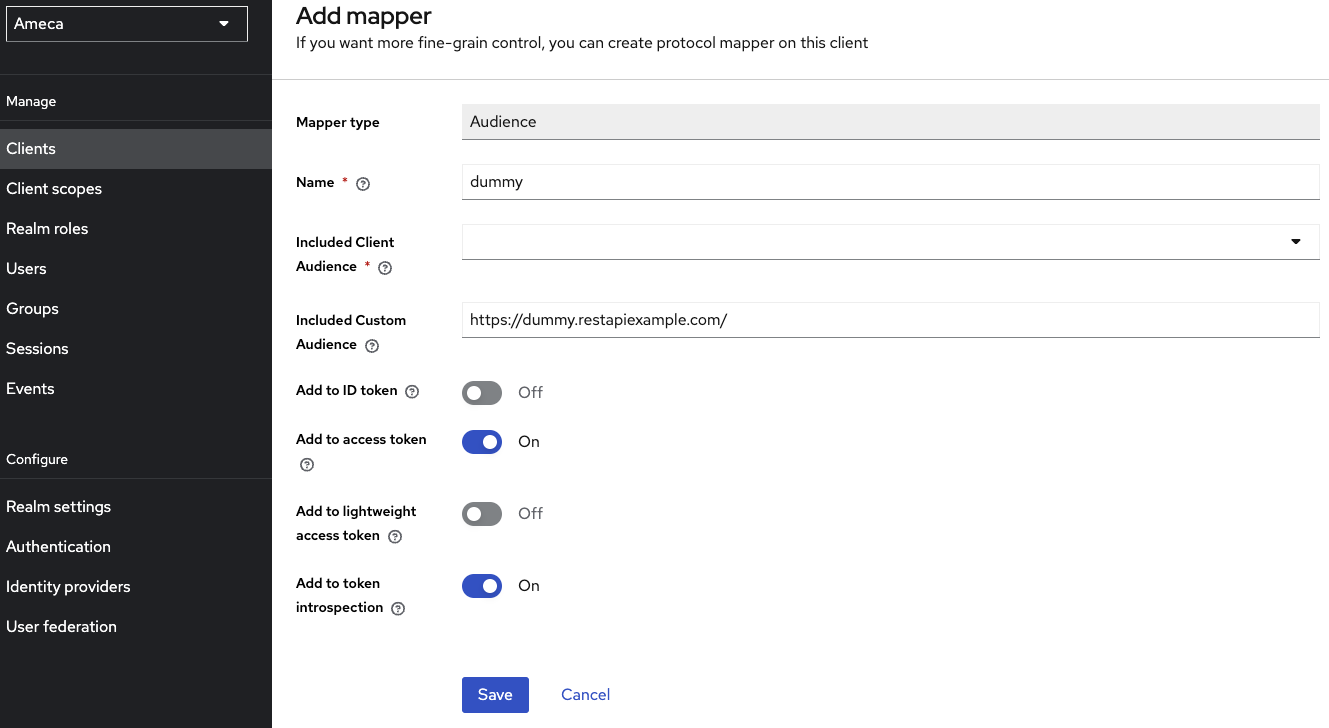
Mapper-2 as Audience mapper
- Click Audience mapping in the list.
- Fill in the name, for example
dummy. - Fill in the Included Custom Audience, for example
https://dummy.restapiexample.com/. - Set Add to access token toggle to
Onposition. -
Click Save.
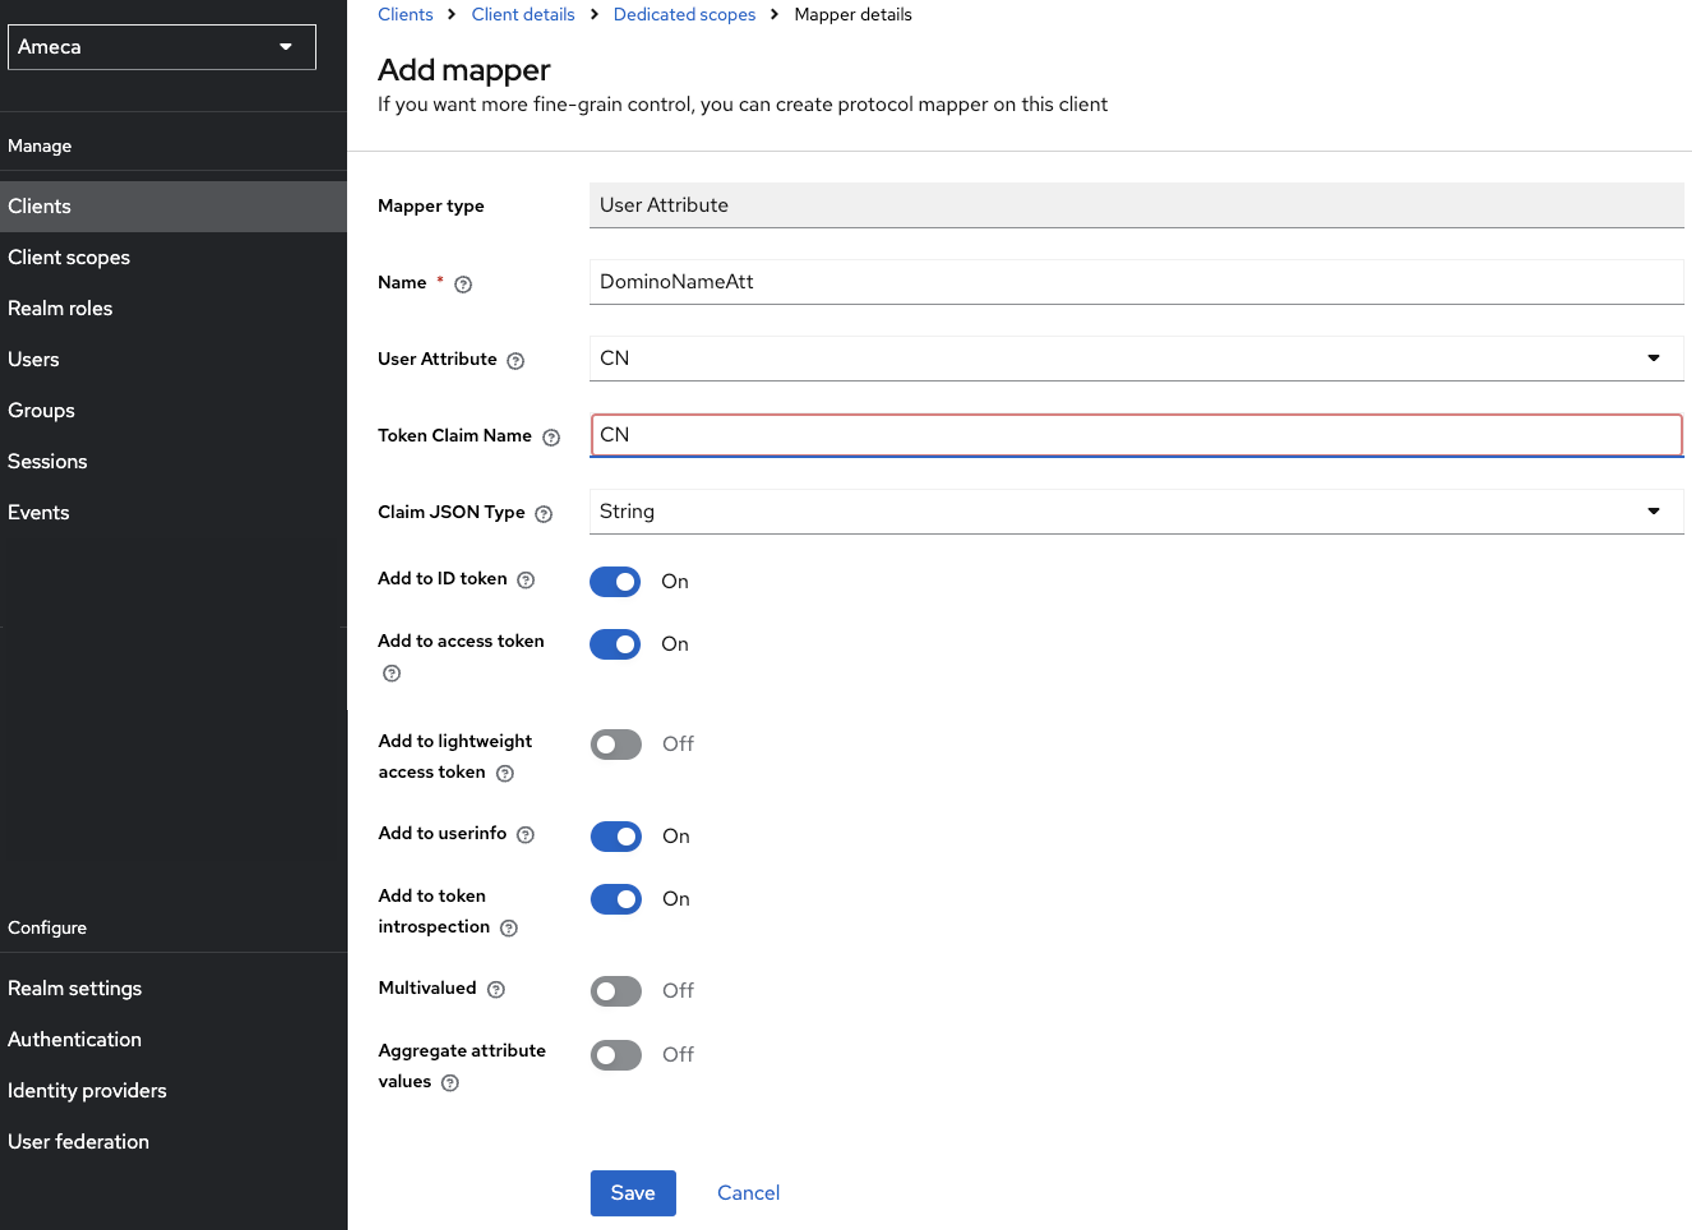
Mapper-3 as User Attribute mapper
- Click the User Attribute mapping in the list.
- Fill in the mapper name, for example
DominoNameAttr. - Fill in the User Attribute, as
CN. - Fill in the Token Claim Name as
CN. - Choose
Stringfrom the dropdown menu of Claim JSON Type. - Set Add to access token toggle to
Onposition. -
Click Save.
-
Click the Client details.
-
Set Assign Type of all scopes to Optional, except your
emailscope. -
Click the Add client scope.
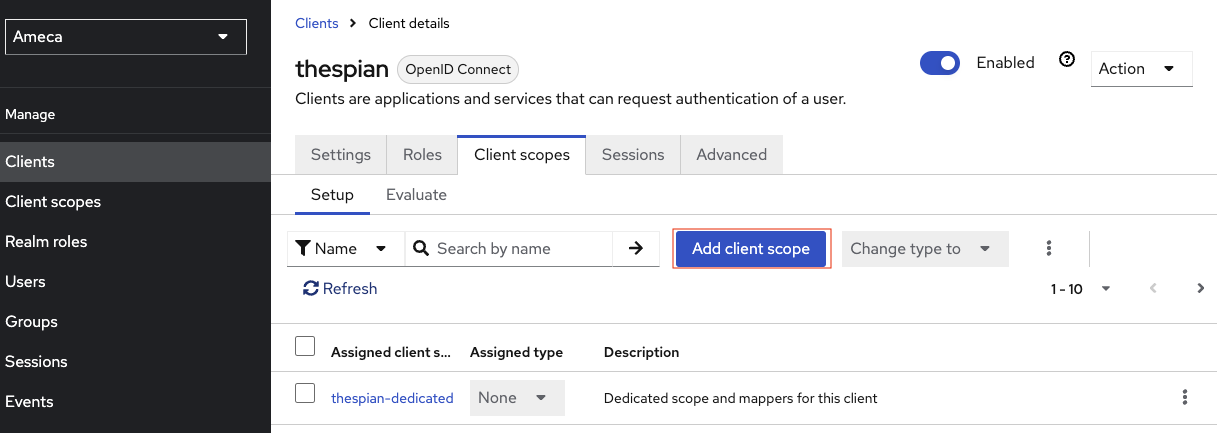
-
Check the name of the client scopes you would like to add on your thespian client scope, for example
demoand$DATA, and click Add and choose Default option.
-
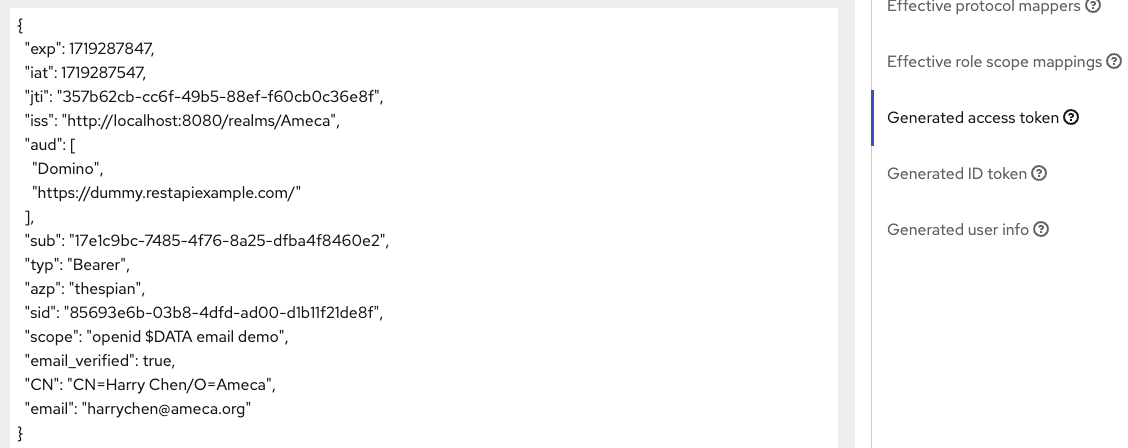
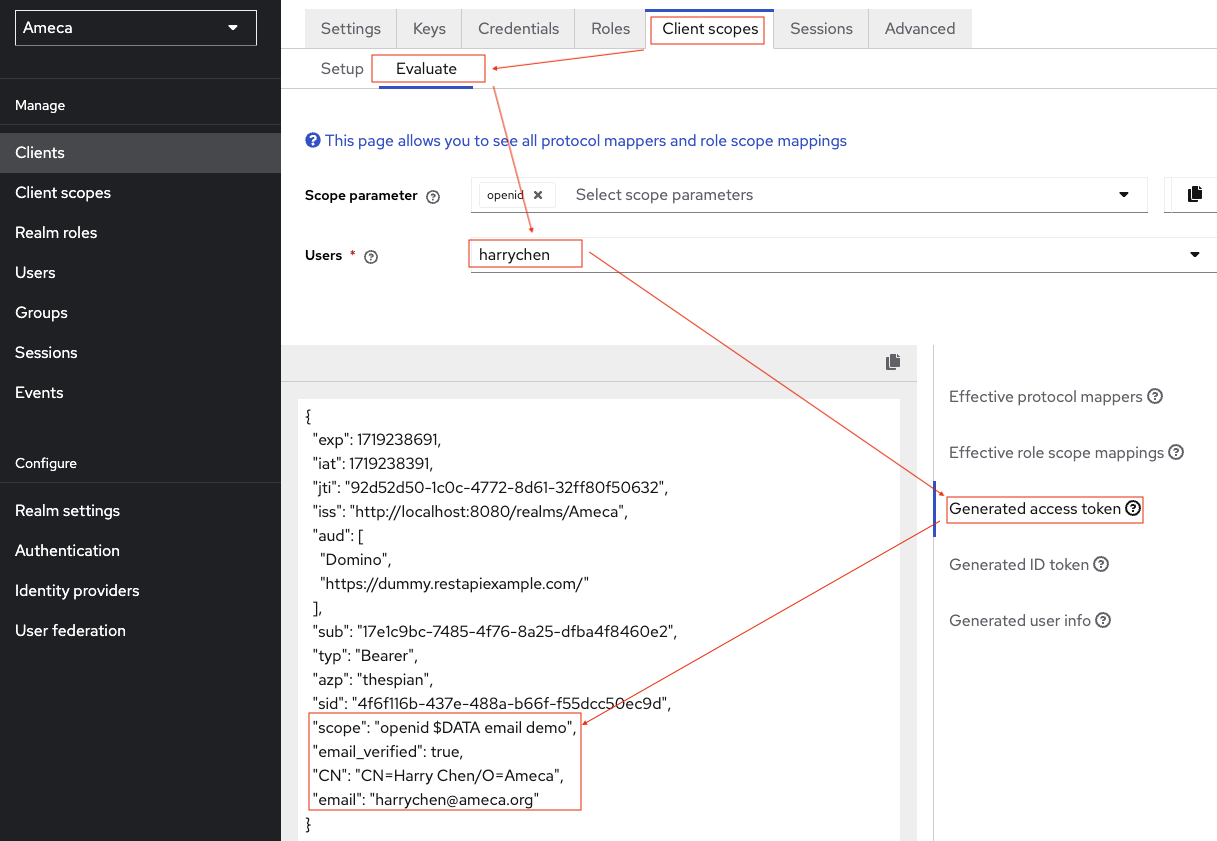
Click Client Scope → Evaluate tab.
- Fill in or select applicable Users.
-
Click Generated access token.
-
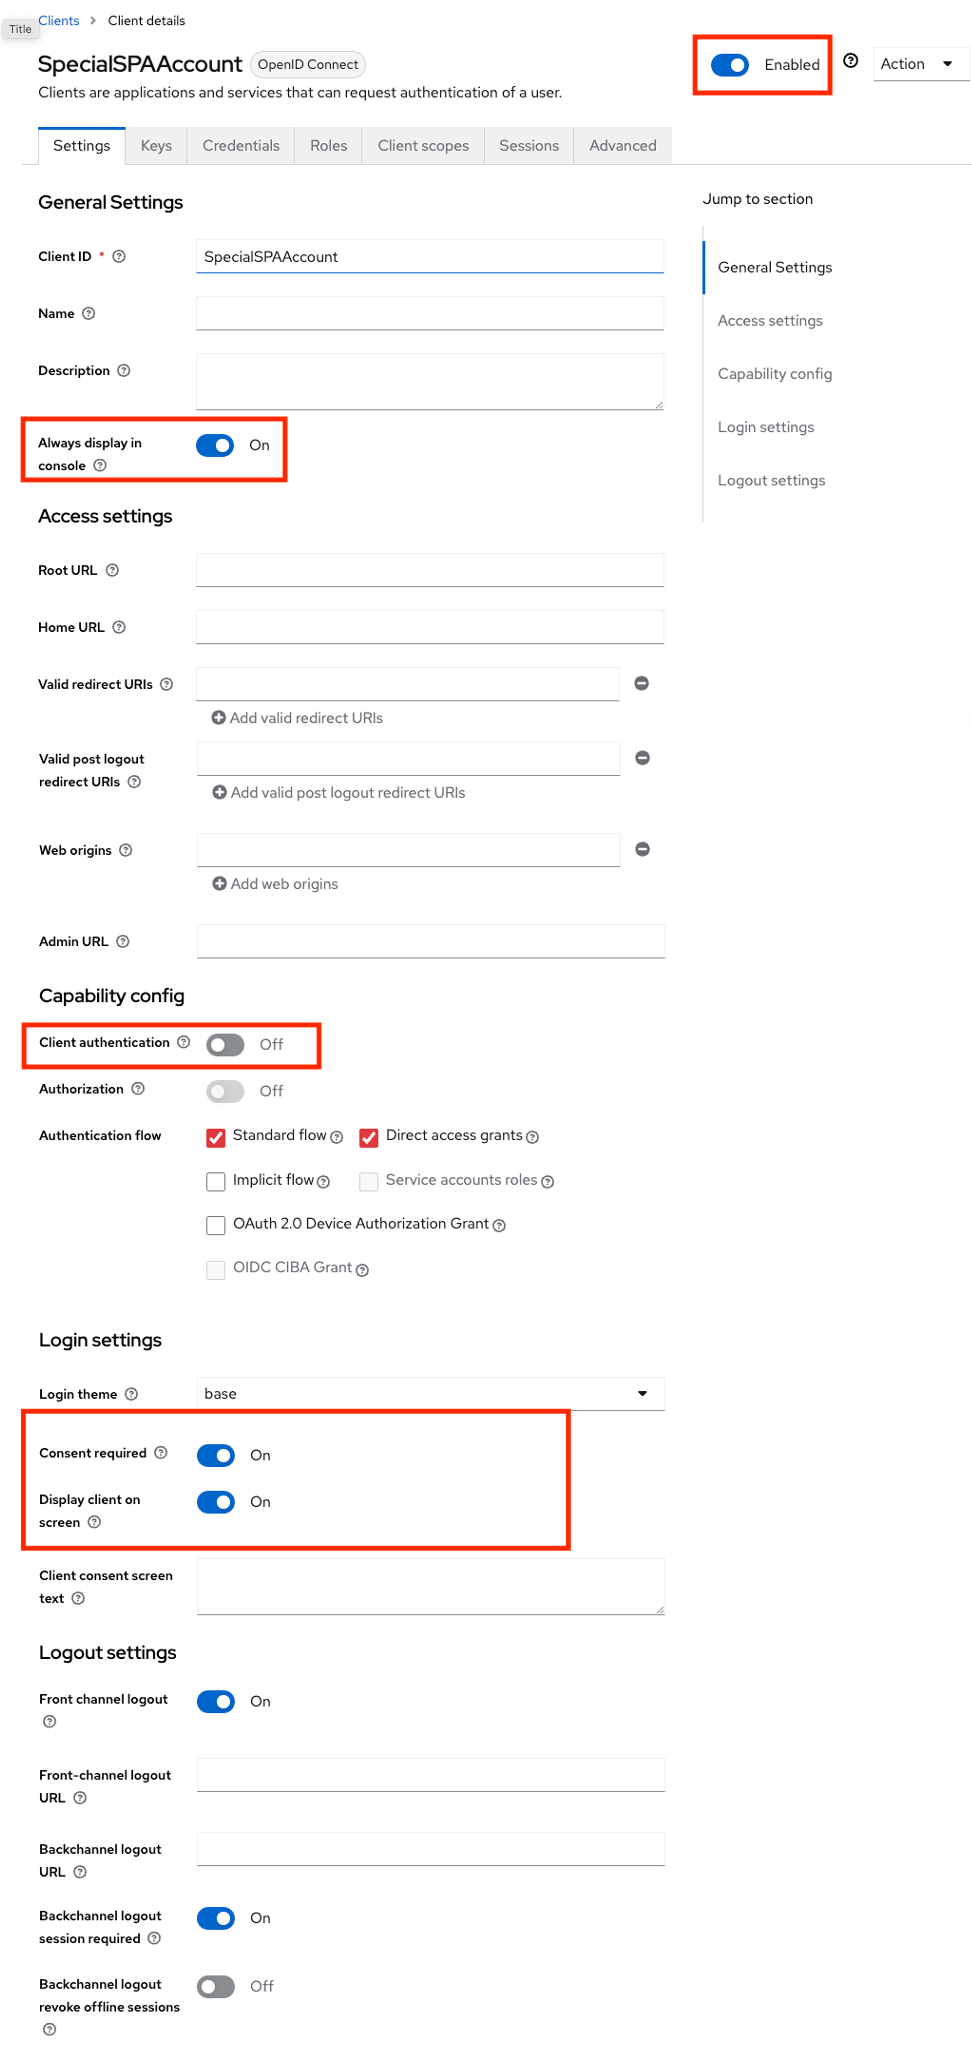
SPA applications
An SPA (Single Page App) or a mobile client can't keep a client secret. For those, the use of Proof Key for Code Exchange (PKCE) (defined in RFC 7636) is recommended (read this intro for details). The only difference in Keycloak is to toggle off the Client Authentication.
Important
It's SECURITY, so learn about Keycloak!
Configure the Domino REST API
You can find the full explanation here. For the short version:
- Create a JSON file in
keepconfig.dto contain the Keycloak related information. - Restart the Domino REST API.
{
  "jwt": {
    "Ameca": {
      "providerUrl": "https://ameca.keycloak.yours/auth/realms/Ameca"
    }
  }
}
where:
| key | explanation |
|---|---|
| jwt | Indicates that the config belongs to JWT |
| Ameca | The sample Keycloak realm name. It must be unique in the jwt key. Replace it with your chosen realm |
| providerUrl | Points to Keycloak's endpoint with the public key. Note that the last segment is the realm name. The string is case sensitive |
Note
Keycloak's providerUrl is different from the general IdP practise to use /.well-known/openid-configuration, mainly since Keycloak can handle multiple realms, the well-known approach can't handle. Hence you need ro use /auth/realms/[RealmName]
Expected result
Test Application specific scopes result in Postman
Before you begin
- Configured Postman
- configured Keycloak
Procedure
-
Modify the token endpoint of via POST with this
{{ server }}/realms/{{ realm }}/protocol/openid-connect/token -
server: Your Keycloak server.
-
realm: Your realm name, for example Ameca.
-
In the
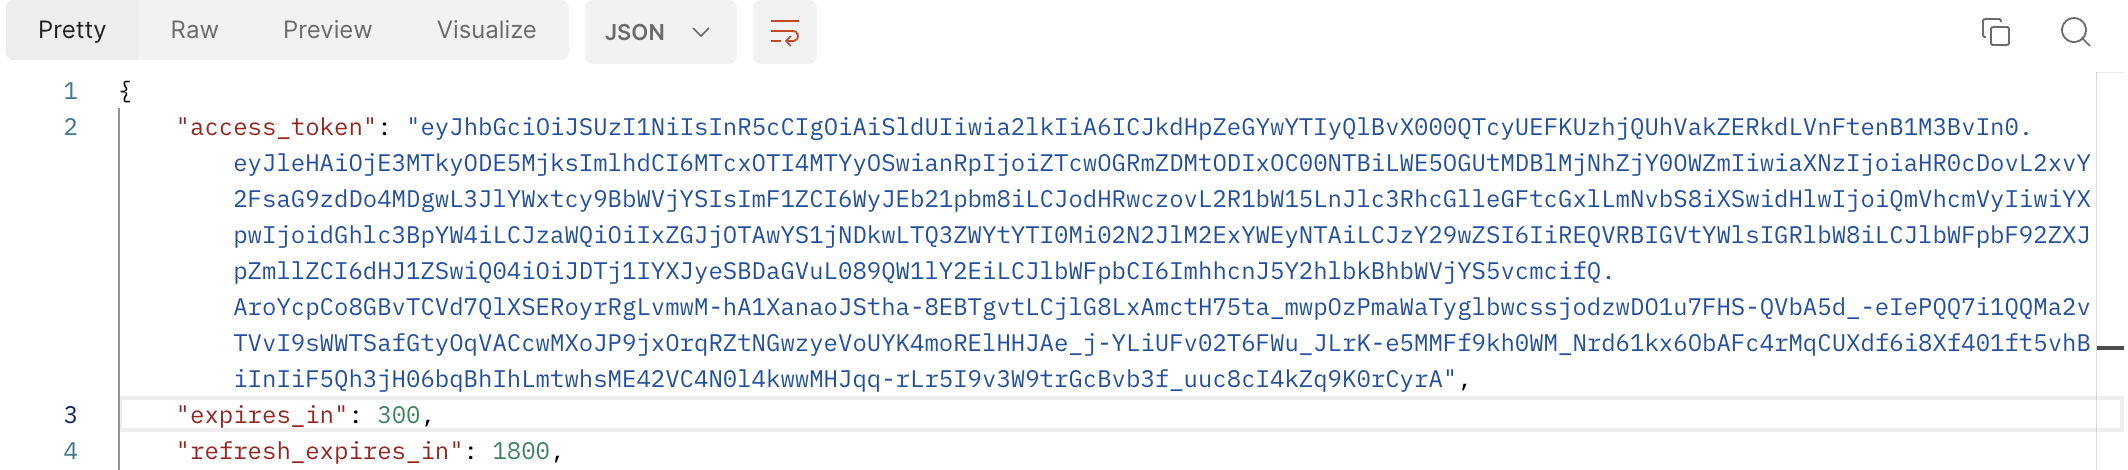
Body, provide theclient_id,client_secret,grant_type,user_nameandpasswordfrom your Keycloak. - Click Send.
The result must have an access token, which must be tested int jwt to return the same result in Keycloak.
JWT
You can use the official JWT site to decode and inspect the encoded token. Copy the access token from Postman and paste it inside the Encoded box.
When decoded, this translates to:
HEADER: ALGORITHM & TOKEN TYPE
{
  "alg": "RS256",
  "typ": "JWT",
  "kid": "dtzYxf0a22BPo_M4A72PAJS8cAHUjFDFGKVqmzpu3po"
}
PAYLOAD: DATA
{
  "exp": 1719281929,
  "iat": 1719281629,
  "jti": "e708dfd3-8218-450b-a98e-00e23af649ff",
  "iss": "http://localhost:8080/realms/Ameca",
  "aud": ["Domino", "https://dummy.restapiexample.com/"],
  "typ": "Bearer",
  "azp": "thespian",
  "sid": "1dbc900a-c490-47ef-a242-67be3a1aa250",
  "scope": "$DATA email demo",
  "email_verified": true,
  "CN": "CN=Harry Chen/O=Ameca",
  "email": "harrychen@ameca.org"
}
which has the same result in the Keycloak generated access token.