Install on Windows
Caution
- Domino REST API is supported for installation on Windows with an HCL Notes client or an HCL Domino server, but not both on the same machine. Should you install both on the same machine, you are on your own.
- Notes client support is experimental and not supported for any production use. It is provided to ease evaluation of the Domino REST API and experimentation without the need to configure a Domino server.
Install on a Windows Domino Server
Before you begin
-
Domino must be installed.
-
Domino REST API installer needs to be run as administrator.
To install, follow the example below:
Important
- Starting Domino REST API version 1.0.7, the installer jar filename now includes the Domino version, for example,
restapiInstall-r12.jar. - Starting Domino REST API version 1.0.9, there will be two installer jar files:
- For Domino 14, use
restapiInstall-r14.jar. - For Domino 12, use
restapiInstall-r12.jar.
- For Domino 14, use
java -jar restapiInstall.jar ^
 -d="C:\Program Files\HCL\Domino\Data" ^
 -i="C:\Program Files\HCL\Domino\notes.ini" ^
 -p="C:\Program Files\HCL\Domino" ^
 -r="C:\Program Files\HCL\Domino\restapi" ^
 -a
Domino REST API and Domino 14
The Domino REST API installer starting with v1.0.9 has a workaround for an issue between Domino REST API and Domino 14.0 on Windows. For more information or if you receive an error during installation, see Create symlink for Domino 14 and Domino Rest API.
All parameters
| Short | Full parameter | Description |
|---|---|---|
-d |
--dataDir=<dataDir> |
Directory of your HCL Notes or Domino data.Mandatory |
-i |
--ini=<notesIni> |
HCL Notes/Domino notes.ini file.Mandatory |
-r |
--restapiDir=<restapiDir> |
Directory to install the Domino REST API files into.Mandatory |
-p |
--programDir=<programDir> |
Directory where HCL Notes or Domino is installed.Mandatory |
-u |
--upgrade |
Performs an upgrade from a previous version. Upgrade will remove known program files and libraries from the Domino REST API directory and install the new version into the same directory. |
-f |
--forceUpgrade |
Performs an upgrade without regard to the previous version. If an unknown version or unexpected files are found in the Domino REST API directory, this option will delete the entire contents of the Domino REST API directory and subdirectories first before installing the new version. |
-a |
--accept |
Automatically accepts terms & conditions. |
-h |
--help |
Shows help message and exits. |
-n |
--noIniUpdates |
Installs the files, shows updated ini entries, but doesn't write them out. |
-o |
--oneTouchInstall |
If installing Domino REST API as part of a Domino One Touch Install, use this option to prevent checking for Notes / Domino directories and notes.ini. |
-y |
--dryRun |
Doesn't actually copy or alter files and settings. |
-s |
--skipDirectoryCheck |
Skips the checks if the program and data directories contain Notes or Domino. |
-V |
--version |
Prints version information and exits. |
The installer adds the restapi task to the automatically starting tasks. If opted out using -n, you must manually add the KeepInstallDir key into your notes.ini and then can subsequently issue load restapi manually in the Domino console.
For more information, see Domino REST API task.
Verify the installation
On a new Domino REST API installation, the following actions are performed:
- create the Domino REST API directory (if necessary)
- copy all binary files needed by Domino REST API to that directory
- copy
restapiinto the Domino directory - update the
ServerTasksvariable innotes.iniwithrestapi - add a variable
KeepInstallDirto thenotes.inipointing to the Domino REST API directory
If an existing installation is found at the location you specified as the restapi directory, the following additional actions are performed:
-
The installer checks for a file in your Domino REST API directory named
installerFiles.txt. -
If this file exists, the installer uses this list as the list of files to remove before proceeding.
- If you specified
-uon the command line, removal of the old files and installation of the new are performed. - If you didn't specify
-u, you will be asked if you want to upgrade. AnsweringA <enter>continues removal of the old files and installation of the new is performed.
- If you specified
-
If this file doesn't exist (which it didn't with
Domino REST API V1), the installer checks if this is V1 by checking for the existence of thekeep-core-1.9.5.jarfile in the Domino REST API directory.-
If this is V1, the installer will use the list of known V1 files before proceeding.
-
If you specified
-uon the command line, removal of the old files and installation of the new are performed. -
If you didn't specify
-u, you will be asked if you want to upgrade. AnsweringA <enter>continues removal of the old files and installation of the new is performed. Pressing any other key aborts. -
If this isn't V1, you will be notified that an unknown version has been found and if you want to proceed you will need to force an upgrade to continue. Forcing an upgrade removes ALL files from the Domino REST API directory and it's subdirectories, so take care that any files you may have put there will be removed. Domino REST API doesn't store any configuration or user files in the Domino REST API directory, only it's runtime and libraries.
-
If you specified
-fon the command line, all files in the Domino REST API directory structure are removed and installation of the new version is performed. - If you didn't specify
-f, you will be asked if you want to force an upgrade. AnsweringA <enter>continues, all files in the REST API directory structure are removed and installation of the new is performed. Pressing any other key aborts.
-
Install on a Windows Notes Client
Run the installer:
Important
- Starting Domino REST API version 1.0.7, the installer jar filename now includes the Domino version, for example,
restapiInstall-r12.jar. - Starting Domino REST API version 1.0.9, there will be two installer jar files:
- For Domino 14, use
restapiInstall-r14.jar. - For Domino 12, use
restapiInstall-r12.jar.
- For Domino 14, use
java -jar restapiInstall.jar ^
 -d="C:\Program Files\HCL\Notes\Data" ^
 -i="C:\Program Files\HCL\Notes\notes.ini" ^
 -r="C:\Program Files\HCL\Notes\restapi" ^
 -p="C:\Program Files\HCL\Notes" ^
 -a
The installer creates a runrestapi.cmd script in the Domino REST API installation directory, run it to launch the Domino REST API.
Verify the client installation
The installer conducts a series of actions:
- Create the Domino REST API directory.
- Copy all binary files needed by Domino REST API to that directory.
- Create
runrestapi.cmdin the Domino REST API directory.
Limitations to client use
- Use is for evaluation only, don't use for production.
- You can't run the Notes client while you are running the Domino REST API against your local Notes install.
-
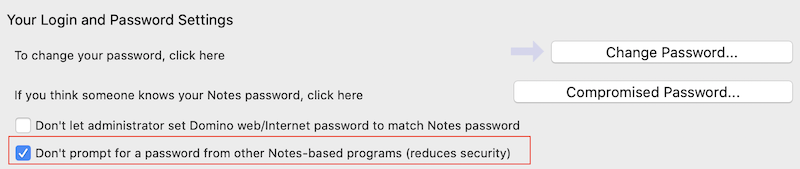
The Notes client must have the Don't prompt for a password from other Notes-based programs option set. This option is in the Security/User Security menu.
-
If your organization has a policy to disable the Don't prompt for a password from other Notes-based programs, you may need to go into Notes, disable and immediately quit Notes. Next time you go into Notes, this setting will be again disabled.
- On the first time run of
runrestapi, even with Don't prompt for a password from other Notes-based programs set, you may be prompted to enter your Notes password in the java window that the Domino REST API is running in. Even if the message prompt has scrolled, you can type in your password and Enter. Notes is prompting because Domino REST API is creating 2 databases needed to run the API.
For more information, see Deploy HCL Domino REST API to HCL Notes Client for additional steps required to use the Notes client.
Check that the REST API is running
The installation, unless told otherwise, added restapi to the servertasks in the notes.ini.
You can quickly check on the Domino console if the REST API is running by using sh ta. In case restapi isn't listed as running task, load it using load restapi. The Domino console will output a message on the success or failure to load.